Building the Powerhouse - Society of Antique Modelers
Building the Powerhouse - Society of Antique Modelers
Building the Powerhouse - Society of Antique Modelers

You also want an ePaper? Increase the reach of your titles
YUMPU automatically turns print PDFs into web optimized ePapers that Google loves.
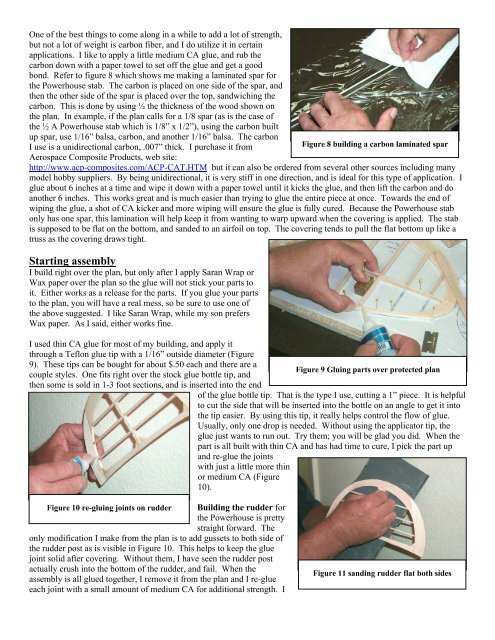
One <strong>of</strong> <strong>the</strong> best things to come along in a while to add a lot <strong>of</strong> strength,<br />
but not a lot <strong>of</strong> weight is carbon fiber, and I do utilize it in certain<br />
applications. I like to apply a little medium CA glue, and rub <strong>the</strong><br />
carbon down with a paper towel to set <strong>of</strong>f <strong>the</strong> glue and get a good<br />
bond. Refer to figure 8 which shows me making a laminated spar for<br />
<strong>the</strong> <strong>Powerhouse</strong> stab. The carbon is placed on one side <strong>of</strong> <strong>the</strong> spar, and<br />
<strong>the</strong>n <strong>the</strong> o<strong>the</strong>r side <strong>of</strong> <strong>the</strong> spar is placed over <strong>the</strong> top, sandwiching <strong>the</strong><br />
carbon. This is done by using ½ <strong>the</strong> thickness <strong>of</strong> <strong>the</strong> wood shown on<br />
<strong>the</strong> plan. In example, if <strong>the</strong> plan calls for a 1/8 spar (as is <strong>the</strong> case <strong>of</strong><br />
<strong>the</strong> ½ A <strong>Powerhouse</strong> stab which is 1/8” x 1/2”), using <strong>the</strong> carbon built<br />
up spar, use 1/16” balsa, carbon, and ano<strong>the</strong>r 1/16” balsa. The carbon<br />
I use is a unidirectional carbon, .007” thick. I purchase it from<br />
Figure 8 building a carbon laminated spar<br />
Aerospace Composite Products, web site:<br />
http://www.acp-composites.com/ACP-CAT.HTM but it can also be ordered from several o<strong>the</strong>r sources including many<br />
model hobby suppliers. By being unidirectional, it is very stiff in one direction, and is ideal for this type <strong>of</strong> application. I<br />
glue about 6 inches at a time and wipe it down with a paper towel until it kicks <strong>the</strong> glue, and <strong>the</strong>n lift <strong>the</strong> carbon and do<br />
ano<strong>the</strong>r 6 inches. This works great and is much easier than trying to glue <strong>the</strong> entire piece at once. Towards <strong>the</strong> end <strong>of</strong><br />
wiping <strong>the</strong> glue, a shot <strong>of</strong> CA kicker and more wiping will ensure <strong>the</strong> glue is fully cured. Because <strong>the</strong> <strong>Powerhouse</strong> stab<br />
only has one spar, this lamination will help keep it from wanting to warp upward when <strong>the</strong> covering is applied. The stab<br />
is supposed to be flat on <strong>the</strong> bottom, and sanded to an airfoil on top. The covering tends to pull <strong>the</strong> flat bottom up like a<br />
truss as <strong>the</strong> covering draws tight.<br />
Starting assembly<br />
I build right over <strong>the</strong> plan, but only after I apply Saran Wrap or<br />
Wax paper over <strong>the</strong> plan so <strong>the</strong> glue will not stick your parts to<br />
it. Ei<strong>the</strong>r works as a release for <strong>the</strong> parts. If you glue your parts<br />
to <strong>the</strong> plan, you will have a real mess, so be sure to use one <strong>of</strong><br />
<strong>the</strong> above suggested. I like Saran Wrap, while my son prefers<br />
Wax paper. As I said, ei<strong>the</strong>r works fine.<br />
I used thin CA glue for most <strong>of</strong> my building, and apply it<br />
through a Teflon glue tip with a 1/16” outside diameter (Figure<br />
9). These tips can be bought for about $.50 each and <strong>the</strong>re are a<br />
Figure 9 Gluing parts over protected plan<br />
couple styles. One fits right over <strong>the</strong> stock glue bottle tip, and<br />
<strong>the</strong>n some is sold in 1-3 foot sections, and is inserted into <strong>the</strong> end<br />
<strong>of</strong> <strong>the</strong> glue bottle tip. That is <strong>the</strong> type I use, cutting a 1” piece. It is helpful<br />
to cut <strong>the</strong> side that will be inserted into <strong>the</strong> bottle on an angle to get it into<br />
<strong>the</strong> tip easier. By using this tip, it really helps control <strong>the</strong> flow <strong>of</strong> glue.<br />
Usually, only one drop is needed. Without using <strong>the</strong> applicator tip, <strong>the</strong><br />
glue just wants to run out. Try <strong>the</strong>m; you will be glad you did. When <strong>the</strong><br />
part is all built with thin CA and has had time to cure, I pick <strong>the</strong> part up<br />
and re-glue <strong>the</strong> joints<br />
with just a little more thin<br />
or medium CA (Figure<br />
10).<br />
Figure 10 re-gluing joints on rudder <strong>Building</strong> <strong>the</strong> rudder for<br />
<strong>the</strong> <strong>Powerhouse</strong> is pretty<br />
straight forward. The<br />
only modification I make from <strong>the</strong> plan is to add gussets to both side <strong>of</strong><br />
<strong>the</strong> rudder post as is visible in Figure 10. This helps to keep <strong>the</strong> glue<br />
joint solid after covering. Without <strong>the</strong>m, I have seen <strong>the</strong> rudder post<br />
actually crush into <strong>the</strong> bottom <strong>of</strong> <strong>the</strong> rudder, and fail. When <strong>the</strong><br />
assembly is all glued toge<strong>the</strong>r, I remove it from <strong>the</strong> plan and I re-glue<br />
each joint with a small amount <strong>of</strong> medium CA for additional strength. I<br />
Figure 11 sanding rudder flat both sides