Building the Powerhouse - Society of Antique Modelers
Building the Powerhouse - Society of Antique Modelers
Building the Powerhouse - Society of Antique Modelers

Create successful ePaper yourself
Turn your PDF publications into a flip-book with our unique Google optimized e-Paper software.
Figure 17 trailing edge is notched for ribs<br />
may add a little<br />
weight, but<br />
makes <strong>the</strong><br />
shape <strong>of</strong> <strong>the</strong> tip<br />
much better<br />
and makes it<br />
much easier to<br />
cover when<br />
completed (see<br />
figure 16). The<br />
tip is glued on<br />
flat, but <strong>the</strong><br />
front <strong>of</strong> <strong>the</strong><br />
trailing edge is<br />
Figure 18 <strong>the</strong> 3/8" tips allow complete shaping<br />
lifted to match <strong>the</strong> curvature <strong>of</strong> <strong>the</strong> rib which is not flat on <strong>the</strong> bottom. When <strong>the</strong> wing tips are glued to <strong>the</strong> wing, note that<br />
<strong>the</strong>y are not flat on <strong>the</strong> plan, but are actually up in <strong>the</strong> air as <strong>the</strong>y are lined up with <strong>the</strong> center <strong>of</strong> <strong>the</strong> leading edge and <strong>the</strong><br />
center <strong>of</strong> <strong>the</strong> trailing edge. This is correct. When<br />
sanding <strong>the</strong> tip to shape (see figure 18) a useful tip is<br />
to put masking tape on <strong>the</strong> ribs so you don’t<br />
accidentally start sanding <strong>the</strong>m away. You use <strong>the</strong><br />
ribs as a guide, but do not want to remove any<br />
material from <strong>the</strong>m. Also note in figure 18 how <strong>the</strong><br />
spars are cut and glued from <strong>the</strong> last rib to <strong>the</strong> tip.<br />
The wing’s center ribs are cut down 1/16” on top and<br />
bottom. This area is to be sheeted with 1/16” medium<br />
weight balsa. In <strong>the</strong> last few years, I have been<br />
utilizing .007 unidirectional carbon fiber at my<br />
dihedral joints as doublers (see figure 19). I have had<br />
real good luck with this method and it is very light.<br />
Using plywood or hard balsa doublers will work okay<br />
Figure 19 shows carbon fiber doublers for <strong>the</strong> spar joints<br />
too, but is a little heavier. The spars in <strong>the</strong> wing are<br />
picked and matched for weight. I try to use a medium<br />
weight <strong>of</strong> 8-12 pounds for <strong>the</strong> wing spars. It is important to match <strong>the</strong> weight and strength <strong>of</strong> <strong>the</strong> spars for <strong>the</strong> balance <strong>of</strong><br />
<strong>the</strong> wing and for <strong>the</strong> longevity <strong>of</strong> it. While <strong>the</strong> wing does not have to be as strong as those on bigger and faster models, it<br />
does have to be strong enough to<br />
withstand <strong>the</strong> impact <strong>of</strong><br />
de<strong>the</strong>rmalizing.<br />
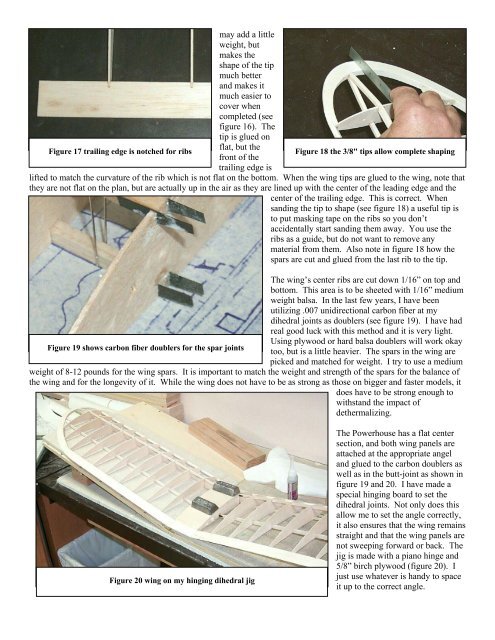
Figure 20 wing on my hinging dihedral jig<br />
The <strong>Powerhouse</strong> has a flat center<br />
section, and both wing panels are<br />
attached at <strong>the</strong> appropriate angel<br />
and glued to <strong>the</strong> carbon doublers as<br />
well as in <strong>the</strong> butt-joint as shown in<br />
figure 19 and 20. I have made a<br />
special hinging board to set <strong>the</strong><br />
dihedral joints. Not only does this<br />
allow me to set <strong>the</strong> angle correctly,<br />
it also ensures that <strong>the</strong> wing remains<br />
straight and that <strong>the</strong> wing panels are<br />
not sweeping forward or back. The<br />
jig is made with a piano hinge and<br />
5/8” birch plywood (figure 20). I<br />
just use whatever is handy to space<br />
it up to <strong>the</strong> correct angle.