Building the Powerhouse - Society of Antique Modelers
Building the Powerhouse - Society of Antique Modelers
Building the Powerhouse - Society of Antique Modelers

You also want an ePaper? Increase the reach of your titles
YUMPU automatically turns print PDFs into web optimized ePapers that Google loves.
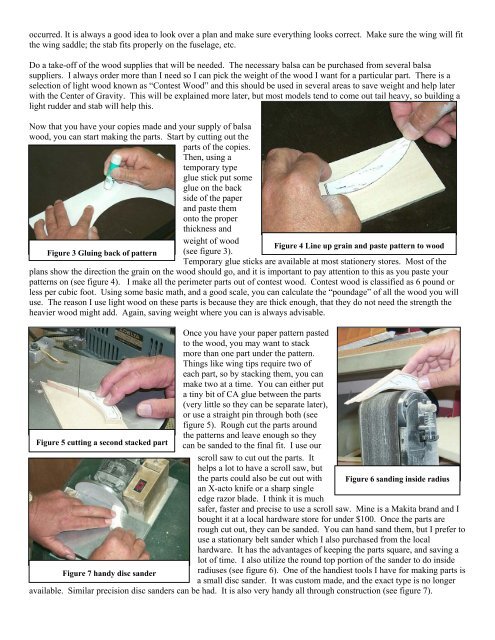
occurred. It is always a good idea to look over a plan and make sure everything looks correct. Make sure <strong>the</strong> wing will fit<br />
<strong>the</strong> wing saddle; <strong>the</strong> stab fits properly on <strong>the</strong> fuselage, etc.<br />
Do a take-<strong>of</strong>f <strong>of</strong> <strong>the</strong> wood supplies that will be needed. The necessary balsa can be purchased from several balsa<br />
suppliers. I always order more than I need so I can pick <strong>the</strong> weight <strong>of</strong> <strong>the</strong> wood I want for a particular part. There is a<br />
selection <strong>of</strong> light wood known as “Contest Wood” and this should be used in several areas to save weight and help later<br />
with <strong>the</strong> Center <strong>of</strong> Gravity. This will be explained more later, but most models tend to come out tail heavy, so building a<br />
light rudder and stab will help this.<br />
Now that you have your copies made and your supply <strong>of</strong> balsa<br />
wood, you can start making <strong>the</strong> parts. Start by cutting out <strong>the</strong><br />
parts <strong>of</strong> <strong>the</strong> copies.<br />
Then, using a<br />
temporary type<br />
glue stick put some<br />
glue on <strong>the</strong> back<br />
side <strong>of</strong> <strong>the</strong> paper<br />
and paste <strong>the</strong>m<br />
onto <strong>the</strong> proper<br />
thickness and<br />
weight <strong>of</strong> wood<br />
Figure 3 Gluing back <strong>of</strong> pattern<br />
Figure 4 Line up grain and paste pattern to wood<br />
(see figure 3).<br />
Temporary glue sticks are available at most stationery stores. Most <strong>of</strong> <strong>the</strong><br />
plans show <strong>the</strong> direction <strong>the</strong> grain on <strong>the</strong> wood should go, and it is important to pay attention to this as you paste your<br />
patterns on (see figure 4). I make all <strong>the</strong> perimeter parts out <strong>of</strong> contest wood. Contest wood is classified as 6 pound or<br />
less per cubic foot. Using some basic math, and a good scale, you can calculate <strong>the</strong> “poundage” <strong>of</strong> all <strong>the</strong> wood you will<br />
use. The reason I use light wood on <strong>the</strong>se parts is because <strong>the</strong>y are thick enough, that <strong>the</strong>y do not need <strong>the</strong> strength <strong>the</strong><br />
heavier wood might add. Again, saving weight where you can is always advisable.<br />
Once you have your paper pattern pasted<br />
to <strong>the</strong> wood, you may want to stack<br />
more than one part under <strong>the</strong> pattern.<br />
Things like wing tips require two <strong>of</strong><br />
each part, so by stacking <strong>the</strong>m, you can<br />
make two at a time. You can ei<strong>the</strong>r put<br />
a tiny bit <strong>of</strong> CA glue between <strong>the</strong> parts<br />
(very little so <strong>the</strong>y can be separate later),<br />
or use a straight pin through both (see<br />
figure 5). Rough cut <strong>the</strong> parts around<br />
<strong>the</strong> patterns and leave enough so <strong>the</strong>y<br />
Figure 5 cutting a second stacked part can be sanded to <strong>the</strong> final fit. I use our<br />
scroll saw to cut out <strong>the</strong> parts. It<br />
helps a lot to have a scroll saw, but<br />
<strong>the</strong> parts could also be cut out with Figure 6 sanding inside radius<br />
an X-acto knife or a sharp single<br />
edge razor blade. I think it is much<br />
safer, faster and precise to use a scroll saw. Mine is a Makita brand and I<br />
bought it at a local hardware store for under $100. Once <strong>the</strong> parts are<br />
rough cut out, <strong>the</strong>y can be sanded. You can hand sand <strong>the</strong>m, but I prefer to<br />
use a stationary belt sander which I also purchased from <strong>the</strong> local<br />
hardware. It has <strong>the</strong> advantages <strong>of</strong> keeping <strong>the</strong> parts square, and saving a<br />
lot <strong>of</strong> time. I also utilize <strong>the</strong> round top portion <strong>of</strong> <strong>the</strong> sander to do inside<br />
Figure 7 handy disc sander<br />
radiuses (see figure 6). One <strong>of</strong> <strong>the</strong> handiest tools I have for making parts is<br />
a small disc sander. It was custom made, and <strong>the</strong> exact type is no longer<br />
available. Similar precision disc sanders can be had. It is also very handy all through construction (see figure 7).