Building the Powerhouse - Society of Antique Modelers
Building the Powerhouse - Society of Antique Modelers
Building the Powerhouse - Society of Antique Modelers

You also want an ePaper? Increase the reach of your titles
YUMPU automatically turns print PDFs into web optimized ePapers that Google loves.
The front <strong>of</strong> <strong>the</strong> cabin, where <strong>the</strong>re is an upright, is a weak<br />
spot because <strong>the</strong> upright is bisected by <strong>the</strong> bottom outline<br />
<strong>of</strong> <strong>the</strong> window. To add strength in this area, I glue a piece<br />
<strong>of</strong> .007 thick unidirectional carbon fiber full height. This<br />
helps support <strong>the</strong> joint, and I have never had one break<br />
since using this method. You can also add ano<strong>the</strong>r<br />
upright, full height, to <strong>the</strong> inside where <strong>the</strong> carbon is glued<br />
in figure 25. Remember you are making a left and right<br />
side, so be conscious to glue <strong>the</strong> support to <strong>the</strong> correct side<br />
on each fuselage side.<br />
I am now ready to join <strong>the</strong> two halves. I start at <strong>the</strong> front<br />
Figure 25 carbon fiber added for strength on upright<br />
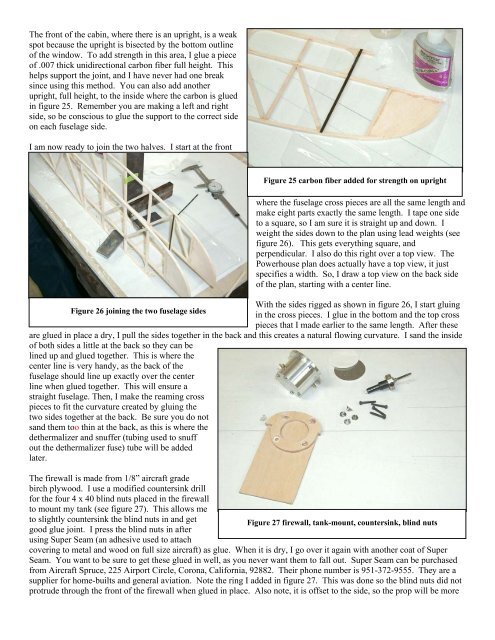
where <strong>the</strong> fuselage cross pieces are all <strong>the</strong> same length and<br />
make eight parts exactly <strong>the</strong> same length. I tape one side<br />
to a square, so I am sure it is straight up and down. I<br />
weight <strong>the</strong> sides down to <strong>the</strong> plan using lead weights (see<br />
figure 26). This gets everything square, and<br />
perpendicular. I also do this right over a top view. The<br />
<strong>Powerhouse</strong> plan does actually have a top view, it just<br />
specifies a width. So, I draw a top view on <strong>the</strong> back side<br />
<strong>of</strong> <strong>the</strong> plan, starting with a center line.<br />
With <strong>the</strong> sides rigged as shown in figure 26, I start gluing<br />
Figure 26 joining <strong>the</strong> two fuselage sides<br />
in <strong>the</strong> cross pieces. I glue in <strong>the</strong> bottom and <strong>the</strong> top cross<br />
pieces that I made earlier to <strong>the</strong> same length. After <strong>the</strong>se<br />
are glued in place a dry, I pull <strong>the</strong> sides toge<strong>the</strong>r in <strong>the</strong> back and this creates a natural flowing curvature. I sand <strong>the</strong> inside<br />
<strong>of</strong> both sides a little at <strong>the</strong> back so <strong>the</strong>y can be<br />
lined up and glued toge<strong>the</strong>r. This is where <strong>the</strong><br />
center line is very handy, as <strong>the</strong> back <strong>of</strong> <strong>the</strong><br />
fuselage should line up exactly over <strong>the</strong> center<br />
line when glued toge<strong>the</strong>r. This will ensure a<br />
straight fuselage. Then, I make <strong>the</strong> reaming cross<br />
pieces to fit <strong>the</strong> curvature created by gluing <strong>the</strong><br />
two sides toge<strong>the</strong>r at <strong>the</strong> back. Be sure you do not<br />
sand <strong>the</strong>m too thin at <strong>the</strong> back, as this is where <strong>the</strong><br />
de<strong>the</strong>rmalizer and snuffer (tubing used to snuff<br />
out <strong>the</strong> de<strong>the</strong>rmalizer fuse) tube will be added<br />
later.<br />
The firewall is made from 1/8” aircraft grade<br />
birch plywood. I use a modified countersink drill<br />
for <strong>the</strong> four 4 x 40 blind nuts placed in <strong>the</strong> firewall<br />
to mount my tank (see figure 27). This allows me<br />
to slightly countersink <strong>the</strong> blind nuts in and get<br />
Figure 27 firewall, tank-mount, countersink, blind nuts<br />
good glue joint. I press <strong>the</strong> blind nuts in after<br />
using Super Seam (an adhesive used to attach<br />
covering to metal and wood on full size aircraft) as glue. When it is dry, I go over it again with ano<strong>the</strong>r coat <strong>of</strong> Super<br />
Seam. You want to be sure to get <strong>the</strong>se glued in well, as you never want <strong>the</strong>m to fall out. Super Seam can be purchased<br />
from Aircraft Spruce, 225 Airport Circle, Corona, California, 92882. Their phone number is 951-372-9555. They are a<br />
supplier for home-builts and general aviation. Note <strong>the</strong> ring I added in figure 27. This was done so <strong>the</strong> blind nuts did not<br />
protrude through <strong>the</strong> front <strong>of</strong> <strong>the</strong> firewall when glued in place. Also note, it is <strong>of</strong>fset to <strong>the</strong> side, so <strong>the</strong> prop will be more