WAP-V6000 INSTRUCTION MANUAL - TEAC Europe GmbH
WAP-V6000 INSTRUCTION MANUAL - TEAC Europe GmbH
WAP-V6000 INSTRUCTION MANUAL - TEAC Europe GmbH

You also want an ePaper? Increase the reach of your titles
YUMPU automatically turns print PDFs into web optimized ePapers that Google loves.
<strong>WAP</strong>-<strong>V6000</strong><br />
<strong>INSTRUCTION</strong> <strong>MANUAL</strong>
Copyright Notices<br />
Copyright (c) 2009 by <strong>TEAC</strong> <strong>Europe</strong> <strong>GmbH</strong> – All Rights Reserved.<br />
The Product “<strong>TEAC</strong> <strong>WAP</strong>-<strong>V6000</strong>“ (hereinafter referred to as the "Product") includes Open-<br />
Source software packages. These Open-Source software packages are subject to specific<br />
licenses, disclaimers and notices, which are reproduced on the CD-ROM provided with the<br />
Product (see “Licenses.txt”). Please refer to those licenses, disclaimers and notices for your<br />
exact rights hereunder as well as to the following Open-Source Notices.<br />
The source code of Open-Source software packages is available for download under<br />
http://www.wap-opensource.teac.de<br />
Additionally <strong>TEAC</strong> offers to provide the source code of the Open-Source software packages<br />
to you on CD-ROM for a fee for the physical act of transferring a copy, such as the cost of the<br />
media and shipping, upon written request to <strong>TEAC</strong> <strong>Europe</strong> <strong>GmbH</strong>, code “Source-Code”,<br />
Bahnstraße 12, 65205 Wiesbaden, Germany. This offer is valid for a period of three years<br />
from the distribution of this product by <strong>TEAC</strong>.<br />
Open-Source Notices<br />
Part of this product’s software (this program) is free software: you can redistribute it and/or<br />
modify it under the terms of the respective GNU General Public License or GNU Lesser<br />
General Public License as published by the Free Software Foundation, either version 2 (or<br />
2.1 respectively) of the License, or (at your option) any later version.<br />
This program is distributed in the hope that it will be useful, but WITHOUT ANY WARRANTY;<br />
without even the implied warranty of MERCHANTABILITY or FITNESS FOR A PARTICULAR<br />
PURPOSE. See the respective GNU General Public License or GNU Lesser General Public<br />
License for more details.<br />
You should have received a copy of the GNU General Public License and the GNU Lesser<br />
General Public License along with this program. If not, see http://www.gnu.org/licenses/.<br />
Portions of this product’s software are copyright © 2006-May-12 The FreeType Project<br />
www.freetype.org. All rights reserved.<br />
Portions of this product’s software are available under the Mozilla Public License 1.1 (MPL<br />
1.1). Any modification or contribution to such portions of this software are available in Source<br />
Code form under the terms of the Mozilla Public License 1.1 via the internet under <strong>TEAC</strong>’s<br />
website as mentioned above.<br />
Portions of this product’s software are subject to the following disclaimer:<br />
THIS SOFTWARE IS PROVIDED BY THE COPYRIGHT HOLDERS AND CONTRIBUTORS<br />
"AS IS" AND ANY EXPRESS OR IMPLIED WARRANTIES, INCLUDING, BUT NOT LIMITED<br />
TO, THE IMPLIED WARRANTIES OF MERCHANTABILITY AND FITNESS FOR A<br />
PARTICULAR PURPOSE ARE DISCLAIMED. IN NO EVENT SHALL THE COPYRIGHT<br />
HOLDER OR CONTRIBUTORS BE LIABLE FOR ANY DIRECT, INDIRECT, INCIDENTAL,<br />
SPECIAL, EXEMPLARY, OR CONSEQUENTIAL DAMAGES (INCLUDING, BUT NOT<br />
LIMITED TO, PROCUREMENT OF SUBSTITUTE GOODS OR SERVICES; LOSS OF USE,<br />
DATA, OR PROFITS; OR BUSINESS INTERRUPTION) HOWEVER CAUSED AND ON ANY<br />
THEORY OF LIABILITY, WHETHER IN CONTRACT, STRICT LIABILITY, OR TORT<br />
(INCLUDING NEGLIGENCE OR OTHERWISE) ARISING IN ANY WAY OUT OF THE USE<br />
OF THIS SOFTWARE, EVEN IF ADVISED OF THE POSSIBILITY OF SUCH DAMAGE.<br />
2
Contents<br />
Copyright Notices..................................................................................................2<br />
Dear User,.............................................................................................................5<br />
About This Manual................................................................................................5<br />
After unpacking.....................................................................................................5<br />
Safety Information ................................................................................................6<br />
Controls and connectors ......................................................................................7<br />
Infrared (IR) Remote Control.................................................................................8<br />
Table of remote control buttons ...........................................................................9<br />
Remote Control battery installation.....................................................................10<br />
Installation...........................................................................................................11<br />
Connections.........................................................................................................11<br />
Connection Diagram ...........................................................................................11<br />
Start-Up .............................................................................................12<br />
Setup Menu.........................................................................................................14<br />
Wired Network Setup..........................................................................................14<br />
Wireless Network Setup......................................................................................15<br />
Advanced Network Setup ...................................................................................17<br />
Connect <strong>WAP</strong>-<strong>V6000</strong> to computer directly..........................................................17<br />
Wired Network.....................................................................................................17<br />
Wireless Network................................................................................................17<br />
HDD Installation, Configuration and File Management.................18<br />
Hard Disk Drive Installation.................................................................................18<br />
<strong>WAP</strong>-<strong>V6000</strong> HDD Format Wizard.......................................................................20<br />
Copy files from USB Storage Device to <strong>WAP</strong>-<strong>V6000</strong> (Local HDD) ....................21<br />
Copy/Delete files from computer to <strong>WAP</strong>-<strong>V6000</strong> (Local Hard Disk) ...................23<br />
Samba Server function........................................................................................23<br />
Network Protocols to Play Media....................................................25<br />
UPnP Mediaserver installation on computer........................................................25<br />
Other access solutions for networked resources.................................................25<br />
NFS protocol.......................................................................................................25<br />
Samba Client Protocol.........................................................................................28<br />
Play Multimedia Files .......................................................................31<br />
Music...................................................................................................................31<br />
Supported Music Formats ..................................................................................31<br />
To Play Music .....................................................................................................32<br />
Photos.................................................................................................................36<br />
Supported Photo Format.....................................................................................36<br />
To view photos.....................................................................................................36<br />
Playing a Photo Slideshow ................................................................................38<br />
Controlling Photo Playback ................................................................................38<br />
3
Viewing Photo Information ..................................................................................38<br />
Photo Viewing Effect ..........................................................................................38<br />
Viewing Photos While Music is Playing (BackGround Music)..............................40<br />
View Photo in Thumbnails Mode.........................................................................43<br />
Video...................................................................................................................44<br />
Supported Video Formats...................................................................................44<br />
To play video.......................................................................................................45<br />
Control Video Playback .....................................................................................47<br />
Video Viewing Effects .........................................................................................48<br />
Subtitles and Languages/Audio-Tracks...............................................................49<br />
Video Resume Playing .......................................................................................50<br />
DVD Menu Navigation.........................................................................................52<br />
Web Browser......................................................................................53<br />
To open the Web Browser...................................................................................53<br />
Using the Remote Control for Browser navigation...............................................53<br />
Tool bar of the browser........................................................................................54<br />
Opening a web page...........................................................................................54<br />
Internet Media....................................................................................57<br />
Play Internet Radio - Live 365..........................................................................57<br />
Play Internet Radio - My Radio...........................................................................59<br />
Play Internet Video - My Video............................................................................60<br />
Viewing Youtube Content....................................................................................62<br />
Add/Delete the Internet Radio/TV Station Lists...................................................63<br />
BitTorrent Downloader......................................................................64<br />
Enabling the BitTorrent Function.........................................................................64<br />
BitTorrent Management.......................................................................................68<br />
Removing Completed Download Files................................................................69<br />
Firmware Upgrade and Reset to Default.........................................70<br />
Upgrade by Using USB Flash Disk .....................................................................70<br />
Reset to Default ..................................................................................................70<br />
Miscellaneous Settings.....................................................................71<br />
System Setup......................................................................................................71<br />
Bit Torrent Setup..................................................................................................77<br />
Trouble Shooting...............................................................................78<br />
Advice on location, care and safety................................................81<br />
Specifications:...................................................................................83<br />
CE – Declaration of conformity........................................................84<br />
Notes on WEEE..................................................................................84<br />
4
Dear User,<br />
we are pleased that you have chosen a wireless media player from<br />
<strong>TEAC</strong> media systems and congratulate you on this choice.<br />
With your <strong>TEAC</strong> media systems <strong>WAP</strong>-<strong>V6000</strong> you have acquired a modern piece of<br />
wireless audio technology that is in equal measure attractive and of high quality. We<br />
are sure that this product will provide useful service and a lot of fun over the coming<br />
years.<br />
... your <strong>TEAC</strong> media systems team!<br />
About This Manual<br />
The <strong>TEAC</strong> media systems <strong>WAP</strong>-<strong>V6000</strong> User Manual gives you a step-by-step<br />
explanation of how to install <strong>WAP</strong>-<strong>V6000</strong> Media Player. Use this information to set<br />
up and configure <strong>WAP</strong>-<strong>V6000</strong>.<br />
This manual is provided in PDF format on the Installation CD-ROM.<br />
Your computer must have the free Adobe Acrobat Reader or OpenOffice installed in<br />
order to view and print PDF files.<br />
After unpacking<br />
After unpacking you should first check that the contents are complete.<br />
There should be:<br />
● <strong>WAP</strong>-<strong>V6000</strong> Wireless AV Player<br />
● Remote control (2 AA batteries included)<br />
● Power cable<br />
● Category 5 (CAT5) Ethernet cable<br />
● Composite (CVBS) Video cable and Audio cable (3 RCA plugs each ends)<br />
● HDMI cable<br />
● <strong>WAP</strong>-<strong>V6000</strong> Installation CD, including <strong>TEAC</strong> media systems <strong>WAP</strong>-<strong>V6000</strong><br />
User Manual in PDF format and Twonkymedia Server Software<br />
● 4 Screws (for HDD)<br />
5
Safety Information<br />
ATTENTION: Failure to follow these safety instructions could result in fire, electric<br />
shock, or other injury or damage.<br />
● Read these instructions<br />
● Keep these instructions<br />
● Heed all Warnings<br />
● Follow all instructions<br />
● Do not use this apparatus near water.<br />
● Clean only with dry cloth<br />
● Do not install near any hear sources such as radiators, stoves, or other<br />
apparatus (including amplifiers) that produce heart.<br />
● Unplug this apparatus during lightning storms or when unused for long<br />
periods of time.<br />
ATTENTION: To reduce the risk of electronic shock, pull out the mains plug before<br />
removing the cover!<br />
ATTENTION: The device can display static images, which can cause “burn in” of<br />
certain displays. Avoid leaving static images (such as photos or paused videos)<br />
onscreen for long periods of time.<br />
ATTENTION : This device should be used only indoors in well-ventilated areas. To<br />
reduce the risk of fire, electric shock, or interference, do not expose this appliance to<br />
rain, liquid, moisture, excessive hear, or naked flame.<br />
Tip: please visit www.teac.de to check for new firmware for your <strong>WAP</strong>-<strong>V6000</strong>. New<br />
firmware contains latest corrections and often it adds essential new features into<br />
your device!<br />
-- We do recommend, always to update for the latest firmware! --<br />
<strong>TEAC</strong> is always active to offer you the best possible features for your <strong>WAP</strong>-<strong>V6000</strong>!<br />
6
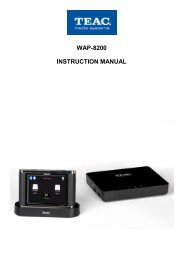
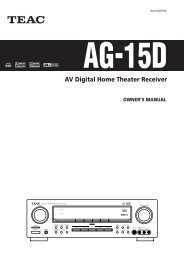
Controls and connectors<br />
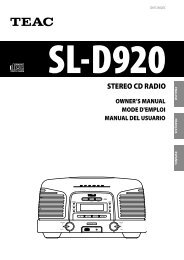
Main unit front view<br />
1 = Standby Button 4 = LC-Display<br />
2 = Navigation Buttons 5 = USB Host<br />
3 = Indication LEDs:<br />
Power/Standby, HDD, Network<br />
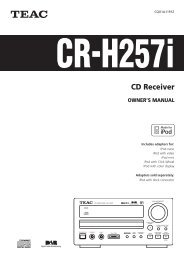
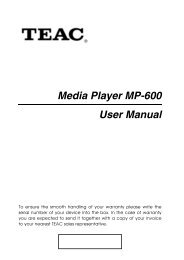
Main unit rear view<br />
1 = Wlan Antenna 1 7 = S/PDIF Optical Digital Output<br />
2 = Composite Video Output 8 = HDMI Output<br />
3 = Audio Output Right Channel 9 = S/PDIF Coaxial Digital Output<br />
4 = Ethernet Lan Terminal 10 = Audio Output Left Channel<br />
5 = Wlan Antenna 2 11 = USB Host<br />
6 = Connector for Power Supply<br />
7
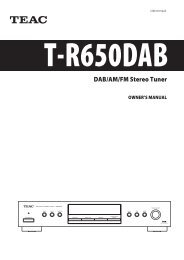
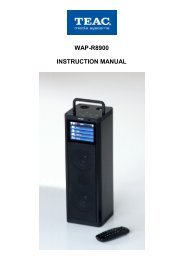
Infrared (IR) Remote Control<br />
8<br />
1 = STANDBY / ON<br />
2 = Video OUTPUT selection<br />
3 = Number keys<br />
4 = PREVious / NEXT track<br />
5 = Navigation keys<br />
6 = Function selection<br />
7 = Playback options<br />
8 = Main menu HOME button<br />
9 = SETUP<br />
10 = Audio MUTE button<br />
11 = Volume control<br />
Battery compartment
Table of remote control buttons<br />
Button FUNCTION DESCRIPTION<br />
POWER Turn On/Off “<strong>WAP</strong>-<strong>V6000</strong>”.<br />
HOME Hotkey to return to Main Menu.<br />
MUTE Mute audio output.<br />
OUTPUT Switch the video output type<br />
COPY Copy USB content into local HDD<br />
MENU Go to the Menu of DVD films.<br />
A-B Set/Cancel A-B repeat mode.<br />
SLOW<br />
Slow forward / backward the media with speed 1/2x,<br />
1/4x,1/8x…<br />
ZOOM Zoom video or photo.<br />
REPEAT<br />
1. Video & Music: Repeat current file or Repeat all files in this<br />
folder or cancel repeat function.<br />
2. Photo: Repeat Background music.<br />
STOP Stop the media playing.<br />
DISPLAY<br />
BACK<br />
PREV<br />
NEXT<br />
Display media info. Pressing twice will show more info. about<br />
video.<br />
1. Press to return to previous folder or setup page.<br />
2. Save/cancel wireless setting in wireless setup page.<br />
1. Skip to the previous page when browsing media files.<br />
2. Skip to the previous file when playing media files.<br />
1. Skip to the next page when browsing media files.<br />
2. Skip to the next file when playing media files.<br />
VIDEO Press to jump to VIDEO mode<br />
MUSIC Press to jump to MUSIC mode<br />
PICTURES Press to jump to PHOTO mode<br />
iMedia Press to jump to Internet Media mode<br />
DIRECTIONS<br />
1. Press “LEFT” to stop current mode return to former layer;<br />
Press “RIGHT” to enter a selected folder or server.<br />
2. Video Mode: Press “UP” or “DOWN” to choose other file<br />
3. Photo Mode: Move picture in “zoom” mode or rotate picture<br />
in “rotate” mode<br />
4. Music Mode: Press “UP” to skip to previous music file or<br />
press “DOWN” to skip to next music file.<br />
OK/Play Pause 1. Play or pause media files<br />
9
2. Enter the highlight item.<br />
REWIND Fast backward the media file with speed 2x, 4x, 8x…<br />
FORWARD Fast forward the media file with speed 2x, 4x, 8x…<br />
SUB & LANG<br />
Select different subtitles and languages when playing video<br />
file.<br />
VOLUME+/- Increase/Decrease the volume.<br />
BGM<br />
NUMBERS<br />
1. Add/Remove a music file as background music.<br />
2. Add/Remove a music station from “My Media” as<br />
background music.<br />
1. Input number with the key value.<br />
2. Go to 00%-99% progress of current video or music file.<br />
RECORD Record stream into HDD<br />
:/ Go to the specified time of current file.<br />
SORT<br />
Sorting all the files in one folder and re-arrange in alphabetical<br />
order<br />
SETUP Hotkey to Setup Menu.<br />
Remote Control battery installation<br />
The RC is powered by two “Micro“ AAA batteries. A fresh set of batteries can<br />
achieve several weeks of normal usage.<br />
We do recommend to utilize common Alkaline Batteries.<br />
● The battery compartment is placed at the back of the RC cabinet.<br />
● The battery cover slider can be unlocked by slight shifting down the cover<br />
lock and pulling out the cover. After unlocking, the cover can easily be<br />
removed.<br />
● Please care to insert the batteries according to the markings in the battery<br />
case and on the batteries itself. Wrong polarity might damage the RC.<br />
● Then insert the battery cover back on the opening and press-in until you<br />
recognize it was locked again.<br />
● The remote control now is ready to use.<br />
Note: It is possible to utilize rechargeable AA-type batteries (NiMH or NiCd).<br />
However, rechargeable batteries have higher self-discharge and less cell tension,<br />
causing shorter operation time. Therefore we do not recommend to use<br />
rechargeable batteries.<br />
10
Installation<br />
Following descriptions explain how to install the <strong>WAP</strong>-<strong>V6000</strong> with basic setup.<br />
Install your <strong>WAP</strong>-<strong>V6000</strong> in this order:<br />
1. Connect <strong>WAP</strong>-<strong>V6000</strong><br />
2. Set Up <strong>WAP</strong>-<strong>V6000</strong><br />
3. Install software on your computer from Installation CD<br />
4. Configure your Twonkymedia Server to work with the <strong>WAP</strong>-<strong>V6000</strong><br />
Connections<br />
Make sure you have the appropriate cables for connecting. Take care to watch the<br />
colors of the plugs on the cable.<br />
For Video, <strong>WAP</strong>-<strong>V6000</strong> offers digital HDMI or analogue Composite connections.<br />
For Audio, beside the audio that goes through the digital HDMI connection, there<br />
are digital S/P-DIF coaxial and optical connections as well as analogue stereo line<br />
outputs.<br />
Note: If your audio system is connected by digital outputs, please go to<br />
Setup System Setup Audio Setup<br />
for configuration.and set the audio output <strong>WAP</strong>-<strong>V6000</strong> to Digital mode.<br />
For Network, you may have an Ethernet cable (Lan) plugged into the unit or<br />
connect by the wireless system (wlan). Neither will interfere with the other, but only<br />
one network can be accessed at a time (wired or wireless).<br />
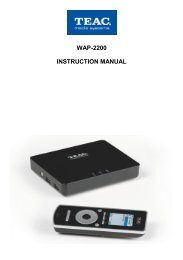
Connection Diagram<br />
Following is a connection example with network and UPnP devices.<br />
11
Start-Up<br />
Follow these steps to start-up your <strong>WAP</strong>-<strong>V6000</strong><br />
Turn on the TV Screen. Set the video sources selector on your TV to match the<br />
connection from your <strong>WAP</strong>-<strong>V6000</strong>. For example, if you used HDMI, set the TV to<br />
use “HDMI” Input.<br />
1. Turn on <strong>WAP</strong>-<strong>V6000</strong>. The LED on the front panel of the <strong>WAP</strong>-<strong>V6000</strong> lights<br />
up to show that it is powered on.<br />
2. Check the TV display. The default display of <strong>WAP</strong>-<strong>V6000</strong> is<br />
Composite(CVBS). If you use HDMI, take the remote control and push<br />
OUTPUT Key. You can cycle through the TV modes to get the appropriate<br />
display output.<br />
3. Wait a few seconds for the start up page to show up, and it will turn into the<br />
Main Menu.<br />
The start up page will last for only few seconds, and then go to the Main Menu. If<br />
there is still no video output after the start up page appears, please make sure the<br />
<strong>WAP</strong>-<strong>V6000</strong> and the TV are in the same mode. If not, please cycle through the<br />
OUTPUT key on the remote control, wait few seconds during each cycle to establish<br />
the next mode.<br />
12
Note: When you cycle through the “Output” Key, the <strong>WAP</strong>-<strong>V6000</strong> will tell<br />
you which mode you are at. Above is an example of cycling to “HDMI”<br />
mode. Please press “OK” if HDMI mode is what you want to select. It will<br />
switch to the original mode automatically if idle for 15 seconds.<br />
4. After reaching the main menu for the first time, we do recommend you to<br />
setup your <strong>WAP</strong>-<strong>V6000</strong> to fully suit your system environment.<br />
13
Setup Menu<br />
For setup, simply press the SETUP hotkey on the remote control or select “Setup”<br />
from the main menu by LEFT/RIGHT and confim by OK button.<br />
In Setup Main Menu, select Wired or Wireless to set up for your network.<br />
Wired Network Setup<br />
1. Select Network Wizard from set up main menu to start setup wizard<br />
2. Select “Wired” and follow the on screen instructions.<br />
Note: If you connect to a network using DHCP, <strong>WAP</strong>-<strong>V6000</strong> automatically detects<br />
your network. If you don’t connect using DHCP, go back to set up main menu and<br />
select Network Set Up. You may have to enter your IP address, net mask, gateway,<br />
and DNS addresses.<br />
14
Wireless Network Setup<br />
Attention: <strong>WAP</strong>-<strong>V6000</strong> supports present wlan standards 802.11b, 11g and 11n. A<br />
wireless connection of 802.11b or 802.11g standard can work well if you want to play<br />
music or view photos. For demanding video streaming, especially when streaming<br />
HD contents, a wired Lan or high performance 802.11n Wlan connection between<br />
the mediaserver and <strong>WAP</strong>-<strong>V6000</strong> is recommended. Please check your wlan router's<br />
standard to know about its possible limitations.<br />
1. Press “Setup” hotkey on the remote control or select “SETUP” mode from<br />
the Main Menu.<br />
2. Select “Network Wizard” from set up main menu to start setup wizard<br />
3. Select ‘Wireless” and follow the on screen instructions.<br />
4. <strong>WAP</strong>-<strong>V6000</strong> displays all available networks, navigate on the menu and<br />
choose the one you want.<br />
5. <strong>WAP</strong>-<strong>V6000</strong> detects the network type automatically; click “Next” and then<br />
“Save” to apply setting.<br />
15
6. If the network you choose is encrypted, a “Lock” icon displays on the<br />
network.<br />
7. Select “Key Value”, and have your password ready to enter.<br />
8. Input your password and choose “Enter” to save.<br />
9. Follow the onscreen instructions to complete the setting.<br />
Note: With each network, there are signal strength indicators in 3 colors; red, yellow<br />
and green. It is recommended to play high-bit-rate video only when the signal turns<br />
into green or to re-adjust the two antennas of <strong>WAP</strong>-<strong>V6000</strong> accordingly.<br />
16
When Wireless Network is hidden<br />
If you can’t find the ESSID (Network Name) on the “ESSID Device List”, follow these<br />
steps to configure wireless network manually.<br />
1. Select Wireless Setup.<br />
2. Select Network type as “Infrastructure” mode.<br />
3. Press “Back” to accept the setting or press “OK” to change the setting.<br />
4. Enter a value of up to 32 characters for the SSID by on-screen keyboard.<br />
5. Input other related information such like “Authentication”, “Key Format”, and<br />
proper “Key Value” of this hidden wireless network.<br />
6. Press “Back” or “Left” buttons to leave the wireless setup page and save the<br />
configurations.<br />
Advanced Network Setup<br />
Connect <strong>WAP</strong>-<strong>V6000</strong> to computer directly<br />
This item gives you a description on how to connect the <strong>WAP</strong>-<strong>V6000</strong> directly to your<br />
computer instead of getting involved in the local area network.<br />
Wired Network<br />
1. Connect the LAN cable to the LAN port of both <strong>WAP</strong>-<strong>V6000</strong> and the<br />
computer.<br />
2. Go to <strong>WAP</strong>-<strong>V6000</strong>, press Setup hotkey or select “Setup Main Menu”.<br />
3. Follow on screens instructions to complete Wired Network settings.<br />
Note: In this case, use a LAN cross cable type.<br />
Wireless Network<br />
1. Press Setup hotkey or select “Setup Main Menu”.<br />
2. Select “Wireless Network Setup”, and set ‘Network Type” as “Ad-hoc” mode.<br />
3. Configure an ESSID with software as you wish.<br />
4. You may choose to configure security settings for this connection or not.<br />
5. Press “BACK” button on remote control to save the settings.<br />
6. Go to your computer to configure your computer to wireless network.<br />
Note: a Wlan Ad-hoc-direct connection can be used by just TWO users at a time!<br />
17
HDD Installation, Configuration and File Management<br />
Hard Disk Drive Installation<br />
<strong>WAP</strong>-<strong>V6000</strong> supports 3.5” SATA HDD as internal storage. By installing the HDD<br />
inside, you can copy and delete media files via computer to local HDD and record<br />
streams to HDD.<br />
Attention: We recommend you to have a new HDD to install. You can chose to let<br />
<strong>WAP</strong>-<strong>V6000</strong> automatically format the HDD to EXT3 and erase your existing files.<br />
Follow the instructions below to set up HDD.<br />
1. Make sure <strong>WAP</strong>-<strong>V6000</strong> is turned off.<br />
2. Lay the unit upside-down on the working surface.<br />
Attention: to avoid scratches on the cover's top surface, lay the case cover<br />
upside-down on a soft cloth!<br />
3. Use a screw driver to unscrew the 4 screws at the bottom.<br />
4. Remove the top cover from bottom tray.<br />
18
5. Insert the HDD into the case cover as below direction.<br />
6. Put the HDD on the cover and fix the HDD firmly by the <strong>WAP</strong>-<strong>V6000</strong><br />
accessory HDD screws in the four holes.<br />
7. Connect the SATA data cable from HDD to the <strong>WAP</strong>-<strong>V6000</strong> board.<br />
8. Connect the HDD power cable from HDD to the <strong>WAP</strong>-<strong>V6000</strong> board.<br />
9. Re-install the bottom tray to the top cover of the <strong>WAP</strong>-<strong>V6000</strong> by its 4 original<br />
screws.<br />
10. Now you can operate your <strong>WAP</strong>-<strong>V6000</strong> again, including the installed HDD.<br />
19
<strong>WAP</strong>-<strong>V6000</strong> HDD Format Wizard<br />
After HDD installation is completed, <strong>WAP</strong>-<strong>V6000</strong> will detect your HDD compatibility<br />
and perform formatting if necessary. Follow below steps to complete the format<br />
process.<br />
1. Turn on <strong>WAP</strong>-<strong>V6000</strong> and your TV.<br />
2. HDD Format Wizard will detect if your HDD is formatted for best<br />
compatibility.<br />
3. Click “Yes” if you are sure you want to initialize the process. If you do not<br />
want to format the HDD, go to “No“.<br />
4. Wait few seconds for the process to be complete.<br />
5. The Main Menu automatically appears after format is finished.<br />
ATTENTION: <strong>WAP</strong>-<strong>V6000</strong> supports Samba Server (copying files from computer)<br />
with hard disks formatted by <strong>WAP</strong>-<strong>V6000</strong> HDD format wizard. If you skip HDD<br />
format wizard, the samba server will be disabled.<br />
ATTENTION: After formatting, the all media files on this HDD will be deleted. Please<br />
backup your files before you install the HDD into <strong>WAP</strong>-<strong>V6000</strong>.<br />
20
ATTENTION: <strong>WAP</strong>-<strong>V6000</strong> will format your HDD as EXT3 format for best<br />
performance. This file format can not be recognized by Windows system originally.<br />
Note: By default, <strong>WAP</strong>-<strong>V6000</strong> will check the format of the HDD if the HDD was<br />
initialized by <strong>WAP</strong>-<strong>V6000</strong> with EXT3 format. The data in the HDD, which is not with<br />
EXT3 file system, may still be able to be played by <strong>WAP</strong>-<strong>V6000</strong>. This way, functions<br />
like copy via USB and network will NOT be working.<br />
There is a setting option to avoid HDD format checking after power-on. Please go to<br />
Setup System Setup Hard Disk Share for configuration.<br />
Copy files from USB Storage Device to <strong>WAP</strong>-<strong>V6000</strong> (Local HDD)<br />
Once the <strong>WAP</strong>-<strong>V6000</strong> is installed with a local HDD, you can copy files from USB<br />
storage device through USB hosts, or copy and delete files from computer through<br />
LAN.<br />
Follow below steps to copy files from USB storage device.<br />
1. Go to “My Media” at Set Up Main Page<br />
2. Select the name of your USB Storage device from the server list.<br />
21
3. Highlight the file you want to copy, and then press COPY key on the remote<br />
control.<br />
4. The <strong>WAP</strong>-<strong>V6000</strong> will ensure you whether you want to copy, press “Yes” if<br />
you want to move on.<br />
Note: The <strong>WAP</strong>-<strong>V6000</strong> only support USB hosts copy to local HDD, you are not able<br />
to delete files copied to HDD by using this feature.<br />
22
Copy/Delete files from computer to <strong>WAP</strong>-<strong>V6000</strong> (Local Hard Disk)<br />
<strong>WAP</strong>-<strong>V6000</strong> supports Samba protocol. You can copy/delete files on each<br />
<strong>WAP</strong>-<strong>V6000</strong> internal HDD available in your local network by using your computer.<br />
Samba Server function<br />
<strong>WAP</strong>-<strong>V6000</strong> supports a Samba server function which shares your local storage<br />
space with client computer over the network. For computer with Windows OS, it’s<br />
well known as “My Network Places“.<br />
The following is an example on how to do this through Microsoft Windows XP.<br />
1. Click “My Network Places” icon on your computer.<br />
2. Click “Entire Network”<br />
3. Click “Microsoft Windows Network” and “MShome”<br />
4. The default <strong>WAP</strong>-<strong>V6000</strong> Local HDD location is “MShome”, double click it<br />
and you will see the <strong>WAP</strong>-<strong>V6000</strong> (ShareHDD) icon.<br />
5. Double click the <strong>WAP</strong>-<strong>V6000</strong> (ShareHDD) icon, a login menu pops up.<br />
6. Input the default user name and password. By default, <strong>WAP</strong>-<strong>V6000</strong> is using<br />
“admin” for user name and password.<br />
23
7. After login is successful. Now you can copy/delete media files between your<br />
computer to <strong>WAP</strong>-<strong>V6000</strong> local HDD by using your computer mouse.<br />
Note: please go to “System Setup“ “Harddisk Share Setup“ for setup options on<br />
SMB server.<br />
24
Network Protocols to Play Media<br />
To browse and playback the audio, photo and video media files stored on your<br />
computer (connected to your network) or NAS, <strong>WAP</strong>-<strong>V6000</strong> offers various access<br />
solutions like NFS, SMB and UPnP.<br />
UPnP Mediaserver installation on computer<br />
For UPnP access to your media files, a media server software is required. The<br />
media server is beneficial to have the media contents sorted according your<br />
individual requirements, independant from their “physical“ arrangements in<br />
subdirectories. E.g. for audio files, the mediaserver can refer to ID3 tags in the files<br />
to have them sorted by various categories like album, artist, genre etc. The UPnP<br />
mediaserver access ensures full data safety on your computer without direct data<br />
access as required for SMB or NFS. With <strong>WAP</strong>-<strong>V6000</strong>, the TwonkyMedia Server<br />
software is provided on the installation CD.<br />
Attention: <strong>WAP</strong>-<strong>V6000</strong> cannot find and playback your media files stored on a<br />
networked computer by UPnP (without using SMB/NFS) without the UPnP<br />
mediaserver installed. Before looking for UPnP mediaserver contents from your<br />
network computer, ensure properly installed mediaserver software!<br />
Other access solutions for networked resources<br />
Firstly, have the IP address and the subfolder name of your target source ready (e.g.<br />
your NAS’ IP and the sub folder of the NAS), below are two options of approaching<br />
your target source by NFS and by SMB protocol.<br />
NFS protocol<br />
The NFS protocol allows the <strong>WAP</strong>-<strong>V6000</strong> to access media files on NAS (Network<br />
Attached Storage) without the using of other UPnP server.<br />
1. Select and enter “iMedia” from the Main Page.<br />
25
2. Select “My Media” and enter “Add New Entry”. Edit Dialogue will pop up.<br />
3. Key in the nickname (for example “nfs”) and the URL of your target source.<br />
The url link must be in following arrangement.<br />
nfs://ip/export_directory<br />
(for example, nfs//192.168.2.112/mnt/hd_a2)<br />
The 192.168.2.112 is the IP address of the NAS you want to approach, and<br />
26
the mnt/hd_a2 is the sub folder name of your target source.<br />
4. After the URL is saved, go back to the menu of “My Media”, and you will find<br />
the protocol at “My Media” list.<br />
5. Enter into the menu, and select the files you want to play. In this case, you<br />
don’t need to put in any username or password.<br />
27
Samba Client Protocol<br />
The Samba Client allows the <strong>WAP</strong>-<strong>V6000</strong> to access media files from samba shares<br />
on computers on the network. Go to Setup -> System Setup -> Other Settings -><br />
Network Option -> Samba Client to turn on this option.<br />
As long as the network is linked, there is no additional set up to enable this feature.<br />
Following steps show how to access media through the Samba Client Protocol.<br />
1. Get into “My Media” in the main menu.<br />
28
2. All available sources will be shown on the same menu list layer (including<br />
local HDD, USB storage, UPnP Server and folders at local area network<br />
(those you can find through your Windows computer at the path of “My<br />
neighborhood”)<br />
Local HDD<br />
UPnP server<br />
Samba client<br />
= Samba client protocol = UPnP Server<br />
3. Get into the source you want to select.<br />
Note: Since sources from UPnP server or Samba client will be found at the<br />
same layer, you may have 2 different approaches of same sources at one<br />
menu list. You can compare the 2 approaches of Samba client and UPnP<br />
server to the same NAS as seen above.<br />
29<br />
Total 28 sources<br />
found
4. When access the NAS through Samba client, if there is request to key in<br />
user name and password, the dialogue will pop out. Key in User name and<br />
Password to login NAS.<br />
5. After input of username and password, you can get into your target source<br />
and select the media files you want to play.<br />
Note: The performance of high bit rate files (>30 Mbps) might have some lag<br />
through Samba Protocol, therefore we don’t suggest to play high bit rate files with<br />
this protocol.<br />
30
Play Multimedia Files<br />
Music<br />
Supported Music Formats<br />
Format File Extension<br />
AAC+ AAC, MP4, M4A<br />
AAC-LC AAC, MP4, M4A<br />
AC3 / Dolby Digital 5.1 Down<br />
mixing AC3<br />
AC3 Pass through AC3<br />
DTS Pass through DTS<br />
LPCM WAV, PCM<br />
MP3 MP3 (ID3 tag supported)<br />
MP3Pro MP3<br />
OGG Vorbis OGG<br />
WMA WMA, ASF<br />
WMA Lossless WMA, ASF<br />
WMA Voice WMA, ASF<br />
WMA Pro WMA, ASF<br />
31
To Play Music<br />
1. Select “My Media” from Main Menu to enter server list, or press MUSIC<br />
hotkey on remote control. .<br />
2. All available file sources will be listed on the My Media list, including files<br />
stored at Twonkymedia server in your computer, at USB flash stick, at USB<br />
external Hard disk drive, local hard disk drive or at other UPnP servers.<br />
Please select the media you like to use and press the OK button on the<br />
remote control.<br />
Remark: When you want to play music on other UPnP Servers, please<br />
make sure the UPnP function for each device is enabled correctly.<br />
3. Select MUSIC mode and press “OK” to enter music mode.<br />
32
4. If you select Twonkymedia server, the music files will organize by “Album”,<br />
“Artist”, or “Genre” etc., automatically for your convenience; or you can<br />
select “All Music” to see all music files. You may also select “Files” to view<br />
the music files that organized in several subfolders as on your computer.<br />
5. Please use “Up” and “Down” buttons on the remote control to navigate those<br />
folders, and select the entry by press OK or “Right” button on the remote<br />
control. OK on a music track will start playback.<br />
Note: icon stands for a folder; icon stands for a file.<br />
6. On the screen, you can see related information about ID3 data of the music<br />
such as “Artist”, “Album”, “Title”, and “Genre”. If it contains the of the Album<br />
cover, it will also be shown on music playback screen.<br />
Note: During music playback, you can jump back to list screen by pressing the<br />
BACK button. In the list screens, you can navigate to find anothe3r music track for<br />
next playback, without interrupting the current music playback! Current music track<br />
is especially marked to find it in the list if required.<br />
33
Cover pictures: <strong>WAP</strong>-<strong>V6000</strong> supports cover display for each audiofile with ID3 tag.<br />
To achieve cover display, you can import a cover picture into each audio file, using<br />
your PC. This and more ID3 tasks can be proceeded comfortably by a wellknown<br />
freeware software, e.g. MP3tag (Win), ID3X (MAC) or EasyTAG (Linux).<br />
Please note: there are some programs which support audiofiles and related cover<br />
pictures, like WMP, iTunes or Amarok, but they have an incompatible solution based<br />
on an internal directory to store cover pictures separate from audiofiles, but not in<br />
the audiofile's ID3 tags. These pictures do not appear if you open the audiofile by<br />
other applications or <strong>WAP</strong>-<strong>V6000</strong>.<br />
If you want to have the cover pictures available for your <strong>WAP</strong>-<strong>V6000</strong> and also for<br />
your portable audio devices, simply import the cover pictures into the ID3 tags.<br />
Controlling Music Playback<br />
Use the remote to PLAY, PAUSE, or STOP music playback. Controlling music<br />
playback will be as easy as controlling your TV set.<br />
Play and Pause<br />
Press “PLAY” button while music is playing you can pause the music by pressing<br />
“PLAY” button again can resume the music<br />
Pause Music<br />
Play Music<br />
Volume Control<br />
Press “Vol+” or “Vol-” buttons to control the volume<br />
Mute<br />
Press “Mute” button to mute or un-mute the music.<br />
Mute music<br />
Un-mute music<br />
34
Skip to Next or Previous File:<br />
Press “Next” or “Down” buttons to skip to next music file.<br />
Press “PREV” or “UP” buttons to skip to previous music file.<br />
Fast Forward:<br />
Press “>>(FF)” button to fast forward the music file. Press several times to switch<br />
the speed.<br />
Fast Rewind:<br />
Press “
Photos<br />
Supported Photo Format<br />
Format File Extension<br />
BMP BMP<br />
EXIF SUPPORT JPEG, JPEG, JPE, TIFF, TIF<br />
GIF GIF<br />
JPEG JPEG, JPG<br />
JPEG2000 JPG, JPEG, JPE<br />
PNG PNG<br />
TIFF TIFF, TIFF<br />
Windows Media Photo WDP, HDP<br />
To view photos<br />
1. Select “My Media” from Main Menu to enter server list, or press “PHOTO”<br />
hotkey on remote control.<br />
2. All available file sources will be listed on the server list, including files<br />
stored at Twonkymedia server in your computer, at USB flash stick, at USB<br />
external Hard disk drive, local hard disk drive or at other UPnP servers.<br />
Please select the media server you want to use and press the OK button<br />
on the remote control.<br />
3. Select “PHOTO” mode and press “OK”, or press “PHOTO” hotkey to enter<br />
photo mode.<br />
36
4 If you select “Twonkymedia server”, you may select “Files” to view the<br />
image files that organized in several subfolders as on your computer, or<br />
select “All Photos” to see all shared image files. Please use “Up” and<br />
“Down” buttons on the remote control to navigate those folders, and select<br />
the option by press OK or “Right” button on the remote control.<br />
5 Select the folder that contains the image files or the subfolders you want,<br />
and press OK, or “Right” button on the remote control to play it.<br />
37
Note: icon stands for a folder; icon stands for a file.<br />
Playing a Photo Slideshow<br />
To start playing a photo slideshow (all photos in one folder), you need to press OK<br />
Button twice(!!) on the remote to enable this function.<br />
1. Navigate to the first photo of each folder and press OK button to view this<br />
photo.<br />
2. Press again the OK button if you want to enable Photo Slide Show feature.<br />
The PLAY icon will display when the Photo Slide Show is enabled.<br />
3. Press STOP button to stop the function. The “Pause“ icon will be displayed<br />
when the Photo Slide Show is stopped.<br />
4.<br />
Controlling Photo Playback<br />
Play, Pause and Stop<br />
Press OK button on the image files list to enable slideshow playing. Press STOP<br />
button to stop it.<br />
Skip to Next or Previous File:<br />
Press “Next” or “Down” buttons to skip to next video file.<br />
Press “PREV” or “UP” buttons to skip to previous music file.<br />
Viewing Photo Information<br />
Press “Info” button to get image information.<br />
Photo Viewing Effect<br />
Zoom in and Zoom Out<br />
Press ZOOM button while viewing the photo that you want to manipulate,.<br />
1. Press “Zoom” button and press “Left” button to enlarge the image.<br />
38
2. When the image screen is larger than TV screen, press “Zoom” again<br />
and press “directions” buttons to move the image.<br />
3. Press “Zoom” button and press “Right” button to shrink the image<br />
Rotate:<br />
Press “Rotate” button while viewing the photo to enable rotate function.<br />
39
Viewing Photos While Music is Playing (BackGround Music)<br />
The <strong>WAP</strong>-<strong>V6000</strong> is capable of displaying photos and playing background music<br />
simultaneously. Follow below steps to add music to “BGM” (Back Ground Music) list.<br />
1. Enter music files list<br />
2. Use “Up” and “Down” buttons on the remote control to navigate music files,<br />
and press “BGM” hotkey on remote control to invoke “BGM” tool bar.<br />
Possible BGM options are:<br />
add single track to BGM, add complete album to BGM, delete track from<br />
BGM, BGM list view and BGM PLAY or BGM PAUSE.<br />
3. Press “Right” and “Left” buttons to select options on “BGM” tool bar, and<br />
press “OK”.<br />
4. The music files that been added to “BGM” list will display with “BGM” icon.<br />
40
Add music to BGM list. Music added successfully<br />
5. To play BGM files, please select “BGM PLAY”button on “BGM” tool bar; to<br />
stop playing BGM, please select “BGM PAUSE” button.<br />
6. To remove music files from BGM list, please select “delete” icon on the file<br />
you want to remove.<br />
7. To check the selection for BGM, please select “BGM list” icon to view all<br />
music files in the list.<br />
41
8. After BGM setting is complete, you can go to “Photo” folder to view photo,<br />
and press “BGM” hotkey to evoke the BGM function.<br />
42
View Photo in Thumbnails Mode<br />
You can view thumnails of several photos at a time. To enable the thumbnail mode,<br />
please do the following:<br />
1. Go to “Setup Main Menu”.<br />
2. Select “Other Settings”.<br />
3. Choose “Thumnail” on “Photo Display Setup” Menu.<br />
4. After go back to the folder, you will now view several photos displayed at a<br />
time.<br />
43
Video<br />
Supported Video Formats<br />
Format File Extension<br />
DivX 3 AVI, DivX<br />
DivX 4 AVI, DivX<br />
DivX 5 HD AVI, DivX<br />
DiVX 5 SD AVI, DivX<br />
DivX 6 HD AVI, DivX<br />
DivX 6 SD AVI, DivX<br />
H. 264 AVC MPEG4 part 10<br />
(HD) MPG, MP4, MOV, AVI<br />
H. 264 AVC MPEG4 part 10<br />
(SD) MPG, MP4, MOV, AVI<br />
MJPEG AVI<br />
MPEG-1 MPG, MPEG, DAT<br />
MPEG-2 HD MPG, MPEG<br />
MPEG-2 SD MPG, MPEG<br />
MPEG-2 VOB MPG, MPEG, VOB<br />
MPEG-4 part 2 ASP MP4, AVI<br />
VC-1 HD 1080i WMV<br />
VC-1 HD 720p WMV<br />
WMV 9 WMV, ASF<br />
WMV HD 1080i WMV, ASF<br />
WMV HD 720p WMV, ASF<br />
WMVPro WMV, ASF<br />
XviD AVI, MP4<br />
HD 1080i/p AVI, MP4, MOV<br />
DVD ISO, IFO<br />
44
To play video<br />
1. Select “My Media” from Main Menu to enter server list, or press “VIDEO”<br />
hotkey on remote control.<br />
2. All available file sources will be listed on the server list, including files stored<br />
at <strong>TEAC</strong> media systems media server in your computer, at USB flash stick,<br />
at USB external Hard disk drive, local hard disk drive or at other UPnP<br />
servers. Please select the media server you want to use and press “OK”<br />
button on remote control.<br />
3. Select VIDEO mode and press “OK”, or press “VIDEO” hotkey to enter video<br />
mode.<br />
45
4. If you select “<strong>TEAC</strong> media systems DMS”, you may select “My Folder” to<br />
view the video files that organized in several subfolders as on your<br />
computer, or select “All Videos” to see all shared video files. Please use<br />
“Up” and “Down” buttons on the remote control to navigate those folders,<br />
and select the option by press “OK” or “Right” button on the remote control.<br />
5. Select the folder that contains the video files or the subfolders you want, and<br />
press “OK”, “Play”, or “Left” button on the remote control to play it.<br />
Note: icon stands for a folder; icon stands for a file.<br />
46
Control Video Playback<br />
Volume Control:<br />
Press “Vol+” or “Vol-” buttons to control the volume<br />
Mute:<br />
Press “Mute” button to mute or un-mute the video.<br />
Pause and Play:<br />
Press OK button while video is playing you can pause the music by pressing<br />
OK button again can resume the music<br />
Skip to Next or Previous File<br />
Press “Next” or “Down” buttons to skip to next video file.<br />
Press “PREV” or “UP” buttons to skip to previous music file.<br />
Fast Forward:<br />
Press “>>(FF)” button to fast forward the video file. Press several times to<br />
switch the speed.<br />
Rewind:<br />
Press “
Slow backward<br />
Press “Slow” button and press “Left” button to slow backward the video file.<br />
Press “Left” button several times to switch the speed.<br />
Viewing Video Information<br />
Press “Info” button to get video information.<br />
Video Viewing Effects<br />
Zoom in and Zoom Out:<br />
While video is playing, press ZOOM button to enable zoom in/ zoom out function.<br />
1. Press “Zoom” button and press “Left” button to enlarge the video screen.<br />
2. When the video screen is larger than TV screen, press “Zoom” again and<br />
press “directions” buttons to move the video screen.<br />
3. Press “Zoom” button and press “Right” button to shrink the video screen<br />
48
Repeat and Repeat All<br />
You can turn on the repeat function to continuously play individual video or video<br />
within a folder.<br />
Press “Repeat” button once to repeat playing current video file.<br />
Press “Repeat” button twice to repeat all video files in current folder.<br />
Press “Repeat” button for third time again to disable the repeat mode.<br />
Subtitles and Languages/Audio-Tracks<br />
If you are playing “VOB” files or “AVI” files, “SUB” button and “LANG” button are<br />
available for the subtitle and language switching. Press “LANG” to change different<br />
languages or audio tracks that are included in “VOB” files; and press “SUB” button to<br />
change different subtitles in both “VOB” and “AVI” files.<br />
Note: To use Subtitles, make sure that it is in the same folder as your video file and<br />
that the files are both named exactly the same.<br />
49
Video Resume Playing<br />
The <strong>WAP</strong>-<strong>V6000</strong> supports resume video playing to the previous point where the<br />
video is interrupted. The device needs to keep powered on to enable this function.<br />
The default setting is that it will ask you everytime whether you want to resume the<br />
playing when you are back to the interrupted file. If you want to change the setting,<br />
please follow below instructions:<br />
1. Go to “System Set Up “<br />
2. Select “Other Setting”, and highlight “Video Resume Playing”.<br />
You can disable the setting or make it always on without asking.<br />
50
Play Next Video Automatically<br />
The default setting is the all the video files in one folder will be played continuously<br />
until the last file and then return to the main menu.<br />
If you want to play only the selected file and then return to the main menu, please go<br />
to “Other Settings” and set “Play Next Video” to disable the function.<br />
Search Video<br />
The <strong>WAP</strong>-<strong>V6000</strong> provides two options to seek the video frame. One is to seek by<br />
percentage of total file length; and the other is to seek by time.<br />
Seek by Percentage<br />
While video is playing, you can press the numeric keys on the remote control to<br />
Jump to your destination. For example, when you press “7” + “0”, you will jump to<br />
70% of the total file length.<br />
Seek by Time<br />
Firstly, press “0” of the numeric keys on the remote control to enter into time seek<br />
mode. Then you can input the time frame you want to search.<br />
51
DVD Menu Navigation<br />
The <strong>WAP</strong>-<strong>V6000</strong> support viewing DVD files as you are playing a DVD menu.<br />
Follow below steps to enable DVD menu navigation feature.<br />
1. When you select a DVD file, choose the item with disk icon and press OK<br />
2. The Menu will appear. Use the navigation buttons on the remote control to<br />
select the item you want.<br />
52
Web Browser<br />
To open the Web Browser<br />
Wherever you stay in the user interface, press ‘Home’ button on the remote control<br />
to return to the main menu as shown below. Select the icon which shows ‘Web<br />
Browser’ and press ‘ok’.<br />
The homepage of the web browser will be displayed, then you can surf the web<br />
using the remote control or keyboard and mouse.<br />
An optional USB keyboard and mouse can be plugged to facilitate the web surfing.<br />
You can EXIT from the web browser by selecting ‘Exit’ or pressing Back button on<br />
the remote control.<br />
Using the Remote Control for Browser navigation<br />
While using the remote control, the key definition is as follows:<br />
KEYPAD FUNCTION DESCRIPTION<br />
BACK<br />
Escape from the browser and return to the main<br />
menu.<br />
VIDEO Left-click of the mouse<br />
MUSIC<br />
Press to enter keyboard mode and press again<br />
to be back to mouse mode.<br />
iMedia Right-click the mouse.<br />
DIRECTIONS To move the cursor.<br />
OK/Play Left-click or Enter<br />
SUB & LANG<br />
NUMBERS<br />
Select different subtitles and languages when<br />
playing video file.<br />
Equivalent to the numbers or characters on the<br />
keyboard.<br />
53
Tool bar of the browser<br />
Opening a web page<br />
Press ‘File’ → ’Move page’ → Enter the web address you like to go.<br />
Tab function<br />
Tabs can be opened and switched when you like to look at different web pages more<br />
efficiently.<br />
Press ‘File’ → ’Switch tab’ → Select a tab to be opened.<br />
54
Previous, Next and Home Pages<br />
Press ‘History’ → ’ Back’ or ‘Forward’ or ‘Home’.<br />
View of the pages<br />
The web page being loaded can be stopped or reloaded by choosing the icon from<br />
‘View’. Text size can be changed, and the whole page can be zoom in or out for<br />
more convenient view by the users.<br />
55
Bookmark function<br />
Bookmarks can be added, loaded and deleted by using ‘Bookmark’<br />
56
Internet Media<br />
Play Internet Radio - Live 365<br />
Live365 is an Internet radio service that provides unlimited on-demand access to<br />
thousands of radio stations. The audio is streamed directly over the Internet.<br />
Follow below steps to access the radio stations:<br />
1. Make sure your network setting is correct and be able to access internet.<br />
2. Select “media” from main menu or press “media” button on the remote<br />
control.<br />
3. Select “Live 365” and press “OK” button on remote control.<br />
57
4. Select a catalog you prefer from list, or select “All Broadcasts” to browse all<br />
radio stations.<br />
5. Select a radio station from list, and press “OK”, “Play”, or “Left” button to<br />
play it.<br />
Note: stands for a web radio station.<br />
Live365- Playing<br />
58
Play Internet Radio - My Radio<br />
1. Make sure your network setting is correct and be able to access internet<br />
2. Select “iMedia” from main menu or press “iMedia” button on the remote<br />
control.<br />
3. Select “My Media” and press “OK” button on remote control.<br />
4. Select “My Radio” and press “OK” to enter.<br />
5. There are some radio stations listed as default; you can select one of the<br />
stations from list and play it.<br />
6. You can also add your favorite radio station manually by select “Add New<br />
Entry”.<br />
59
7. Select “Add New Station” or “Add New Folder” to configure a new radio<br />
station or Folder; then enter related information of this new radio station or<br />
Folder.<br />
Play Internet Video - My Video<br />
1. Make sure your network setting is correct and be able to access internet<br />
2. Select “iMedia” from main menu or press “iMedia” button on the remote<br />
control.<br />
3. Select “My Media” and press “OK” button on remote control.<br />
60
4. Select “My Video” and press “OK” to enter.<br />
5. There are also some internet video stations listed as default; you can select<br />
one of the stations from the list and play it.<br />
Note: stands for a web video station.<br />
You can press the Zoom key on the remote, and zoon in/out icon will show up. .<br />
Press “right” or “left” on the navigation button to enlarge or reduce the screen<br />
Screen enlarged Screen reduced<br />
61
Viewing Youtube Content<br />
You can use the <strong>WAP</strong>-<strong>V6000</strong> to view Youtube content.<br />
To view YouTube content, follow these steps:<br />
6. Make sure your network setting is correct and be able to access internet<br />
7. Select “iMedia” from main menu or press “iMedia” button on the remote<br />
control.<br />
8. Select “Youtube” and press “OK” button on remote control.<br />
<strong>WAP</strong>-<strong>V6000</strong> lists the Youtube content in 7 categories, Choose the item you<br />
will view and press “OK”.<br />
Note: The Youtube content on <strong>WAP</strong>-<strong>V6000</strong> is streamed from www.youtube.com<br />
62
Add/Delete the Internet Radio/TV Station Lists<br />
You can manage the iMedia list at the <strong>WAP</strong>-<strong>V6000</strong> onscreen menu.<br />
1. Go into the “Favorites”.<br />
2. Press the MENU key on the remote control. The Menu list will pop up. You<br />
can now add. modify, delete and backup your list iMedia list.<br />
63
BitTorrent Downloader<br />
The model <strong>WAP</strong>-<strong>V6000</strong> incorporates the BitTorrent download function. Make sure<br />
the local 3.5” HDD is already installed before enabling this feature. (Please refer to<br />
HDD Installation as mentioned in this operation manual).<br />
Enabling the BitTorrent Function<br />
After the HDD is installed, follow below steps to start the download.<br />
1. Go to the “Setup Main Menu”, and highlight “BitTorrent Setup”<br />
2. Select “Enable BitTorrent”.<br />
3. The option, Max Upload Connection, is to prevent the traffic of your outgoing<br />
network from being too heavy, and keep a high CPU efficiency of the device.<br />
4. The option, Max Upload Rate and Max Download Rate, is for users to utilize<br />
available bandwidth according to individual network management.<br />
5. The option, Listen Port and DHT Port, is for users to configure the maximum<br />
network efficiency, which are correspondent to the configuration of local NAT<br />
and Routers.<br />
64
Add New Torrent Seed and Start Downloader<br />
1. Go to “iMedia” and select “BitTorrent”<br />
Have your .torrent seed file ready at USB storage or local HDD. Insert your<br />
USB storage to the <strong>WAP</strong>-<strong>V6000</strong>, Enter into “BitTorrent”.<br />
2. Select “Add New Torrent” and press “OK”<br />
3. Enter into the location where the .torrent file to be selected is stored.<br />
65
4. Select the torrent files and press “OK” .<br />
5. New downloading activity will appear on the menu.<br />
Make sure that <strong>WAP</strong>-<strong>V6000</strong> is connected to Internet, to keep Bit Torrent active.<br />
66
The downloaded files will be stored in the path: MyMedia\HDD Disk 1\bt, please<br />
refer to the following screenshots.<br />
67
BitTorrent Management<br />
The BitTorrent Control Menu offers you the ability to start, stop, set priority and<br />
remove the files. You can press MENU key on the remote control to enter the<br />
control menu.<br />
1. Use Navigation key to select the torrent files you want to manage.<br />
2. Press “MENU” key in the remote control, the “BT Control” Menu will appear.<br />
3. Use Navigation key on the remote to select the function you want to<br />
perform.<br />
Removing Torrent files<br />
On the “BT Control” Menu, you can highlight the torrent files and select “Remove<br />
Torrent” to remove the torrent files which are downloading.<br />
68
Removing Completed Download Files<br />
If the files have been downloaded completely, there may be some other data along<br />
with the main torrent files. You can highlight the files and press “OK” to view all the<br />
data contents.<br />
1. Highlight the download completed files<br />
To view all the data contents press OK.<br />
You can press “Display” key on the remote to view the files info.<br />
2. If you want to remove all the data, you can highlight the files and select<br />
“Remove BT” and remove all the data which have been stored at local HDD.<br />
69
Firmware Upgrade and Reset to Default<br />
Upgrade by Using USB Flash Disk<br />
<strong>WAP</strong>-<strong>V6000</strong> supports using USB storage for updates. Follow the steps below to<br />
check for product updates:<br />
1. Have your USB storage ready, download by computer the latest firmware<br />
from www.teac.de to USB storage.<br />
2. Insert the USB flash to the USB port of <strong>WAP</strong>-<strong>V6000</strong>.<br />
3. Go to “Set Up Main Menu” “Version” and choose ‘Firmware upgrade”<br />
4. Choose “USB Upgrade”, the system will automatically search available<br />
firmware code on your attached USB storage.<br />
5. Follow the onscreen instructions to complete the upgrade.<br />
6. When the upgrade is successfully finished, <strong>WAP</strong>-<strong>V6000</strong> will reboot<br />
automatically.<br />
ATTENTION: Do not power off the system or remove the USB storage while the<br />
upgrade process is running.<br />
Reset to Default<br />
You can restore all configurations to factory default settings by following below<br />
steps:<br />
1. Go to “Set Up Main Menu” “Version”, and choose “Reset to Default”<br />
2. Make sure you want to do so, then press “OK” button to restore system to<br />
default settings.<br />
ATTENTION: Restoring <strong>WAP</strong>-<strong>V6000</strong> to its default settings will erase the network<br />
set up and media sever configuration. You will need to set up <strong>WAP</strong>-<strong>V6000</strong> again to<br />
run on your network and to access media files.<br />
70
Miscellaneous Settings<br />
The user interface language and other settings in your <strong>WAP</strong>-<strong>V6000</strong> are configured in<br />
the “System Setup” of the “Setup Main Menu”. Please select the item that you<br />
want to configure and press OK button or “Right” button on remote control to enter<br />
the related sub-page. After configuration, press Back button or “Left” button to leave<br />
the setup menu and save the configurations that you changed.<br />
System Setup<br />
If you want to change the configuration of your setup, you can select the “Setup”<br />
from Main Page, and select “System Setup” from Setup Main Menu. You can select,<br />
configure or adjust Language, TV mode, Audio, Video and other settings here.<br />
Below table is a brief description for the System Setup selection.<br />
Item Name Settings Action<br />
Language Language Select<br />
TV Mode Setup<br />
Audio Setup<br />
Video Setup<br />
Other Setting<br />
TV System/ Video Output/<br />
Video Scale<br />
Digital Audio Output/Analog<br />
Audio Output<br />
Brightness/ Contrast/ HUE/<br />
Saturation<br />
Screen Saver/ Photo Display<br />
Mode/ Slide Show Time/ BG<br />
Music<br />
Configure<br />
Configure<br />
Adjust<br />
Configure<br />
HardDisk Share Set Up User Name / Password Configure<br />
71
Language<br />
Here you can chose your preferred user interface language.<br />
Language Table<br />
Item Name Settings Action<br />
Language<br />
English/German/French/Italian/Spanish/<br />
Portugese/Turkish/Netherlandish/<br />
Serbian/Hewbrew/Traditonal Chinese<br />
Select<br />
TV Mode Setup<br />
This provides you a menu to change the TV mode setting, including the Video<br />
output, TV system and aspect ratio.<br />
72
TV Mode Setup Table<br />
Item Name Settings Action<br />
Video Output P-SCAN YPbPr/ S-Video/ HDMI Select<br />
TV System<br />
NTSC/480p/720p60/1080i60/<br />
1080p24/1080p60<br />
Select<br />
Aspect Ratio 4:3 PS/ 16:9/ 4:3 LB Select<br />
Note: For some video film which is with 24 frames per second, you may see poor<br />
quality on the display. Please select 1080p24 as the TV output mode, and make<br />
sure your TV set support 1080p24 before the trial.<br />
Audio Setup<br />
Please make sure the Digital Audio Output mode (SPDIF-PCM / SPDIF-RAW) is<br />
turned on, if you are connecting the Optical/Coaxial cable.<br />
Audio Setup Table<br />
Item Name Settings Action<br />
Digital Audio Output ON / OFF Select<br />
Analog Audio Output<br />
STEREO / MONO R / MONO L<br />
/ MIX MONO<br />
DTS SPDIF RAW (passthrough) -<br />
Select<br />
AAC SPDIF PCM / SPDIF RAW Select<br />
AC3 SPDIF PCM / SPDIF RAW Select<br />
WMA PRO SPDIF PCM / SPDIF RAW Select<br />
Note: For DTS (Digital Theater System) audio tracks, the device passes it through<br />
digital audio output port (Optical or Coaxial cable) to an external decoder.<br />
73
Video Setup<br />
The Video Setup provides you settings to enhance the video quality to best match<br />
with other sources on your screen.<br />
Video Setup Table<br />
Item Name Settings Action<br />
Brightness 0 ~ 32 Adjust<br />
Contrast 0 ~ 32 Adjust<br />
HUE 0 ~ 32 Adjust<br />
Saturation 0 ~ 32 Adjust<br />
Other Settings<br />
The “Photo Display Setup” , “Video Resume Playing” and “Play Next Video”<br />
Are explained in the related chapters for media playback. In “Other Settings“ you<br />
also can configure the “Screen Saver Time”, “Slide Show Time” and “Music Auto<br />
Play” functions.<br />
The Advanced Setting can setup the Network Activity LED and the LCD screen.<br />
74
Other Settings Table<br />
Item Name Settings Action<br />
Screen Saver OFF/ 1 min~30 min Select<br />
Photo Display Setup List / Thumbnail Switch<br />
Slide Show Time 1 sec ~ 3 min Select<br />
Music Auto Play Repeat All/ OFF/ One Time Select<br />
Video Resume Playing Ask/Always/Off Switch<br />
Play Next Video Enable/Disable Switch<br />
Hard Disk Share Setup<br />
If you have installed a Hard Disk Drive into your <strong>WAP</strong>-<strong>V6000</strong>, you can see the “Hard<br />
Disk Share Setup” here to configure your HDD Settings.<br />
You can rename the default Share Name, Group Name, User Name and Password<br />
by onscreen keyboard.<br />
To format the HDD, select the “Format“ function.<br />
75
Check HDD Format: The device will check the HDD format every time it is powered<br />
on. This can be disabled by selecting the option below.<br />
Note: Please remember if you have disabled this function, in case you need new<br />
formatting of the HDD, once you replaced the HDD in your <strong>WAP</strong>-<strong>V6000</strong>!<br />
LCD Settings<br />
Here, the contrast of the front LCD panel text display can be adjusted.<br />
76
Bit Torrent Setup<br />
Go to Setup Bit Torrent Setup to configure the relevant items.<br />
The items to be configured are listed as follows:<br />
Enable Bit Torrent<br />
The Bit Torrent function can be turned off by this option.<br />
Max Upload Connection<br />
To limit a maximum number of bit torrends at a time to comply with the performance<br />
of your network or your internet connection.<br />
77
Trouble Shooting<br />
No Television display or Poor Display.<br />
1. Make sure your TV is turned on and switched to the correct input.<br />
2. Make sure <strong>WAP</strong>-<strong>V6000</strong> is turned on and switched to the correct TV mode.<br />
3. If the TV Mode that you are using is not the right one for your television, you<br />
may not be able to see the display on television. To fix this problem, push<br />
“Output” key on the remote control. You can cycle through each of the<br />
possible TV modes to find and select the correct one.<br />
4. Make sure you are using the correct video cables and that they are<br />
connected firmly to <strong>WAP</strong>-<strong>V6000</strong> and to your TV.<br />
5. The Power cords for <strong>WAP</strong>-<strong>V6000</strong> and your TV are securely connected to a<br />
working power source.<br />
Unstable Display with 1080p24 films<br />
For some video film which is with 24 frames per second, you may see poor quality<br />
on the display. Please select 1080p24 as the TV output mode, and make sure your<br />
TV set support 1080p24 before the trial.<br />
No Audio Output with films with DTS encoded audio track.<br />
<strong>WAP</strong>-<strong>V6000</strong> does not decode audio with DTS format, but pass through to S/PDIF for<br />
external AV amplifier. For the films with DTS sound tracks, pls enable ‘Digital Audio<br />
Output’ and use an external decoder.<br />
<strong>WAP</strong>-<strong>V6000</strong> does not find my network.<br />
If you use wireless networks, make sure that the Wireless Network Name (SSID)<br />
and the security settings of <strong>WAP</strong>-<strong>V6000</strong> and media server match exactly. If you use<br />
wired network, make sure the cable hooked correctly.<br />
78
<strong>WAP</strong>-<strong>V6000</strong> does not find the UPnP media server.<br />
1. Verify that the TwonkyMedia Server software was installed on your<br />
computer.<br />
2. Verify that <strong>WAP</strong>-<strong>V6000</strong> and the computer running the software are on the<br />
same subnet and that they can communicate with each other. In most<br />
cases, this means that the first three fields of the two IP address should be<br />
the same.<br />
3. Make sure you have setup the media server for importing media files.<br />
TwonkyMedia Server can only be seen for a short time<br />
Some firewall or antivirus software may cause failures of the UPnP communications<br />
between <strong>WAP</strong>-<strong>V6000</strong> and the Media Server. Please configure your firewall setting to<br />
allow the access of “UPnP” and Media Server.<br />
If you disable the firewall or antivirus applications while testing Media Server access,<br />
your computer is not protected! Therefore we do recommend to setup carefully.<br />
<strong>WAP</strong>-<strong>V6000</strong> does not receive a valid IP Address<br />
1. Verify that a working DHCP server is on your network. computers on the<br />
network should get IP addresses in the correct range.<br />
2. You can use a Static IP Address of there is a problem connecting to the<br />
server.<br />
3. If you are using a wireless network, verify that <strong>WAP</strong>-<strong>V6000</strong> is associated<br />
with the correct SSID, and that the WEP settings on <strong>WAP</strong>-<strong>V6000</strong> match the<br />
setting on your access point.<br />
No Subtitle when playing “mpeg2” files<br />
Please make sure to enable the “subtitle” function by press “subtitle button” every<br />
time when you are watching mpeg2 video files; also please enable this function with<br />
each mpeg2 video file that has subtitle file with it.<br />
No Subtitle when playing “mpeg2” files after pressing “subtitle” button<br />
Please make sure the conversation of the mpeg2 video file has begun before<br />
pressing “subtitle” button.<br />
No Subtitle when playing “mpeg2” files<br />
Please note if you have enabled the “Transcoding” function, the subtitle function<br />
might not work for some video files.<br />
79
Fast forward or slow forward is not working<br />
Please note if you have enabled the “Transcoding” function, the “fast forward”, “fast<br />
backward”, “slow forward”, and “slow backward” functions will not work due to<br />
limitation.<br />
Can not add music files to BGM list?<br />
Please make sure you did not add more than 500 music files to BGM list since the<br />
capacity of BGM list is 500 files.<br />
Can not find Firmware Upgrade file in the USB device<br />
Please check if you put the latest firmware file under root directory of USB device, or<br />
<strong>WAP</strong>-<strong>V6000</strong> system can not find it.<br />
Top cover can not be disassembled to install an HDD.<br />
Please make sure all four screws are completed loosen and taken away from the<br />
screw holes.<br />
Performance of video playing is irregular<br />
If you use wireless connection, the playing performance can be affected by the<br />
wireless environment, you may try to enable the “Transcoding” function to make the<br />
video playing smoother.<br />
External Enclosure USB HDD is not detected<br />
External Enclodue USB HDD may require too high current from USB port. In such a<br />
case please use an external power supply for the External Enclosure USB HDD.<br />
80
Advice on location, care and safety<br />
● To connect your <strong>WAP</strong>-<strong>V6000</strong> with power supply system, please make sure<br />
to have a socket close to your sound-system.<br />
● If the <strong>WAP</strong>-<strong>V6000</strong> is not in use for a longer period of time, be sure that the<br />
power source is disconnected from your system.<br />
● Do not use alcohol, benzene, thinner or acids to clean the cabinet.<br />
● Do not place your <strong>WAP</strong>-<strong>V6000</strong> near radiators, airconditioning or radiocontrolled<br />
systems.<br />
● Avoid leaving the <strong>WAP</strong>-<strong>V6000</strong> in permanent strain such as direct sunlight,<br />
extreme moist or dryness, exeptional cold or heat, mechanical vibrations or<br />
shock.<br />
● Do not touch the player with bare hands if the built-in battery is leaking. In<br />
this case, contact service center for help since the liquid may remain in the<br />
player. If your body or clothes has been contacted with the battery liquid,<br />
wash it off thoroughly with water. Also, if some of liquid gets into your eyes,<br />
do not rub your eyes but immediately wash them with clean water, and<br />
consult a doctor.<br />
● Never use the player while driving a car or using other vehicles to avoid<br />
traffic accidents. This is also content of the law of some countries. Even<br />
while walking it may be dangerous especially when crossing the street.<br />
● Hearing experts' advice against the constant use of personal stereos played<br />
at high volume. Constant exposure to high volumes can lead to hearing<br />
loss. If you should experience ringing in the ears or hearing loss,<br />
discontinue use and seek medical advice.<br />
● Never disconnect the player from computer during downloading, uploading<br />
and formatting to avoid failures and losses of data.<br />
● Only use batteries, charging adapters, and accessories which were<br />
approved from <strong>TEAC</strong> for using it with a certain device model. Using other<br />
types of equipment may void the approval for use, and/or warranty claims.<br />
Furthermore there may be dangerous implications. Please ask in case your<br />
vendor for approved accessories.<br />
● Supplied or connected to units cabling is subject to wearout. Especially<br />
carrying it in trouser pockets or other insufficient carrying cases, bending it,<br />
strong pulling, or buckling it, may lead to premature failure and to damages.<br />
Please ensure correct handling and keep the cabling carefully furled in<br />
cases which will void stresses to it. Whenever cables are disconnected<br />
never pull the cable. Pull the plug instead.<br />
● The supplied batteries are subject to wearout. Their capacity and therefore<br />
their life time depend on the number of charge/decharge cycles. And even<br />
without using them there is a deterioration of capacity. Changes in<br />
temperature like high or low temperatures, mechanical stress (like dropping<br />
81
down) or other environmental influences may reduce the capacity of the<br />
batteries. So use batteries within the limits of the specification only and take<br />
them out of the device, if it is not used for a longer period of time or run<br />
from wall outlet.<br />
● Prior to take batteries out of the unit, you have to switch off the device and<br />
disconnect it from the charging adapter. Check charging adapters for their<br />
model number prior using it for charging the device.<br />
● Avoid losses of data by regularly making backups of your data.<br />
● Do not open the cabinet, contact qualified personnel only.<br />
● For service staff: Never open cabinet, when speaker system is connected to<br />
230 V AC power supply system.<br />
● CAUTION !! Power ON / OFF switch does not separate mains power!<br />
● Deliberate harm to the equipment is not covered by the guarantee.<br />
● Please contact your dealer in case of technical problems.<br />
82
Specifications:<br />
● Wireless AV Player with infrared (IR) remote control<br />
● On/Standby, Volume and all control funktions driven by remote control<br />
● Battery case for 2x AAA-Batteries<br />
● LC-Display and navigation buttons on main unit for funktions control and<br />
audio playback without TV screen<br />
● User interface language selection: GB, D, F, I, E, P, TR, NL, SRB, HE, CN.<br />
● Playback sources: optional Harddisk (internal, SATA), USB, Lan, Wlan.<br />
● Video: output up to 1080p, quick search via forward or percentage jump<br />
function, automatic play of files in order.<br />
● Formats: DivX3,4,5-SD/HD,6-SD/HD, H264, MPG, MP4, MOV, AVI, TS,<br />
DAT, VOB, WMV, ASF, ISO, IFO, MKV (Matroska), DVD menu, subtitle.<br />
● Audio: with track info (ID3 Tags, Albumcover, Filename etc.)<br />
● Track search during running music playback!<br />
● Formats: AAC, MP4, M4P, AC3, DTS (passthough), WAV, PCM, MP3 (ID3),<br />
MP3pro, WMA (voice, Lossless, Pro), ASF, Flac, FLAC 24/96.<br />
● Photo: Zoom-/Rotate funktions, Diashow with background music (BGM)!<br />
● Formats: BMP, JPG/JPEG/JPE (EXIF), JPEG2000, TIF/TIFF (EXIF), GIF,<br />
PNG, WDP, HDP.<br />
● Network: access by NFS, Windows resources (SMB), UPnP-Mediaservers.<br />
● Internet: Web-Browser, Download-Torrent, Internet-Radio: z.B. Live365,<br />
Internet-Video: e.g. YouTube, Internet-Photo and many more.<br />
● Connections: Audio: Line Out, S/PDIF digital output optical+coaxial; Video:<br />
Composite, HDMI 1.1; USB: USB 2.0 at Front/Rear (2x), supports FAT32<br />
and NTFS file systems; Network: Ethernet, Wlan (802.11b-11n up to<br />
300Mbps).<br />
● Frequency range: 20 - 20.000 Hz, S/N > 95 dB<br />
● Mains: 110-230 Volt ~ 50/60 Hz, Standby consumption 5 W (230 V)<br />
● Dimensions: Wireless AV Player: 192 x 180 x 62 mm<br />
IR remote control: 220 x 43 x 22 mm<br />
● Accessories (inkl.): Installations CD with Twonkymedia UPnP-Mediaserver,<br />
Audio/Video- and HDMI- and internal HDD Sata/power cablesl.<br />
● System requirements: internal SATA harddisk (optional) or USB storage or<br />
network connection Lan/Wlan; audiosystem Stereo/Surround; Video-Display<br />
with Composite/HDMI Input.<br />
83
CE – Declaration of conformity<br />
We herewith declare, the <strong>TEAC</strong> media systems <strong>WAP</strong>-<strong>V6000</strong> wireless audio player<br />
complies with the following norms or normative documents:<br />
EMC directive 1999/5/EC<br />
ETSI EN 301 489-1 V1.6.1:2005, ETSI EN 301 489-17 V1.2.1:2002;<br />
EN 55022:2006: EN 61000-3-2:2006, EN 61000-3-3:1995 + A1:2001 + A2:20,<br />
EN 61000-4-2:1995 + A1:1998 + A2:20, EN 61000-4-3:2002 + A1:2002,<br />
EN 61000-4-4:2004, EN 61000-4-5:1995 + A1:2001,<br />
EN 61000-4-6:1996 + A1:2001, EN 61000-4-11:2004;<br />
ETSI EN 300 328 V1.7.1:2006;<br />
EN 55024:1998 + A1:2001 + A2:2003, EN 61000-3-2:2006,<br />
EN 61000-3-3:1995 + A1:2001 + A2:2005, IEC 61000-4-2:1995 + A1:1998 + A2:2000,<br />
IEC 61000-4-3:2002 + A1:2002, IEC 61000-4-4:2004,IEC 61000-4-5:1995 + A1:2000,<br />
IEC 61000-4-6:1996 + A1:2000, IEC 61000-4-8:1993 + A1:2000, IEC 61000-4-11:2004<br />
LVD directive 2006/95/EC<br />
EN 60950-1: 2001+A11<br />
This statement is based on the test reports of an EMV - laboratory.<br />
All texts and illustrations were produced with greatest care. <strong>TEAC</strong> media systems<br />
cannot however accept any legal or other responsibility for any remaining incorrect<br />
information and its consequences.<br />
Changes in specifications and features may be made without notice or obligation<br />
Company and product names provided herein are trademarks of their respective<br />
companies.ve owners. Contents, designs and specifications may change without<br />
notice.<br />
In case there is audible noise, possibly caused be strong radio waves (e.g. by<br />
mobile phones) we recommend to turn down the volume control of the unit.<br />
If you have special questions to the product and cannot find a solution in this<br />
introduction, you can look for more informations at our homepage Thank you!<br />
www.teac.de<br />
Notes on WEEE<br />
The device may not be disposed of w ith household rubbish. This appliance is<br />
labelled in accordance w ith <strong>Europe</strong>an Directive 2002/96/EG concerning used<br />
electrical and electronic appliances (w aste electrical and electronic equipment -<br />
WEEE). The guideline determines the framew ork for the return and recycling of<br />
used appliances as applicable throughout the EU. To return your used device,<br />
please use the return and collection systems available to you.<br />
84