- Page 1:
Upload by mohaa99 (show some respe
- Page 4 and 5:
More Praise for Head First HTML wit
- Page 6 and 7:
Other related books from O’Reilly
- Page 8 and 9:
Head First HTML with CSS and XHTML
- Page 10 and 11:
the authors Authors of Head First H
- Page 12 and 13:
table of contents x 1 The No pressu
- Page 14 and 15:
table of contents xii h2 img h2 h2
- Page 16 and 17:
table of contents xiv Here’s a lo
- Page 18 and 19:
table of contents xvi 7 Putting I l
- Page 20 and 21:
table of contents 1 0 3 2 xviii 4 5
- Page 22 and 23:
table of contents xx Weekly Elixir
- Page 24 and 25:
table of contents xxii 13 tables an
- Page 26 and 27:
table of contents xxiv 15 The i Ind
- Page 28 and 29:
how to use this book Who is this bo
- Page 30 and 31:
how to use this book xxviii intro W
- Page 32 and 33:
how to use this book Here’s what
- Page 34 and 35:
how to use this book Read Me This i
- Page 36 and 37:
the review team Tech Reviewers Lous
- Page 39 and 40:
1 getting to know HTML The Language
- Page 41 and 42:
What does the Web server do? Web se
- Page 43 and 44:
What the browser creates... When th
- Page 45 and 46:
Sharpen your pencil You’re closer
- Page 47 and 48:
Your big break at Starbuzz Coffee S
- Page 49 and 50:
Creating the Starbuzz Web page Of c
- Page 51 and 52:
Step four: Change your TextEdit Pre
- Page 53 and 54:
Step two: Open Notepad Once you’v
- Page 55 and 56:
Meanwhile, back at Starbuzz Coffee.
- Page 57 and 58:
Opening your Web page in a browser
- Page 59 and 60:
Starbuzz Coffee Beverages House
- Page 61 and 62:
Are we there yet? You have an HTML
- Page 63 and 64:
Tags dissected... Okay, you’ve se
- Page 65 and 66:
Exercise Starbuzz Coffee’s Missio
- Page 67 and 68:
Meet the style element To add style
- Page 69 and 70:
Cruisin’ with style... It’s tim
- Page 71 and 72:
Exercise Now that you’ve put a li
- Page 73 and 74:
HTML CSS Right. In fact we’re tot
- Page 75 and 76:
6 6 15 6 6 15 14 Across HTMLcross I
- Page 77 and 78:
Starbuzz Coffee Beverage
- Page 79 and 80:
Exercise Solutions Starbuzz Coffe
- Page 81 and 82:
2 going further, with hypertext Mee
- Page 83 and 84:
elixir.html A page listing some ref
- Page 85 and 86:
2 3 Edit lounge.html Open “lounge
- Page 87 and 88:
What does the browser do? 1 First,
- Page 89 and 90:
Understanding attributes Attributes
- Page 91 and 92:
Attributes Exposed This week’s in
- Page 93 and 94:
Label Destination What you write in
- Page 95 and 96:
Organizing the lounge... Let’s gi
- Page 97 and 98:
I think the problem is that the bro
- Page 99 and 100:
3 4 Trace a path from the source to
- Page 101 and 102:
Going the other way; linking up int
- Page 103 and 104:
Q: What’s a parent folder? If I h
- Page 105 and 106:
Finding the path from “elixir.htm
- Page 107 and 108:
BULLET POINTS When you want to lin
- Page 109 and 110:
It’s time for the competition to
- Page 111 and 112:
Exercise Solutions Head First Lou
- Page 113 and 114:
Sharpen your pencil Solution “abo
- Page 115 and 116:
3 building blocks We better find so
- Page 117 and 118:
From Journal to Web site, at 12mph
- Page 119 and 120:
From a sketch to an outline Now tha
- Page 121 and 122:
Don’t forget, you always need the
- Page 123 and 124:
Adding some new elements You have t
- Page 125 and 126:
Wait a sec... you removed the doubl
- Page 127 and 128:
Five-Minute Mystery The Case of the
- Page 129 and 130:
Adding a Let’s get a into Tony
- Page 131 and 132:
Solved: The Case of the Elements Se
- Page 133 and 134:
there are no Dumb Questions Q: I th
- Page 135 and 136:
Inline Block Well, a lot of people
- Page 137 and 138:
Exercise Here’s what the changes
- Page 139 and 140:
Q: So, the only purpose of is to i
- Page 141 and 142:
Remember, it’s important to use t
- Page 143 and 144:
Step Two: Enclose your list items w
- Page 145 and 146:
Exercise Here’s another list from
- Page 147 and 148:
Putting one element inside anoth
- Page 149 and 150:
Using nesting to make sure your tag
- Page 151 and 152:
A bunch of HTML elements, in full c
- Page 153 and 154:
Q: Wow, I never knew the browser co
- Page 155 and 156:
BULLET POINTS n n n Rockin’ page.
- Page 157 and 158:
Exercise Solutions Here’s the rew
- Page 159 and 160:
Top 100 Top 100 Dark Side of the
- Page 161:
Exercise Solutions 9 L 7 B Across 4
- Page 164 and 165:
getting on the web Getting Starbuzz
- Page 166 and 167:
what’s the goal A Web Detour HELL
- Page 168 and 169:
what’s the goal A Web Detour Movi
- Page 170 and 171:
what’s the goal A Web Detour As m
- Page 172 and 173:
A Web Detour Q: My hosting company
- Page 174 and 175:
uniform resource locators Mainstree
- Page 176 and 177:
absolute paths to your files What
- Page 178 and 179:
easier urls 140 Chapter 4 I’d lik
- Page 180 and 181:
142 Chapter 4 Earl needs a little h
- Page 182 and 183:
linking to other web pages How do w
- Page 184 and 185:
testing those links And now for the
- Page 186 and 187:
time for a little mystery Five-Minu
- Page 188 and 189:
est practices for your links The ti
- Page 190 and 191:
creating destinations Using the el
- Page 192 and 193:
linking to a destination anchor Now
- Page 194 and 195:
case solved, its all about relative
- Page 196 and 197:
targeting windows Opening a new win
- Page 198 and 199:
a little brain crossover 160 Chapte
- Page 200 and 201:
exercise solutions Sharpen your pen
- Page 202 and 203:
exercise solutions Exercise Solutio
- Page 204 and 205:
images in your html How the browser
- Page 206 and 207:
how browsers load images 3 4 Having
- Page 208 and 209:
differences between gif and jpeg He
- Page 210 and 211:
when to use gif or jpeg 172 Chapter
- Page 212 and 213:
using urls with images : it’s not
- Page 214 and 215:
use the alt attribute for accessibi
- Page 216 and 217:
a fan site for ipods Creating the u
- Page 218 and 219:
inserting an image Sharpen your pen
- Page 220 and 221:
all about image sizes Q: What’s w
- Page 222 and 223:
choosing a photo editor 184 Chapter
- Page 224 and 225:
esizing an image Resizing the image
- Page 226 and 227:
using save for web As you can see,
- Page 228 and 229:
image saving and quality Save the i
- Page 230 and 231:
comparing image settings d 192 Chap
- Page 232 and 233:
viewing mypod with resized images T
- Page 234 and 235:
using thumbnail images Create the t
- Page 236 and 237:
images and layout Take myPod for an
- Page 238 and 239:
adding individual image pages Creat
- Page 240 and 241:
adding links to images Add the imag
- Page 242 and 243:
adding a logo 204 Chapter 5 The myP
- Page 244 and 245:
choosing between gif and jpeg What
- Page 246 and 247:
creating a transparent gif Save the
- Page 248 and 249:
setting a matte color Set the matte
- Page 250 and 251:
testing the transparent gif And now
- Page 252 and 253:
eview using images with html 214 Ch
- Page 254 and 255:
exercise solutions 216 Chapter 5 Ex
- Page 256 and 257:
exercise solutions Exercise Solutio
- Page 258 and 259:
exercise solutions Exercise Solutio
- Page 261 and 262:
6 standards, compliance, and all th
- Page 263 and 264:
standards, compliance, and all that
- Page 265 and 266:
HTML 4.01 Ah, the good life. HTML 4
- Page 267 and 268:
We can’t have your pages putting
- Page 269 and 270:
Okay, I think we’ve got it now. L
- Page 271 and 272:
See, piece of cake. The DOCTYPE is
- Page 273 and 274:
Validating the Head First Lounge We
- Page 275 and 276:
Fixing that error Okay, this looks
- Page 277 and 278:
See, we’re getting this error mes
- Page 279 and 280:
Making the validator (and more than
- Page 281 and 282:
Okay, it’s been more than a “fe
- Page 283 and 284:
I think we’ve been pretty darn st
- Page 285 and 286:
Do we have validation? standards, c
- Page 287 and 288:
Fixing the nesting problem So it lo
- Page 289 and 290:
Q: Okay, I think I get all this, an
- Page 291 and 292: Webville Guide to Strict HTML 4.01
- Page 293 and 294: there are no Dumb Questions Q: That
- Page 295 and 296: Transitional Strict So, you’re ju
- Page 297 and 298: Webville Forecast standards, com
- Page 299 and 300: BULLET POINTS n HTML 4.01 is the HT
- Page 301 and 302: Exercise Solutions standards, co
- Page 303 and 304: 7 moving to XHTML Putting an ‘X
- Page 305 and 306: What is XML? Okay, we’re going to
- Page 307 and 308: I don’t get it. We changed the DO
- Page 309 and 310: XHTML is becoming the language of c
- Page 311 and 312: If my HTML is transitional 4.01, an
- Page 313 and 314: 3 All empty tags should end in “
- Page 315 and 316: Validation: it’s not just for HTM
- Page 317 and 318: XHTML sounds like a good thing. Is
- Page 319 and 320: HTML XHTML You’re forgetting a fe
- Page 321 and 322: Across Micro XHTMLcross It’s been
- Page 323 and 324: 8 getting started with CSS Don’t
- Page 325 and 326: getting started with css you are he
- Page 327 and 328: Using CSS with XHTML We’re sure C
- Page 329 and 330: Getting CSS into your XHTML Okay, y
- Page 331 and 332: Cruising with style: the test drive
- Page 333 and 334: Let’s put a line under the welcom
- Page 335 and 336: Q: So how does that work when you h
- Page 337 and 338: getting started with css Head F
- Page 339 and 340: Sharpen your pencil Color in the el
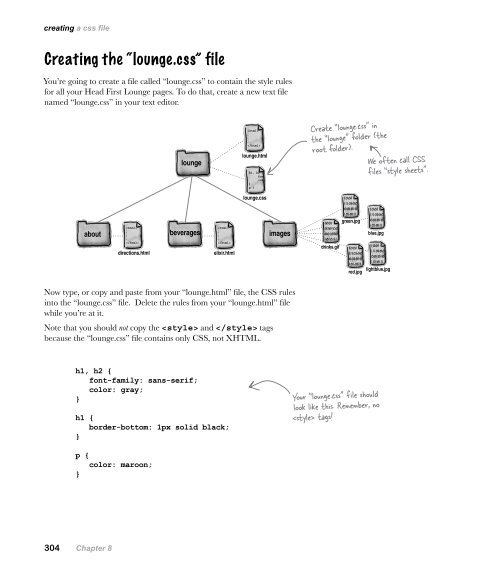
- Page 341: Getting the Lounge style into the e
- Page 345 and 346: Test driving the entire lounge... S
- Page 347 and 348: Sharpen your pencil Now that you’
- Page 349 and 350: It’s time to talk about your inhe
- Page 351 and 352: Test drive your new CSS As usual, g
- Page 353 and 354: Test drive Add a rule for the elem
- Page 355 and 356: Adding a class to “elixir.html”
- Page 357 and 358: A greentea test drive Save, and the
- Page 359 and 360: Cool! Yes, that works. One more que
- Page 361 and 362: And if we still don’t have a clea
- Page 363 and 364: CSS XHTML You have to admit XHTML i
- Page 365 and 366: If you have errors in your CSS, usu
- Page 367 and 368: Making sure the Lounge CSS validate
- Page 369 and 370: BULLET POINTS n n n CSS contains si
- Page 371 and 372: Markup Magnets Solution Remember dr
- Page 373 and 374: ody { } font-family: sans-serif; h1
- Page 375 and 376: Who gets the inheritance? h1 and h2
- Page 377: Exercise Solutions 2 S 11 L E R 3 1
- Page 380 and 381: common text properties Text and fon
- Page 382 and 383: overview of font families What is a
- Page 384 and 385: develop your sense of fonts Bainbri
- Page 386 and 387: improving tony’s journal Dusting
- Page 388 and 389: some fonts questions Test driving T
- Page 390 and 391: how to specify font sizes Adjusting
- Page 392 and 393:
using keywords for size 354 Chapter
- Page 394 and 395:
setting up tony’s font sizes Let
- Page 396 and 397:
some more questions on font size Q:
- Page 398 and 399:
using normal weight Test drive the
- Page 400 and 401:
using a font style Styling Tony’s
- Page 402 and 403:
overview of web colors How do Web c
- Page 404 and 405:
the color names 366 Chapter 9 Why d
- Page 406 and 407:
using rgb values Specify color in r
- Page 408 and 409:
understanding hex codes The two min
- Page 410 and 411:
using a photo editor for web colors
- Page 412 and 413:
put your hex skills to the test 374
- Page 414 and 415:
testing and more hex colors Test dr
- Page 416 and 417:
using a border instead of an underl
- Page 418 and 419:
a crossword on color 380 Chapter 9
- Page 420 and 421:
exercise solutions 382 Chapter 9 Cr
- Page 423 and 424:
10 the box model Getting Intimate w
- Page 425 and 426:
The music CDs and artists are style
- Page 427 and 428:
A very quick test drive Let’s do
- Page 429 and 430:
Getting ready for some major renova
- Page 431 and 432:
What is the border? Elements can ha
- Page 433 and 434:
Padding Margins Our guarantee: at t
- Page 435 and 436:
Meanwhile back at the lounge... We
- Page 437 and 438:
Creating the guarantee style Let’
- Page 439 and 440:
Padding, border, and margins for th
- Page 441 and 442:
A test drive with the margin When y
- Page 443 and 444:
Wait a sec, it seems like we have t
- Page 445 and 446:
Fixing the background image By defa
- Page 447 and 448:
Are we there yet? Make sure you sav
- Page 449 and 450:
Border Width The border-width prope
- Page 451 and 452:
Congratulations! Bravo! You’ve ta
- Page 453 and 454:
Head First: An id attribute? I thou
- Page 455 and 456:
But how do I use id in CSS? You sel
- Page 457 and 458:
Step Three: save your changes and r
- Page 459 and 460:
Using multiple style sheets So how
- Page 461 and 462:
Q: That’s pretty cool. So I can s
- Page 463 and 464:
XHTMLcross the box model You’re r
- Page 465 and 466:
Sharpen your pencil Solution Left m
- Page 467 and 468:
11 divs and spans Advanced Web Cons
- Page 469 and 470:
A close look at the elixirs XHTML A
- Page 471 and 472:
Let’s explore how we can divide a
- Page 473 and 474:
? brain power On a referral from th
- Page 475 and 476:
Q: So, a acts like a container tha
- Page 477 and 478:
Taking the for a test drive That w
- Page 479 and 480:
Adding some real style to the elixi
- Page 481 and 482:
Test driving the width Next, save t
- Page 483 and 484:
Well then how do we specify the wid
- Page 485 and 486:
Adding the basic styles to the elix
- Page 487 and 488:
That’s interesting because I noti
- Page 489 and 490:
We’re almost there... We’re clo
- Page 491 and 492:
What we need is a way to select des
- Page 493 and 494:
Changing the color of the elixir he
- Page 495 and 496:
Look what you’ve accomplished...
- Page 497 and 498:
But there’s more... Here’s anot
- Page 499 and 500:
there are no Dumb Questions Q: Shou
- Page 501 and 502:
Jim I was thinking we could just wr
- Page 503 and 504:
Step three: styling the s Before we
- Page 505 and 506:
Hey guys, I know you think you’re
- Page 507 and 508:
How can you style elements based on
- Page 509 and 510:
Putting those pseudo-classes to wor
- Page 511 and 512:
Isn’t it about time we talk about
- Page 513 and 514:
The cascade For this exercise, you
- Page 515 and 516:
Q: What makes a specificity number
- Page 517 and 518:
Step five: Finally, sort any confli
- Page 519 and 520:
Super brain power ?This is a specia
- Page 521 and 522:
Sharpen your pencil Solution h1 Her
- Page 523 and 524:
Sharpen your pencil Solution Your j
- Page 525 and 526:
12 layout and positioning Arranging
- Page 527 and 528:
Use the flow, Luke The Flow is what
- Page 529 and 530:
What about inline elements? So you
- Page 531 and 532:
One more thing you should know abou
- Page 533 and 534:
How to float an element Let’s ste
- Page 535 and 536:
Behind the scenes at the lounge Now
- Page 537 and 538:
The new Starbuzz Let’s take a qui
- Page 539 and 540:
layout and positioning from at
- Page 541 and 542:
a:link { color: #b76666; text-decor
- Page 543 and 544:
I have an idea. In the future, why
- Page 545 and 546:
Fixing the two-column problem Are y
- Page 547 and 548:
Test drive As usual, save your “s
- Page 549 and 550:
Back to clearing up the overlap pro
- Page 551 and 552:
Q: Do margins collapse on floated e
- Page 553 and 554:
Step One: start with the sidebar We
- Page 555 and 556:
Liquid and Frozen Designs All the d
- Page 557 and 558:
Test driving with a tank of jello A
- Page 559 and 560:
Another example of absolute positio
- Page 561 and 562:
Using absolute positioning We’re
- Page 563 and 564:
Time for the absolute test drive Ma
- Page 565 and 566:
One tradeoff you can make to fix th
- Page 567 and 568:
Positioning the award We want the a
- Page 569 and 570:
Float Absolute layout and positioni
- Page 571 and 572:
Sharpen your pencil Time to put all
- Page 573 and 574:
How does fixed positioning work? Co
- Page 575 and 576:
Putting the coupon on the page Add
- Page 577 and 578:
Getting relative This is it, the la
- Page 579 and 580:
To three-columns and beyond... Whil
- Page 581 and 582:
XHTMLcross layout and positioning T
- Page 583 and 584:
Exercise Solutions Sharpen your pen
- Page 585:
Solution 12 F 5 J 1 V 2 F 3 Z 4 C I
- Page 588 and 589:
something new from tony 550 Chapter
- Page 590 and 591:
an xhtml table How to create a tabl
- Page 592 and 593:
tables up close Tables dissected Yo
- Page 594 and 595:
testing you on tables Artist Album
- Page 596 and 597:
checking out the unstyled table Tes
- Page 598 and 599:
tables and style Now let’s style
- Page 600 and 601:
cells and the box model 562 Chapter
- Page 602 and 603:
dealing with table borders Getting
- Page 604 and 605:
coloring cells How about some color
- Page 606 and 607:
using table spans Another look at T
- Page 608 and 609:
testing your table knowledge 570 Ch
- Page 610 and 611:
we need a nested table Four out of
- Page 612 and 613:
testing and improvements Test drivi
- Page 614 and 615:
how to override nested styles Overr
- Page 616 and 617:
ack to styling lists Giving the lis
- Page 618 and 619:
some finer points about styling lis
- Page 620 and 621:
some left brain action 582 Chapter
- Page 622 and 623:
exercise solutions Exercise Solutio
- Page 624 and 625:
exercise solutions Sharpen your pen
- Page 626 and 627:
exercise solutions 588 Chapter 13 J
- Page 628 and 629:
exercise solutions 1 S 590 Chapter
- Page 630 and 631:
owsers and forms How forms work If
- Page 632 and 633:
how to write a form What you write
- Page 634 and 635:
the form element How the form eleme
- Page 636 and 637:
overview of form elements What can
- Page 638 and 639:
more form elements What can go in a
- Page 640 and 641:
the bean machine Here’s what the
- Page 642 and 643:
creating the form Getting ready to
- Page 644 and 645:
form element names How form element
- Page 646 and 647:
adding input elements Back to getti
- Page 648 and 649:
using a select Adding the element
- Page 650 and 651:
providing choices ? brain power Cha
- Page 652 and 653:
adding checkboxes Exercise 614 Chap
- Page 654 and 655:
successful submission The final tes
- Page 656 and 657:
match the form names Your informat
- Page 658 and 659:
form methods: get and post POST GET
- Page 660 and 661:
test yourself, get and post Sharpen
- Page 662 and 663:
tabular versus presentation 624 Cha
- Page 664 and 665:
deciding how to style forms To Tabl
- Page 666 and 667:
the xhtml, continued Ship to: N
- Page 668 and 669:
styling the form Styling the form a
- Page 670 and 671:
other form elements What more could
- Page 672 and 673:
eview of forms 634 Chapter 14 BULLE
- Page 674 and 675:
exercise solutions 636 Chapter 14 S
- Page 676 and 677:
the end 638 Chapter 14 Congratulati
- Page 678 and 679:
specialized selectors #1 More Selec
- Page 680 and 681:
splitting your pages #2 Frames HTML
- Page 682 and 683:
web tools #4 Tools for Creating Web
- Page 684 and 685:
generating pages #6 Server-side Scr
- Page 686 and 687:
etter printing with css #8 More abo
- Page 688 and 689:
etter looking blogs #10 Blogs Weblo
- Page 690 and 691:
the index block elements flow 488-4
- Page 692 and 693:
the index CSS (continued) using wit
- Page 694 and 695:
the index forms (continued) picking
- Page 696 and 697:
the index images (continued) users
- Page 698 and 699:
the index No Dumb Questions !import
- Page 700 and 701:
the index passwords in forms 633 PD
- Page 702 and 703:
the index spanning rows and columns
- Page 704 and 705:
the index text, font size (continue


