Operating Manual - Winkhaus
Operating Manual - Winkhaus
Operating Manual - Winkhaus

Create successful ePaper yourself
Turn your PDF publications into a flip-book with our unique Google optimized e-Paper software.
<strong>Operating</strong> <strong>Manual</strong> EAV 19<br />
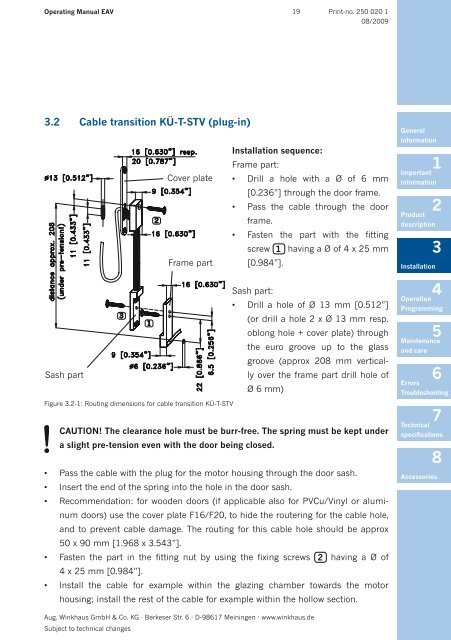
3.2 Cable transition KÜ-T-STV (plug-in)<br />
∅13 [0.512"]<br />
distance approx. 208<br />
(under pre-tension!)<br />
11 [0.433"]<br />
Sash part<br />
11 [0.433"]<br />
3<br />
16 [0.630"] resp.<br />
20 [0.787"]<br />
Figure 3.2-1: Routing dimensions for cable transition KÜ-T-STV<br />
1<br />
2<br />
9 [0.354"]<br />
∅6 [0.236"]<br />
Cover plate<br />
9 [0.354"]<br />
16 [0.630"]<br />
Frame part<br />
16 [0.630"]<br />
Aug. <strong>Winkhaus</strong> GmbH & Co. KG · Berkeser Str. 6 · D-98617 Meiningen · www.winkhaus.de<br />
Subject to technical changes<br />
22 [0.866"]<br />
6.5 [0.256"]<br />
Print-no. 250 020 1<br />
08/2009<br />
Installation sequence:<br />
Frame part:<br />
• Drill a hole with a Ø of 6 mm<br />
[0.236”] through the door frame.<br />
• Pass the cable through the door<br />
frame.<br />
• Fasten the part with the fitting<br />
screw 1 having a Ø of 4 x 25 mm<br />
[0.984”].<br />
Sash part:<br />
• Drill a hole of Ø 13 mm [0.512”]<br />
(or drill a hole 2 x Ø 13 mm resp.<br />
oblong hole + cover plate) through<br />
the euro groove up to the glass<br />
groove (approx 208 mm vertically<br />
over the frame part drill hole of<br />
Ø 6 mm)<br />
CAUTION! The clearance hole must be burr-free. The spring must be kept under<br />
a slight pre-tension even with the door being closed.<br />
• Pass the cable with the plug for the motor housing through the door sash.<br />
• Insert the end of the spring into the hole in the door sash.<br />
• Recommendation: for wooden doors (if applicable also for PVCu/Vinyl or aluminum<br />
doors) use the cover plate F16/F20, to hide the routering for the cable hole,<br />
and to prevent cable damage. The routing for this cable hole should be approx<br />
50 x 90 mm [1.968 x 3.543”].<br />
• Fasten the part in the fitting nut by using the fixing screws 2 having a Ø of<br />
4 x 25 mm [0.984”].<br />
• Install the cable for example within the glazing chamber towards the motor<br />
housing; install the rest of the cable for example within the hollow section.<br />
General<br />
information<br />
1<br />
Important<br />
information<br />
Installation<br />
2<br />
Product<br />
description<br />
3<br />
4<br />
Operation<br />
Programming<br />
5<br />
Maintenance<br />
and care<br />
6<br />
Errors<br />
Troubleshooting<br />
7<br />
Technical<br />
specifications<br />
8<br />
Accessories