Operating Manual - Winkhaus
Operating Manual - Winkhaus
Operating Manual - Winkhaus

Create successful ePaper yourself
Turn your PDF publications into a flip-book with our unique Google optimized e-Paper software.
<strong>Operating</strong> <strong>Manual</strong> EAV 29<br />
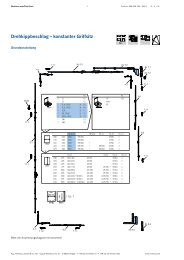
3.6 Non-<strong>Winkhaus</strong> access control system<br />
3.6.1 Non-<strong>Winkhaus</strong> access control system general<br />
Aug. <strong>Winkhaus</strong> GmbH & Co. KG · Berkeser Str. 6 · D-98617 Meiningen · www.winkhaus.de<br />
Subject to technical changes<br />
Print-no. 250 020 1<br />
08/2009<br />
Please observe the following instructions when using other than the precalled systems<br />
to control the electronic automatic locking system (e. g. transponder set, wireless remote<br />
control):<br />
• If several appliances (like access control + EAV) are operated together in the same<br />
door, you can use a common power supply with min. 1,5A for EAV additionally the<br />
power requirement of the access control system. For this you need a stabilized<br />
12V DC direct current (chapter 2: product description power supply).<br />
• Ensure that the decontrol signal takes place over a potential-free contact when<br />
using non-<strong>Winkhaus</strong> access control systems.<br />
If required use a coupling relay for realizing this.<br />
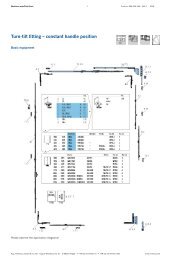
3.6.2 Non-<strong>Winkhaus</strong> access control system finger scanner ekey home<br />
integra<br />
Prerequisites for installation:<br />
• The described access control system ekey home integra have to be installed into<br />
the door sash.<br />
• If parallel to the access control another open signal (potential-free signal: e. g.<br />
„Open“ button, intercom, ...) should be used for unlocking, then it is possible via the<br />
cable transition KÜ-T-integra-EAV 1 (see figure: 3.6.1-1, detail B è connection<br />
grey/brown).<br />
Installation sequence:<br />
• Plug-in the cable of the cable transition KÜ-T-integra-EAV 1 with 8-pole plug at<br />
the control unit ekey home integra 2 (terminal X1).<br />
• Assembly connection between control unit ekey home integra 2 and finger scanner<br />
ekey home integra 3 via cable type A ekey home integra 6 with double<br />
sided plugs (terminal X3).<br />
+ NOTICE!<br />
Control unit ekey home integra, finger scanner ekey home integra,<br />
cable type A ekey home integra included in standard delivery ekey.<br />
General<br />
information<br />
1<br />
Important<br />
information<br />
Installation<br />
2<br />
Product<br />
description<br />
3<br />
4<br />
Operation<br />
Programming<br />
5<br />
Maintenance<br />
and care<br />
6<br />
Errors<br />
Troubleshooting<br />
7<br />
Technical<br />
specifications<br />
8<br />
Accessories