Operating Manual - Winkhaus
Operating Manual - Winkhaus
Operating Manual - Winkhaus

Create successful ePaper yourself
Turn your PDF publications into a flip-book with our unique Google optimized e-Paper software.
<strong>Operating</strong> <strong>Manual</strong> EAV 23<br />
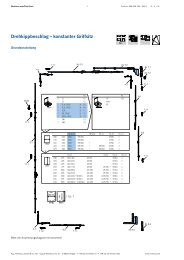
3.4 Access control system transponder set<br />
Aug. <strong>Winkhaus</strong> GmbH & Co. KG · Berkeser Str. 6 · D-98617 Meiningen · www.winkhaus.de<br />
Subject to technical changes<br />
Print-no. 250 020 1<br />
08/2009<br />
Prerequisites for installation:<br />
• The transponder signal is processed in the reader/control unit.<br />
• This unit has to be installed in a standard flush-type box inside the building (close<br />
to the door).<br />
+ NOTICE!<br />
Should you want to accommodate the control unit and button in the same<br />
flush-type box, this must have a depth of 65 mm [2.559”].<br />
• Unless you use a button beside the door, you will have to install a flush-type box<br />
with a filler panel for the reader unit.<br />
DANGER!<br />
For safety reasons, do not install it in a flush-type box with a 230 V switch or<br />
socket outlet!<br />
• The transponder antenna is located in a housing for exposed installations and is to<br />
be installed in a weatherproof zone outside the entrance door.<br />
• Do not install the antenna directly on metal as its range could be decreased drastically.<br />
• Do not install any other antenna within a radius of 1 m [1.094 yd]!<br />
+ NOTICE!<br />
If you plan installations on a metal substructure, you will have to use a wooden<br />
board and spacer bolts, if applicable, or large bore holes to ensure the<br />
proper function of the antenna! To test the scanning performance, you may<br />
have to tentatively install it on site, if applicable!<br />
• Connect the cable of the antenna to the reader/control unit.<br />
• We recommend: Lay a reserve pipe from the antenna to the reader unit.<br />
General<br />
information<br />
1<br />
Important<br />
information<br />
Installation<br />
2<br />
Product<br />
description<br />
3<br />
4<br />
Operation<br />
Programming<br />
5<br />
Maintenance<br />
and care<br />
6<br />
Errors<br />
Troubleshooting<br />
7<br />
Technical<br />
specifications<br />
8<br />
Accessories