722.6 TECHNICAL SERVICE INFORMATION
722.6 TECHNICAL SERVICE INFORMATION
722.6 TECHNICAL SERVICE INFORMATION

Create successful ePaper yourself
Turn your PDF publications into a flip-book with our unique Google optimized e-Paper software.
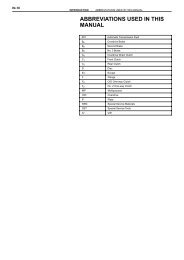
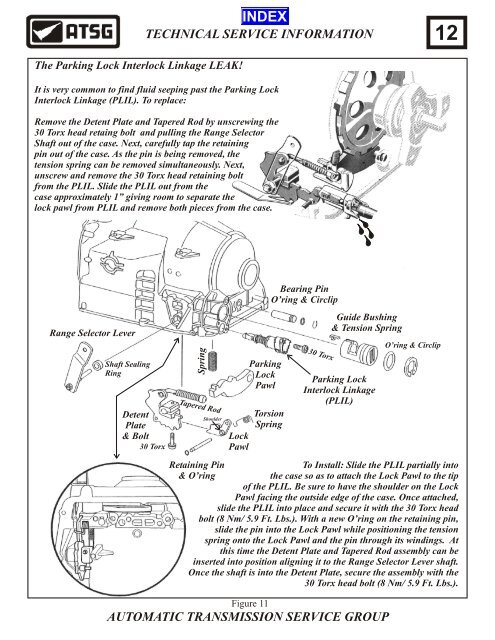
The Parking Lock Interlock Linkage LEAK!<br />
Range Selector Lever<br />
Shaft Sealing<br />
Ring<br />
<strong>TECHNICAL</strong> <strong>SERVICE</strong> <strong>INFORMATION</strong><br />
It is very common to find fluid seeping past the Parking Lock<br />
Interlock Linkage (PLIL). To replace:<br />
Remove the Detent Plate and Tapered Rod by unscrewing the<br />
30 Torx head retaing bolt and pulling the Range Selector<br />
Shaft out of the case. Next, carefully tap the retaining<br />
pin out of the case. As the pin is being removed, the<br />
tension spring can be removed simultaneously. Next,<br />
unscrew and remove the 30 Torx head retaining bolt<br />
from the PLIL. Slide the PLIL out from the<br />
case approximately 1” giving room to separate the<br />
lock pawl from PLIL and remove both pieces from the case.<br />
Spring<br />
Tapered Rod<br />
Detent<br />
Plate<br />
Shoulder<br />
& Bolt Lock<br />
30 Torx<br />
Pawl<br />
Parking<br />
Lock<br />
Pawl<br />
Torsion<br />
Spring<br />
Bearing Pin<br />
O’ring & Circlip<br />
30 Torx<br />
Guide Bushing<br />
& Tension Spring<br />
Parking Lock<br />
Interlock Linkage<br />
(PLIL)<br />
O’ring & Circlip<br />
12<br />
Retaining Pin<br />
To Install: Slide the PLIL partially into<br />
& O’ring<br />
the case so as to attach the Lock Pawl to the tip<br />
of the PLIL. Be sure to have the shoulder on the Lock<br />
Pawl facing the outside edge of the case. Once attached,<br />
slide the PLIL into place and secure it with the 30 Torx head<br />
bolt (8 Nm/ 5.9 Ft. Lbs.). With a new O’ring on the retaining pin,<br />
slide the pin into the Lock Pawl while positioning the tension<br />
spring onto the Lock Pawl and the pin through its windings. At<br />
this time the Detent Plate and Tapered Rod assembly can be<br />
inserted into position aligning it to the Range Selector Lever shaft.<br />
Once the shaft is into the Detent Plate, secure the assembly with the<br />
30 Torx head bolt (8 Nm/ 5.9 Ft. Lbs.).<br />
Figure 11<br />
AUTOMATIC TRANSMISSION <strong>SERVICE</strong> GROUP