722.6 TECHNICAL SERVICE INFORMATION
722.6 TECHNICAL SERVICE INFORMATION
722.6 TECHNICAL SERVICE INFORMATION

Create successful ePaper yourself
Turn your PDF publications into a flip-book with our unique Google optimized e-Paper software.
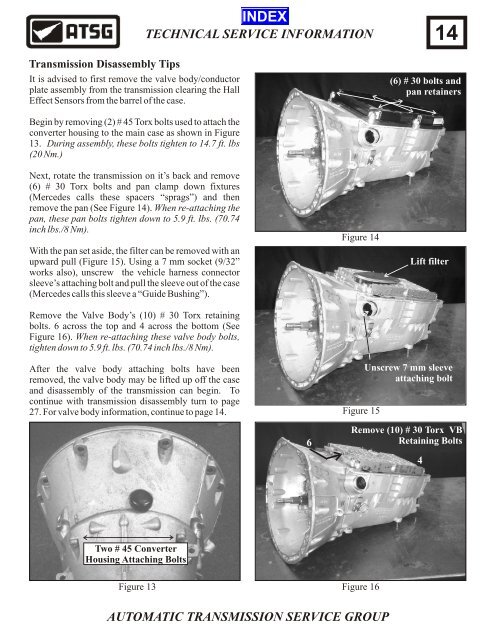
Transmission Disassembly Tips<br />
It is advised to first remove the valve body/conductor<br />
plate assembly from the transmission clearing the Hall<br />
Effect Sensors from the barrel of the case.<br />
Begin by removing (2) # 45 Torx bolts used to attach the<br />
converter housing to the main case as shown in Figure<br />
13. During assembly, these bolts tighten to 14.7 ft. lbs<br />
(20 Nm.)<br />
Next, rotate the transmission on it’s back and remove<br />
(6) # 30 Torx bolts and pan clamp down fixtures<br />
(Mercedes calls these spacers “sprags”) and then<br />
remove the pan (See Figure 14). When re-attaching the<br />
pan, these pan bolts tighten down to 5.9 ft. lbs. (70.74<br />
inch lbs./8 Nm).<br />
With the pan set aside, the filter can be removed with an<br />
upward pull (Figure 15). Using a 7 mm socket (9/32”<br />
works also), unscrew the vehicle harness connector<br />
sleeve’s attaching bolt and pull the sleeve out of the case<br />
(Mercedes calls this sleeve a “Guide Bushing”).<br />
Remove the Valve Body’s (10) # 30 Torx retaining<br />
bolts. 6 across the top and 4 across the bottom (See<br />
Figure 16). When re-attaching these valve body bolts,<br />
tighten down to 5.9 ft. lbs. (70.74 inch lbs./8 Nm).<br />
After the valve body attaching bolts have been<br />
removed, the valve body may be lifted up off the case<br />
and disassembly of the transmission can begin. To<br />
continue with transmission disassembly turn to page<br />
27. For valve body information, continue to page 14.<br />
Two # 45 Converter<br />
Housing Attaching Bolts<br />
Figure 13<br />
<strong>TECHNICAL</strong> <strong>SERVICE</strong> <strong>INFORMATION</strong><br />
6<br />
Figure 14<br />
Figure 15<br />
Remove (10) # 30 Torx VB<br />
Retaining Bolts<br />
Figure 16<br />
AUTOMATIC TRANSMISSION <strong>SERVICE</strong> GROUP<br />
4<br />
14<br />
(6) # 30 bolts and<br />
pan retainers<br />
Lift filter<br />
Unscrew 7 mm sleeve<br />
attaching bolt