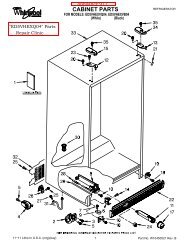
ASD2620HE Amana Refrigerator Service Manual - Appliance 911 ...
ASD2620HE Amana Refrigerator Service Manual - Appliance 911 ...
ASD2620HE Amana Refrigerator Service Manual - Appliance 911 ...

Create successful ePaper yourself
Turn your PDF publications into a flip-book with our unique Google optimized e-Paper software.
<strong>Service</strong> Procedures<br />
Refrigerant Precautions<br />
!<br />
WARNING<br />
To avoid risk of personal injury, do not allow<br />
refrigerant to contact eyes or skin.<br />
!<br />
CAUTION<br />
To avoid risk of property damage, do not use<br />
refrigerant other than that shown on unit serial<br />
number identification plate.<br />
NOTE: All precautionary measures recommended by<br />
refrigerant manufacturers and suppliers apply<br />
and should be observed.<br />
Line Piercing Valves<br />
Line piercing valves can be used for diagnosis, but<br />
are not suitable for evacuating or charging due to<br />
holes pierced in tubing by valves.<br />
NOTE: Do not leave line piercing valves on system.<br />
Connection between valve and tubing is not<br />
hermetically sealed. Leaks will occur.<br />
Open Lines<br />
During any processing of refrigeration system, never<br />
leave lines open to atmosphere. Open lines allow water<br />
vapor to enter system, making proper evacuation more<br />
difficult.<br />
Compressor Operational Test<br />
(short term testing only)<br />
If compressor voltage, capacitor, overload, and motor<br />
winding tests are successful (do not indicate a fault),<br />
perform the following test:<br />
1.Disconnect power to unit.<br />
2.Discharge capacitor by shorting capacitor<br />
terminals through a resistor.<br />
NOTE: Not all units have run capacitor.<br />
3.Remove leads from compressor terminals.<br />
4.Attach test cord to compressor windings.<br />
Common lead on test cord attaches to C terminal<br />
on compressor.<br />
Start lead on test cord attaches to S terminal on<br />
compressor.<br />
Run lead on test cord attaches to M terminal on<br />
compressor.<br />
! WARNING<br />
To avoid risk of electrical shock, personal injury, or death, disconnect electrical power source to unit, unless test<br />
procedures require power to be connected. Discharge capacitor through a 10,000 ohm resistor before attempting<br />
to service. Ensure all ground wires are connected before certifying unit as repaired and/or operational.<br />
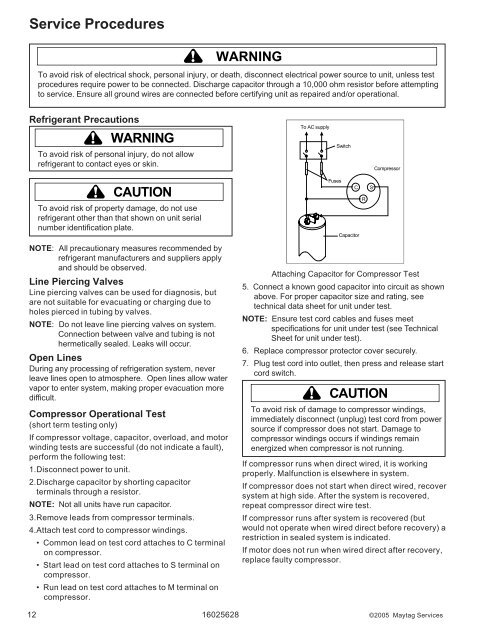
To AC supply<br />
12 16025628 ©2005 Maytag <strong>Service</strong>s<br />
Fuses<br />
Switch<br />
C<br />
Capacitor<br />
R<br />
S<br />
Compressor<br />
Attaching Capacitor for Compressor Test<br />
5. Connect a known good capacitor into circuit as shown<br />
above. For proper capacitor size and rating, see<br />
technical data sheet for unit under test.<br />
NOTE: Ensure test cord cables and fuses meet<br />
specifications for unit under test (see Technical<br />
Sheet for unit under test).<br />
6. Replace compressor protector cover securely.<br />
7. Plug test cord into outlet, then press and release start<br />
cord switch.<br />
!<br />
CAUTION<br />
To avoid risk of damage to compressor windings,<br />
immediately disconnect (unplug) test cord from power<br />
source if compressor does not start. Damage to<br />
compressor windings occurs if windings remain<br />
energized when compressor is not running.<br />
If compressor runs when direct wired, it is working<br />
properly. Malfunction is elsewhere in system.<br />
If compressor does not start when direct wired, recover<br />
system at high side. After the system is recovered,<br />
repeat compressor direct wire test.<br />
If compressor runs after system is recovered (but<br />
would not operate when wired direct before recovery) a<br />
restriction in sealed system is indicated.<br />
If motor does not run when wired direct after recovery,<br />
replace faulty compressor.