ASD2620HE Amana Refrigerator Service Manual - Appliance 911 ...
ASD2620HE Amana Refrigerator Service Manual - Appliance 911 ...
ASD2620HE Amana Refrigerator Service Manual - Appliance 911 ...

You also want an ePaper? Increase the reach of your titles
YUMPU automatically turns print PDFs into web optimized ePapers that Google loves.
Disassembly Procedures<br />
! WARNING<br />
To avoid risk of electrical shock, personal injury, or death, disconnect electrical power source to unit, unless test<br />
procedures require power to be connected. Discharge capacitor through a resistor before attempting to service.<br />
Ensure all ground wires are connected before certifying unit as repaired and/or operational.<br />
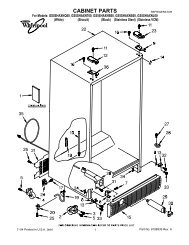
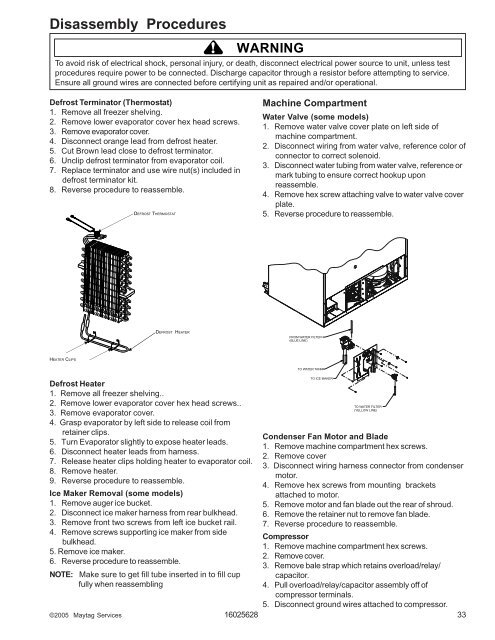
Defrost Terminator (Thermostat)<br />
1. Remove all freezer shelving.<br />
2. Remove lower evaporator cover hex head screws.<br />
3. Remove evaporator cover.<br />
4. Disconnect orange lead from defrost heater.<br />
5. Cut Brown lead close to defrost terminator.<br />
6. Unclip defrost terminator from evaporator coil.<br />
7. Replace terminator and use wire nut(s) included in<br />
defrost terminator kit.<br />
8. Reverse procedure to reassemble.<br />
HEATER CLIPS<br />
DEFROST THERMOSTAT<br />
DEFROST HEATER<br />
Defrost Heater<br />
1. Remove all freezer shelving..<br />
2. Remove lower evaporator cover hex head screws..<br />
3. Remove evaporator cover.<br />
4. Grasp evaporator by left side to release coil from<br />
retainer clips.<br />
5. Turn Evaporator slightly to expose heater leads.<br />
6. Disconnect heater leads from harness.<br />
7. Release heater clips holding heater to evaporator coil.<br />
8. Remove heater.<br />
9. Reverse procedure to reassemble.<br />
Ice Maker Removal (some models)<br />
1. Remove auger ice bucket.<br />
2. Disconnect ice maker harness from rear bulkhead.<br />
3. Remove front two screws from left ice bucket rail.<br />
4. Remove screws supporting ice maker from side<br />
bulkhead.<br />
5. Remove ice maker.<br />
6. Reverse procedure to reassemble.<br />
NOTE: Make sure to get fill tube inserted in to fill cup<br />
fully when reassembling<br />
Machine Compartment<br />
Water Valve (some models)<br />
1. Remove water valve cover plate on left side of<br />
machine compartment.<br />
2. Disconnect wiring from water valve, reference color of<br />
connector to correct solenoid.<br />
3. Disconnect water tubing from water valve, reference or<br />
mark tubing to ensure correct hookup upon<br />
reassemble.<br />
4. Remove hex screw attaching valve to water valve cover<br />
plate.<br />
5. Reverse procedure to reassemble.<br />
FROM WATER FILTER<br />
(BLUE LINE)<br />
TO WATER TANK<br />
TO ICE MAKER<br />
TO WATER FILTER<br />
(YELLOW LINE)<br />
©2005 Maytag <strong>Service</strong>s 16025628<br />
Condenser Fan Motor and Blade<br />
1. Remove machine compartment hex screws.<br />
2. Remove cover<br />
3. Disconnect wiring harness connector from condenser<br />
motor.<br />
4. Remove hex screws from mounting brackets<br />
attached to motor.<br />
5. Remove motor and fan blade out the rear of shroud.<br />
6. Remove the retainer nut to remove fan blade.<br />
7. Reverse procedure to reassemble.<br />
Compressor<br />
1. Remove machine compartment hex screws.<br />
2. Remove cover.<br />
3. Remove bale strap which retains overload/relay/<br />
capacitor.<br />
4. Pull overload/relay/capacitor assembly off of<br />
compressor terminals.<br />
5. Disconnect ground wires attached to compressor.<br />
33