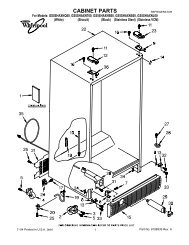
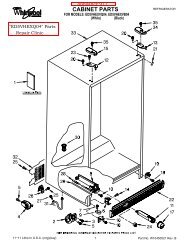
ASD2620HE Amana Refrigerator Service Manual - Appliance 911 ...
ASD2620HE Amana Refrigerator Service Manual - Appliance 911 ...
ASD2620HE Amana Refrigerator Service Manual - Appliance 911 ...

Create successful ePaper yourself
Turn your PDF publications into a flip-book with our unique Google optimized e-Paper software.
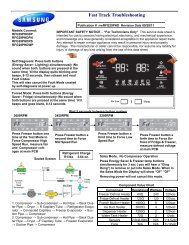
Ice ‘N Water Systems<br />
Symptom Possible<br />
Cause<br />
No LED lit Switch failure in<br />
freezer door.<br />
No dispenser<br />
light when<br />
dispenser switch<br />
is pressed in<br />
Water, Crushed<br />
or Cubed mode.<br />
Dispenser light is<br />
on without<br />
pressing the<br />
dispenser switch<br />
in Water,<br />
Crushed or<br />
Cubed mode.<br />
Water LED is<br />
illuminated but<br />
does not<br />
dispense water<br />
when dispenser<br />
switch is pressed<br />
Water starts to<br />
dispense as soon<br />
as Water mode is<br />
selected without<br />
pressing the<br />
dispenser switch<br />
Crushed LED is<br />
illuminated but<br />
does not<br />
dispense crushed<br />
ice when<br />
dispenser switch<br />
is pressed.<br />
Incorrect<br />
harness wiring.<br />
No power to<br />
the PCB.<br />
No continuity.<br />
Failed light bulb<br />
or PCB.<br />
Failed<br />
dispenser<br />
switch (failed<br />
short)<br />
Failed PCB<br />
Failed<br />
dispenser<br />
switch (failed<br />
open)<br />
Test Procedure Repair<br />
With unit powered, open freezer door. Press<br />
freezer door switch in. If freezer light does not<br />
turn off, switch is defective.<br />
Verify wire color on 9-pin connector. Refer to<br />
Table A.<br />
With unit powered, measure voltage between pin<br />
9 (WH wire) and pin 7 (VT wire) of 9-pin<br />
connector. Meter should read 120VAC.<br />
Disconnect power. Measure continuity between<br />
pin 2 (BR wire) of 9-pin connector and dispenser<br />
lamp terminal.<br />
With unit powered, press the dispenser switch.<br />
Measure voltage on pin 2 (BR wire) of 9-pin<br />
connector. Voltage should read 120VAC.<br />
Disconnect power. Remove both leads from the<br />
switch and measure resistance across switch<br />
terminals. Resistance should read less than 1 Ω<br />
in this position and higher than 10 MΩ when<br />
switch is open.<br />
With unit powered, measure voltage on pin 2<br />
(BR wire) of 9-pin connector. Voltage should<br />
read 0VAC<br />
Disconnect power. Remove both leads from the<br />
switch and measure resistance across switch<br />
terminals. Resistance should read less than 1 Ω<br />
in this position and higher than 10 MΩ when<br />
switch is open.<br />
No continuity Disconnect power. Remove the cover of freezer<br />
door hinge located on top of the unit and<br />
disconnect the connectors. Check YL wire (pin 6<br />
Failed water<br />
valve or PCB.<br />
Failed<br />
dispenser<br />
switch (failed<br />
short)<br />
Failed PCB<br />
Failed<br />
dispenser<br />
switch (failed<br />
open)<br />
No continuity<br />
Failed auger<br />
motor or PCB.<br />
of 9-pin connector) for continuity.<br />
With PCB powered, press dispenser switch.<br />
Measure voltage on pin 6 (YL wire) of 9-pin<br />
connector. Voltage should read 120VAC.<br />
Disconnect power. Remove both leads from the<br />
switch and measure resistance across switch<br />
terminals. Resistance should read less than 1 Ω<br />
in this position and higher than 10 MΩ when<br />
switch is open.<br />
With PCB powered, measure voltage on pin 6<br />
(YL wire) of 9-pin connector. Voltage should<br />
read 0 VAC.<br />
Disconnect power. Remove both leads from the<br />
switch and measure resistance across switch<br />
terminals. Resistance should read less than 1 Ω<br />
in this position and higher than 10 MΩ when<br />
switch is open.<br />
Disconnect power. Remove the cover of freezer<br />
door hinge located on top of the unit and<br />
disconnect the connectors. Check BU wire (pin 4<br />
of 9-pin connector) for continuity.<br />
With PCB powered, press dispenser switch.<br />
Measure voltage on pin 4 (BU wire) of 9-pin<br />
connector. Voltage should read 120VAC.<br />
Replace switch.<br />
Correct wiring.<br />
Replace PCB if meter<br />
reads 120VAC.<br />
Repair open connection.<br />
Replace dispenser light<br />
bulb. If not, replace PCB.<br />
Replace switch.<br />
Replace PCB.<br />
Replace switch.<br />
Repair open connection.<br />
Replace water valve if<br />
voltage reads 120VAC. If<br />
not, replace PCB.<br />
Replace switch.<br />
Replace PCB.<br />
Replace switch.<br />
Repair open connection.<br />
Replace auger motor if<br />
voltage reads 120VAC. If<br />
not, replace PCB.<br />
©2005 Maytag <strong>Service</strong>s 16025628 41