

819-0001 JUN 07.pdf - Frymaster
819-0001 JUN 07.pdf - Frymaster
819-0001 JUN 07.pdf - Frymaster

Create successful ePaper yourself
Turn your PDF publications into a flip-book with our unique Google optimized e-Paper software.
5. Reverse the procedure to install the replacement module.<br />
1.6.5 Replacing an Ignitor Assembly<br />
DANGER<br />
Drain the frypot or remove the handle from the drain valve before proceeding further.<br />
1. Disconnect the fryer from the electrical supply.<br />
2. Disconnect the ignition cable from the ignitor by grasping the boot and gently pulling toward<br />
you.<br />
3. Remove the sheet metal screw securing the ignitor to the mounting plate and pull the ignitor<br />
from the fryer.<br />
4. Reverse the procedure to install the replacement ignitor.<br />
1.6.6 Replacing or Cleaning a Combustion Air Blower<br />
A sheet metal shield or shield assembly prevents inadvertent access to the blower assembly. The<br />
specific design varies depending upon the particular configuration of the fryer and the country for<br />
which manufactured, but in all cases, the shield is attached to the cabinet framing by sheet metal<br />
screws. Remove the screws that secure the shield or shield assembly to the cabinet framing and pull<br />
the shield out of the fryer to expose the combustion air blower assembly.<br />
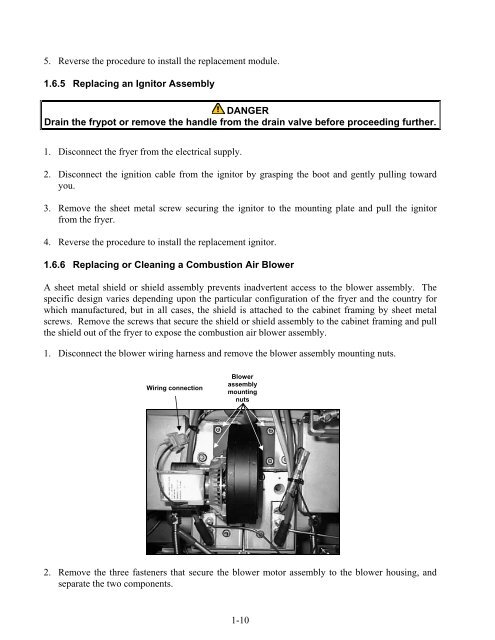
1. Disconnect the blower wiring harness and remove the blower assembly mounting nuts.<br />
Wiring connection<br />
Blower<br />
assembly<br />
mounting<br />
nuts<br />
2. Remove the three fasteners that secure the blower motor assembly to the blower housing, and<br />
separate the two components.<br />
1-10


