

Aprilia Scarabeo 4T servicemanual - Scootergrisen
Aprilia Scarabeo 4T servicemanual - Scootergrisen
Aprilia Scarabeo 4T servicemanual - Scootergrisen

Create successful ePaper yourself
Turn your PDF publications into a flip-book with our unique Google optimized e-Paper software.
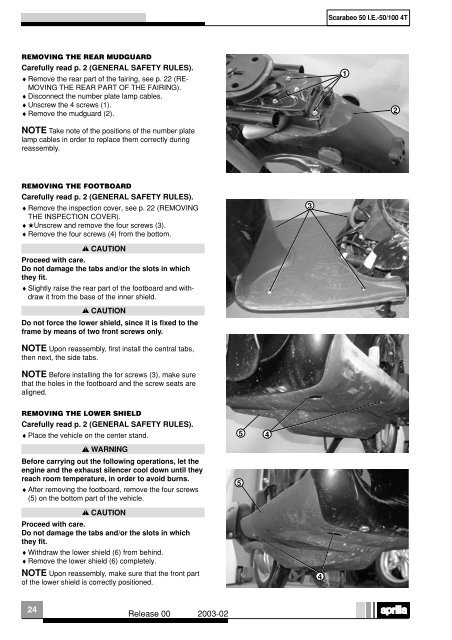
REMOVING THE REAR MUDGUARD<br />
Carefully read p. 2 (GENERAL SAFETY RULES).<br />
♦ Remove the rear part of the fairing, see p. 22 (RE-<br />
MOVING THE REAR PART OF THE FAIRING).<br />
♦ Disconnect the number plate lamp cables.<br />
♦ Unscrew the 4 screws (1).<br />
♦ Remove the mudguard (2).<br />
NOTE Take note of the positions of the number plate<br />
lamp cables in order to replace them correctly during<br />
reassembly.<br />
REMOVING THE FOOTBOARD<br />
Carefully read p. 2 (GENERAL SAFETY RULES).<br />
♦ Remove the inspection cover, see p. 22 (REMOVING<br />
THE INSPECTION COVER).<br />
♦ ★Unscrew and remove the four screws (3).<br />
♦ Remove the four screws (4) from the bottom.<br />
Proceed with care.<br />
Do not damage the tabs and/or the slots in which<br />
they fit.<br />
♦ Slightly raise the rear part of the footboard and withdraw<br />
it from the base of the inner shield.<br />
Do not force the lower shield, since it is fixed to the<br />
frame by means of two front screws only.<br />
NOTE Upon reassembly, first install the central tabs,<br />
then next, the side tabs.<br />
NOTE Before installing the for screws (3), make sure<br />
that the holes in the footboard and the screw seats are<br />
aligned.<br />
REMOVING THE LOWER SHIELD<br />
Carefully read p. 2 (GENERAL SAFETY RULES).<br />
♦ Place the vehicle on the center stand.<br />
Before carrying out the following operations, let the<br />
engine and the exhaust silencer cool down until they<br />
reach room temperature, in order to avoid burns.<br />
♦ After removing the footboard, remove the four screws<br />
(5) on the bottom part of the vehicle.<br />
Proceed with care.<br />
Do not damage the tabs and/or the slots in which<br />
they fit.<br />
♦ Withdraw the lower shield (6) from behind.<br />
♦ Remove the lower shield (6) completely.<br />
NOTE Upon reassembly, make sure that the front part<br />
of the lower shield is correctly positioned.<br />
24<br />
CAUTION<br />
CAUTION<br />
WARNING<br />
CAUTION<br />
Release 00 2003-02<br />
5 4<br />
5<br />
3<br />
4<br />
<strong>Scarabeo</strong> 50 I.E.-50/100 <strong>4T</strong><br />
1<br />
2


