- Page 1 and 2:
Ektron CMS100 User Manual Version 2
- Page 3 and 4:
EKTRON, INC. SOFTWARE LICENSE AGREE
- Page 5 and 6:
Table of Contents Using Ektron CMS1
- Page 7 and 8:
Toolbar Buttons ...................
- Page 9 and 10:
Section 508 Compliance ............
- Page 11 and 12:
Using Ektron CMS100 Using Ektron CM
- Page 13 and 14:
To Log out of Ektron CMS100 Logging
- Page 15 and 16:
When the Workarea opens, you will s
- Page 17 and 18:
The Workarea 3. When you are finish
- Page 19 and 20:
The Workarea 3. To continue, click
- Page 21 and 22:
The Workarea 1. From the workarea,
- Page 23 and 24:
Navigation Folder The Workarea Crea
- Page 25 and 26:
Navigation Toolbar The Workarea Whe
- Page 27 and 28:
3. At the add navigation page, fill
- Page 29 and 30:
The Workarea From here, you are rea
- Page 31 and 32:
The Workarea 4. When you click on t
- Page 33 and 34:
The Workarea 1. Click on the title
- Page 35 and 36:
Button Name Description More Inform
- Page 37 and 38:
The Workarea 5. Click on the title
- Page 39 and 40:
Reordering List of Links The Workar
- Page 41 and 42:
The Workarea 5. In the list of link
- Page 43 and 44:
Editing a Navigation Menu To edit a
- Page 45 and 46:
The Workarea 4. When you click on t
- Page 47 and 48:
The Workarea 3. In the toolbar at t
- Page 49 and 50:
The Library Folder The Workarea The
- Page 51 and 52:
1. Begin by logging into Ektron CMS
- Page 53 and 54:
Button Name Description More Inform
- Page 55 and 56:
NOTE The Workarea 5. When you have
- Page 57 and 58:
The Workarea 10. If this is the ima
- Page 59 and 60:
Editing Images The Workarea 3. The
- Page 61 and 62:
Overwriting Images The Workarea 5.
- Page 63 and 64:
The Workarea 4. When you click on t
- Page 65 and 66:
The Workarea 8. After you click the
- Page 67 and 68:
Deleting Images The Workarea After
- Page 69 and 70:
The Workarea 4. After you have clic
- Page 71 and 72: Quicklinks Toolbar The Workarea Kee
- Page 73 and 74: The Workarea 3. To preview the quic
- Page 75 and 76: 1. Begin by logging into the Ektron
- Page 77 and 78: Button Name Description More Inform
- Page 79 and 80: 5. You may preview the hyperlink by
- Page 81 and 82: The Workarea 3. Click on the previe
- Page 83 and 84: The Workarea 1. Begin by clicking t
- Page 85 and 86: Deleting Hyperlinks The Workarea 8.
- Page 87 and 88: The Workarea 4. Once you have click
- Page 89 and 90: Files Toolbar The Workarea When wor
- Page 91 and 92: The Workarea 3. Begin by clicking t
- Page 93 and 94: NOTE The Workarea 7. You may previe
- Page 95 and 96: NOTE Viewing Files The upload will
- Page 97 and 98: Editing Files The Workarea 5. When
- Page 99 and 100: The Workarea 5. From the edit file
- Page 101 and 102: 1. Click on the file you would like
- Page 103 and 104: NOTE The Workarea 6. Once you click
- Page 105 and 106: NOTE Deleting Files The Workarea 11
- Page 107 and 108: NOTE The Workarea 6. After you clic
- Page 109 and 110: The Workarea Ektron CMS100 User Man
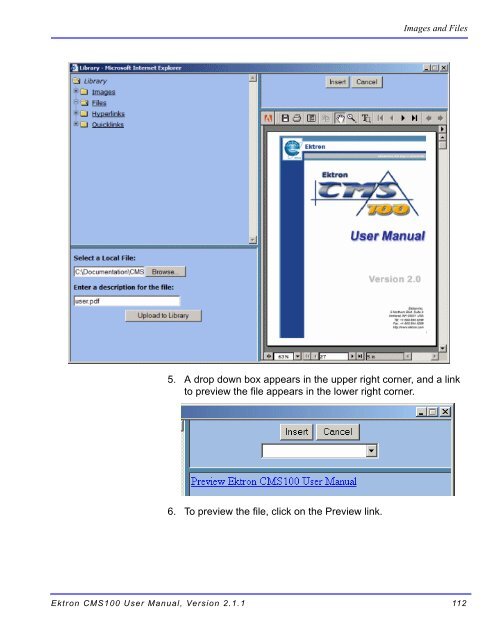
- Page 111 and 112: To Upload Images Images and Files 1
- Page 113 and 114: NOTE 5. Browse through your system
- Page 115 and 116: Images and Files 4. Click the Image
- Page 117 and 118: Images and Files 6. Click Insert at
- Page 119 and 120: Inserting Files Already Uploaded 1.
- Page 121: Images and Files 4. Click on a file
- Page 125 and 126: Ektron CMS100 Content Workflow Appr
- Page 127 and 128: Below is an example of a checked ou
- Page 129 and 130: Who Checked in the Content? To lear
- Page 131 and 132: View History Accessing View History
- Page 133 and 134: Restoring Previous Content In the t
- Page 135 and 136: 1. Browse to the content block that
- Page 137 and 138: Introduction to eWebEditPro Ektron
- Page 139 and 140: Toolbar Buttons Selecting Text This
- Page 141 and 142: Button Equivalent Keystroke (Intern
- Page 143 and 144: Button Equivalent Keystroke Number
- Page 145 and 146: Button Equivalent Keystroke Normal
- Page 147 and 148: Menu Option Lets you For more infor
- Page 149 and 150: Using Ektron CMS100’s Advanced Fe
- Page 151 and 152: Finding Text NOTE To find text on y
- Page 153 and 154: If you want the search to find only
- Page 155 and 156: NOTE Fixing Spelling Errors Dependi
- Page 157 and 158: Setting Spell Check Options Click Y
- Page 159 and 160: Inserting Pictures For information
- Page 161 and 162: Setting a Border Aligning the Pictu
- Page 163 and 164: To align Clickthisinthe Alignment f
- Page 165 and 166: Introduction to Tables Sometimes, t
- Page 167 and 168: Deleting a Table horizontal alignme
- Page 169 and 170: Table Dialog Boxes and Menus This s
- Page 171 and 172: The Table Properties Dialog Box The
- Page 173 and 174:
The Cell Properties Dialog Box The
- Page 175 and 176:
The Table Context Sensitive Menu Th
- Page 177 and 178:
Menu Option Description For more in
- Page 179 and 180:
If you know how many rows and colum
- Page 181 and 182:
If you resize the browser to half t
- Page 183 and 184:
Setting Table Width by Pixels For e
- Page 185 and 186:
Table Backgrounds If you specify ri
- Page 187 and 188:
2. A large question mark appears ne
- Page 189 and 190:
2. A large question mark appears ne
- Page 191 and 192:
Working with Table Cells NOTE Along
- Page 193 and 194:
Inserting a Cell 5. In the layout s
- Page 195 and 196:
NOTE By default, the color of a cel
- Page 197 and 198:
Specifying a Cell’s Background Co
- Page 199 and 200:
2. A large question mark appears ne
- Page 201 and 202:
4. The Cell Properties dialog box a
- Page 203 and 204:
This example illustrates these choi
- Page 205 and 206:
Setting Vertical Alignment 5. Click
- Page 207 and 208:
4. The Cell Properties dialog box a
- Page 209 and 210:
Merging Two Cells 3. Click Split Ce
- Page 211 and 212:
To turn Word Wrap on or off for a c
- Page 213 and 214:
Assigning Cell Spacing To assign ce
- Page 215 and 216:
1. Select the bookmark text or imag
- Page 217 and 218:
The possible values that you can en
- Page 219 and 220:
Using a Quick Link To create a hype
- Page 221 and 222:
Testing a Hyperlink Within the Ektr
- Page 223 and 224:
Working with HTML Ektron CMS100 cre
- Page 225 and 226:
Cleaning HTML 3. Click Insert HTML
- Page 227 and 228:
Section 508 Compliance This section
- Page 229 and 230:
Section 508 Tables WARNING! 5. Pres
- Page 231 and 232:
4. The Section 508 Table Properties
- Page 233 and 234:
Index Numerics 508 compliance, 217
- Page 235:
within a cell, 192 indenting, 133 r