VoIP SIP service administration - Alcatel-Lucent Eye-box Support
VoIP SIP service administration - Alcatel-Lucent Eye-box Support
VoIP SIP service administration - Alcatel-Lucent Eye-box Support

You also want an ePaper? Increase the reach of your titles
YUMPU automatically turns print PDFs into web optimized ePapers that Google loves.
Extended communication server 4.1 :<br />
<strong>VoIP</strong> <strong>SIP</strong> <strong>service</strong> <strong>administration</strong><br />
May, 2008<br />
<strong>Alcatel</strong>-<strong>Lucent</strong> Office Offer - All Rights Reserved © <strong>Alcatel</strong>-<strong>Lucent</strong> 2007
This document explains how to configure the ECS VOIP - <strong>SIP</strong> <strong>service</strong>.<br />
We will see 3 kind of use of VOIP - <strong>SIP</strong> <strong>service</strong>:<br />
- Communications between Virtual Desktop Soft phone Users<br />
- Communications between Virtual Desktop Soft phone User and other station<br />
- Add a click to call button using the VOIP - <strong>SIP</strong> <strong>service</strong> in a website<br />
PRE-REQUISITE<br />
Applicable ECS releases: 4.0, 4.0.1, 4.1<br />
1- The following patches are in pre-requisite:<br />
- P-5270<br />
- P-5356<br />
- P-5813<br />
- P-5505<br />
- P-5323<br />
- P-5373<br />
- P-5297<br />
- P-5274<br />
- P-5341<br />
- P-5283<br />
- P-5374<br />
- P-5528<br />
- P-5537<br />
- P-5324<br />
- P-5450<br />
- P-5534<br />
Note: If you don’t have the following pre-requisite, install them in the same order as shown above.<br />
2- VOIP - <strong>SIP</strong> <strong>service</strong> requires a Name and a Certificate.<br />
3- Name Server: On this documentation, we assume that the ECS is the name server for the<br />
chosen domain name and client PCs. We assume DNS <strong>service</strong> is properly configured.<br />
4- Certificate: You must have a certificate properly configured for the Name you have chosen<br />
for the VOIP - <strong>SIP</strong> <strong>service</strong> (see document P-<br />
5323_Certificate_Management_Improvements_ed01.pdf)<br />
All Rights Reserved © <strong>Alcatel</strong>-<strong>Lucent</strong> 2007 Page 2
5- The ECS <strong>SIP</strong> trunking is compliant with OmniPCX Office release 700 and higher.<br />
A FEW TECHNICAL DETAILS<br />
- Ports for <strong>SIP</strong> signaling :<br />
o Standard <strong>SIP</strong> : 5060 TCP/UDP<br />
o Secured <strong>SIP</strong> : 5061 TCP<br />
- RTP / SRTP supported<br />
- Codec : G711, ILBC and Speex<br />
CONFIGURATION<br />
Communications between Virtual Desktop Soft phone Users<br />
On the <strong>administration</strong> interface:<br />
- Go to Service management > Telephony over Internet (<strong>VoIP</strong> - <strong>SIP</strong>) > Configuration<br />
- Set the VOIP - <strong>SIP</strong> Domain Name<br />
Note: This domain can be the same that you already use on your appliance or a new one. This<br />
domain can be private even for remote worker use case. In any case, you shouldn’t declare a<br />
domain managed by another domain name server.<br />
- Tick the check<strong>box</strong> Automatic creation of the associated DNS zone . Specific fields for <strong>SIP</strong><br />
domains are automatically created in the ECS DNS configuration.<br />
- Select the Server Public IP address.<br />
- Choose the prefix and range of <strong>VoIP</strong> stations (you should have at least 100 stations).<br />
- Click on OK button<br />
All Rights Reserved © <strong>Alcatel</strong>-<strong>Lucent</strong> 2007 Page 3
- Go to the tab SSL Certificate and choose the Certificate for the VOIP - <strong>SIP</strong> domain name.<br />
- Activate 'Telephony on Internet' server<br />
By default, all users of the appliance have a <strong>VoIP</strong> station number assigned and activated.<br />
In the menu Service management > Telephony over Internet (<strong>VoIP</strong> - <strong>SIP</strong>) > <strong>VoIP</strong> stations<br />
configuration, you can deactivated <strong>VoIP</strong> <strong>service</strong> for selected user(s).<br />
DNS activation:<br />
- Go to the menu Service management > Naming <strong>service</strong> > DNS naming > Configuration<br />
- Activate DNS<br />
==>> Virtual Desktop Users can now communicate with each other.<br />
Home Worker<br />
The Soft Phone is a useful tool for remote workers.<br />
It allows the remote worker connected on the Virtual Desktop to call other ECS users as shown<br />
previously and also his contact list or other phone number (see configuration below in the next<br />
chapter).<br />
All Rights Reserved © <strong>Alcatel</strong>-<strong>Lucent</strong> 2007 Page 4
If the computer of the remote worker is behind a firewall, here is the list of ports that must be<br />
authorized on it:<br />
- Port 5061 tcp from the computer to internet<br />
- Range 8000:9000 (this default range can be changed) tcp/udp from the computer to internet<br />
The ECS should have a public IP on Internet.<br />
Communications between Virtual Desktop Soft phone User and another<br />
station<br />
This chapter is applicable with OmniPCX Office release 700 and higher.<br />
To establish a communication between a Soft phone user and another telephony device, the first step<br />
is to create a trunk <strong>SIP</strong> between the OmniPCX Office and the ECS.<br />
In the following OXO trunk <strong>SIP</strong> configuration, we supposed that the OXO has already and properly<br />
been configured (analog access, terminals…)<br />
Trunk <strong>SIP</strong> Configuration on OXO<br />
Connect with OMC on your OXO<br />
Hardware and Limits\ LAN/IP Configuration<br />
- Change the default router address by the IP address of the ECS<br />
Voice over IP\<strong>VoIP</strong>: Parameters<br />
- General tab:<br />
o Number of <strong>VoIP</strong>-trunk channels: select at least 2 channels<br />
o <strong>VoIP</strong> Protocol: <strong>SIP</strong><br />
o RTP Direct not selected<br />
- Gateway tab:<br />
o End of dialing table used selected<br />
External lines<br />
- List of Accesses<br />
o Select <strong>VoIP</strong> access and click on details button<br />
o Click on Link Category button<br />
LC No norm.: 12<br />
LC No Rest.: 16<br />
Voice/Non V. norm. 2<br />
Voice /Non V. rest. 2<br />
Click on OK<br />
o Public Trunk not selected<br />
o Click on OK<br />
All Rights Reserved © <strong>Alcatel</strong>-<strong>Lucent</strong> 2007 Page 5
- List of trunk groups<br />
o Select a free index (no trunk add on it) and click on Details button<br />
Add the <strong>VoIP</strong> access<br />
• Click on link category and set LC No norm. And rest. To 2<br />
Numbering<br />
- Numbering plans<br />
o Internal numbering plan<br />
Secondary trunk group<br />
• In the Start and End fields, enter the number you choose for <strong>VoIP</strong><br />
Stations<br />
• Base ARS<br />
• NMT Keep<br />
• Priv Yes<br />
- Automatic Routing Selection<br />
o Trunk groups list<br />
Add the index you choose in List of trunk groups<br />
Ident is V<br />
o Gateway Parameters<br />
Index: 1<br />
Enter a login and password of your choice<br />
Enter in the realm field the ID number of the ECS (on <strong>administration</strong> interface<br />
Appliance management > Licences & Releases > Software Releases)<br />
o Automatic Routing: Prefixes<br />
Activation: Yes<br />
Net: Priv<br />
Prefix: Enter the prefix you choose in the Secondary trunk group<br />
Substitute: Same as prefix<br />
TrGpList: 1<br />
Called(ISPVPN/H450): het<br />
Right click and select IP Parameters<br />
Destination: <strong>SIP</strong> Gateway<br />
IP Address: Enter the IP address of the ECS which will be used by <strong>VoIP</strong><br />
server.<br />
Gateway Alive Protocol: <strong>SIP</strong> Option<br />
Gateway Bandwidth: Select the bandwidth supported by your network<br />
Gateway Parameters: Select 1<br />
The OXO is now configured.<br />
ECS VOIP - <strong>SIP</strong> configuration<br />
All Rights Reserved © <strong>Alcatel</strong>-<strong>Lucent</strong> 2007 Page 6
The first step is to configure the ECS as shown previously in Communications between Virtual<br />
Desktop Soft phone Users.<br />
On the Administration interface:<br />
- Go in Service management > OmniPCX Office > Detection and Configuration<br />
- Click on Detection of the OmniPCX Office IP address button<br />
- Click on OK and Activate the <strong>service</strong><br />
- Go in Service management > Telephony over Internet (<strong>VoIP</strong> - <strong>SIP</strong>) > Configuration<br />
- OmniPCX Office - <strong>VoIP</strong> <strong>SIP</strong> configuration has been added on this page<br />
- Tick Use this server to do <strong>VoIP</strong>-<strong>SIP</strong><br />
- Enter the IP address of the <strong>VoIP</strong> card of the OXO<br />
- Enter the login and password of the Gateway Parameters (trunk <strong>SIP</strong> configuration on OXO)<br />
- Click on OK button (then you can check your configuration by clicking on Check the<br />
Connection button)<br />
All Rights Reserved © <strong>Alcatel</strong>-<strong>Lucent</strong> 2007 Page 7
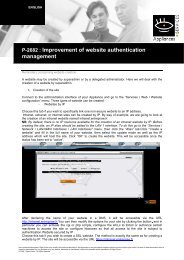
Add a click to call button on a website using the VOIP - <strong>SIP</strong> <strong>service</strong><br />
In this case, we add a click-to-call button on a website. This will allow a visitor of your website to<br />
contact a user of the ECS using VOIP - <strong>SIP</strong> <strong>service</strong>. The pre-requisite for this, is to configure the<br />
ECS and OXO as shown above.<br />
The first step is to configure a website:<br />
- Go to Service management > Web > Configuring web sites<br />
- Add a website (in the following example, by name)<br />
- Click on the modify button an go on <strong>VoIP</strong> tab<br />
- Set Activate the <strong>VoIP</strong> extensions for this site to ON<br />
- Select a user on the list and click on the Add button<br />
The identification key given for this user will be used in the html code of the click-to-call button.<br />
Now you have to activate and configured FTP server or File server to upload data on your website.<br />
In this example, I use ftp server to upload data.<br />
I create a new file called call_freard.html with the following code:<br />
All Rights Reserved © <strong>Alcatel</strong>-<strong>Lucent</strong> 2007 Page 8
<br />
<br />
<br />
Click to call <br />
<br />
<br />
<br />
<br />
<br />
<br />
<br />
<br />
In this code, the following value has to be changed:<br />
This is the name of the button<br />
onClick='ctd("89ee2fd28baa89b003f7068eef6eaf3d")' > -> replace this by the<br />
identifier key given on the <strong>administration</strong> interface<br />
<br />
Then, I push the file by ftp on ftpgroups/www.mywebsite.com/html<br />
You can now go to your website and test this button.<br />
The first time the visitor click on it, the soft phone plug-in will be installed on the visitor’s computer.<br />
The pre-requisite for this plug-in is Internet Explorer 6 or higher and ActiveX must be enable.<br />
Known restrictions<br />
See below the list of known restrictions on this software level:<br />
- Web site : Do not disturb status not visible in the click to call button integrated in a web site<br />
- Virtual desktop : DTMF codes not taken into account during for an external call<br />
- Web site: <strong>SIP</strong> Calls issued from a web site are not correctly logged: caller id is false.<br />
- Virtual desktop: Soft phone Do not disturb mode may not be effective.<br />
- Virtual desktop: Caller id is not displayed in the soft phone for a call issued from an<br />
OXO phone.<br />
- Virtual desktop: When the IP address of the ECS is changed, the PCs using the soft<br />
phone for this server must be rebooted (Windows DNS cache problem).<br />
All Rights Reserved © <strong>Alcatel</strong>-<strong>Lucent</strong> 2007 Page 9
- Web site : A web site created before the <strong>VoIP</strong> –<strong>SIP</strong> patches installation cannot be used<br />
for the click-to-call from a web site<br />
All Rights Reserved © <strong>Alcatel</strong>-<strong>Lucent</strong> 2007 Page 10
-<br />
www.alcatel-lucent.com<br />
All Rights Reserved © <strong>Alcatel</strong>-<strong>Lucent</strong> 2007 Page 11