AFOLUX CX Series Flat Panel PC User Manual - iPCMAX.com
AFOLUX CX Series Flat Panel PC User Manual - iPCMAX.com
AFOLUX CX Series Flat Panel PC User Manual - iPCMAX.com

Create successful ePaper yourself
Turn your PDF publications into a flip-book with our unique Google optimized e-Paper software.
<strong>AFOLUX</strong> <strong>CX</strong> <strong>Series</strong> <strong>Flat</strong> <strong>Panel</strong> <strong>PC</strong><br />
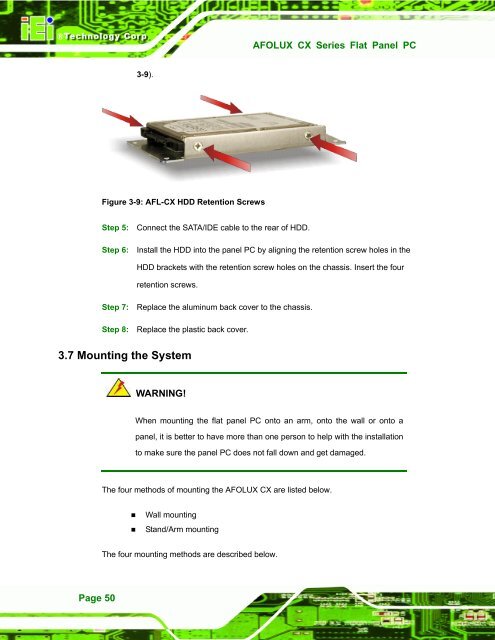
3-9).<br />
Figure 3-9: AFL-<strong>CX</strong> HDD Retention Screws<br />
Step 5: Connect the SATA/IDE cable to the rear of HDD.<br />
Step 6: Install the HDD into the panel <strong>PC</strong> by aligning the retention screw holes in the<br />
HDD brackets with the retention screw holes on the chassis. Insert the four<br />
retention screws.<br />
Step 7: Replace the aluminum back cover to the chassis.<br />
Step 8: Replace the plastic back cover. Step 0:<br />
3.7 Mounting the System<br />
WARNING!<br />
When mounting the flat panel <strong>PC</strong> onto an arm, onto the wall or onto a<br />
panel, it is better to have more than one person to help with the installation<br />
to make sure the panel <strong>PC</strong> does not fall down and get damaged.<br />
The four methods of mounting the <strong>AFOLUX</strong> <strong>CX</strong> are listed below.<br />
• Wall mounting<br />
• Stand/Arm mounting<br />
The four mounting methods are described below.<br />
Page 50