Kerio Connect â User's Guide - Kerio Software Archive
Kerio Connect â User's Guide - Kerio Software Archive
Kerio Connect â User's Guide - Kerio Software Archive

Create successful ePaper yourself
Turn your PDF publications into a flip-book with our unique Google optimized e-Paper software.
<strong>Kerio</strong> <strong>Connect</strong><br />
<strong>Kerio</strong> <strong>Connect</strong> client<br />
<strong>Kerio</strong> Technologies
© 2013 <strong>Kerio</strong> Technologies s.r.o.
Contents<br />
<strong>Kerio</strong> <strong>Connect</strong> client . . . . . . . . . . . . . . . . . . . . . . . . . . . . . . . . . . . . . . . . . . . . . . . . . . . . . . . . . . . 7<br />
<strong>Kerio</strong> <strong>Connect</strong> client . . . . . . . . . . . . . . . . . . . . . . . . . . . . . . . . . . . . . . . . . . . . . . . . . . . . . . 7<br />
Email . . . . . . . . . . . . . . . . . . . . . . . . . . . . . . . . . . . . . . . . . . . . . . . . . . . . . . . . . . . . . . . . . . . . . 7<br />
Calendar . . . . . . . . . . . . . . . . . . . . . . . . . . . . . . . . . . . . . . . . . . . . . . . . . . . . . . . . . . . . . . . . . 8<br />
Contacts . . . . . . . . . . . . . . . . . . . . . . . . . . . . . . . . . . . . . . . . . . . . . . . . . . . . . . . . . . . . . . . . . 9<br />
Tasks . . . . . . . . . . . . . . . . . . . . . . . . . . . . . . . . . . . . . . . . . . . . . . . . . . . . . . . . . . . . . . . . . . . 10<br />
Notes . . . . . . . . . . . . . . . . . . . . . . . . . . . . . . . . . . . . . . . . . . . . . . . . . . . . . . . . . . . . . . . . . . . 11<br />
Configuring your <strong>Kerio</strong> <strong>Connect</strong> client . . . . . . . . . . . . . . . . . . . . . . . . . . . . . . . . . . . . . . . . 12<br />
What to configure in your <strong>Kerio</strong> <strong>Connect</strong> client . . . . . . . . . . . . . . . . . . . . . . . . . . . . 12<br />
Configuring email signature . . . . . . . . . . . . . . . . . . . . . . . . . . . . . . . . . . . . . . . . . . . . . . 12<br />
Setting messages as read . . . . . . . . . . . . . . . . . . . . . . . . . . . . . . . . . . . . . . . . . . . . . . . . . 13<br />
Setting language . . . . . . . . . . . . . . . . . . . . . . . . . . . . . . . . . . . . . . . . . . . . . . . . . . . . . . . . . 14<br />
Configuring time . . . . . . . . . . . . . . . . . . . . . . . . . . . . . . . . . . . . . . . . . . . . . . . . . . . . . . . . 15<br />
Setting email addresses . . . . . . . . . . . . . . . . . . . . . . . . . . . . . . . . . . . . . . . . . . . . . . . . . . 16<br />
Changing your password . . . . . . . . . . . . . . . . . . . . . . . . . . . . . . . . . . . . . . . . . . . . . . . . . 16<br />
Displaying account quotas . . . . . . . . . . . . . . . . . . . . . . . . . . . . . . . . . . . . . . . . . . . . . . . 17<br />
What to do when the quota is used up . . . . . . . . . . . . . . . . . . . . . . . . . . . . . 17<br />
Customizing appearance of <strong>Kerio</strong> <strong>Connect</strong> client . . . . . . . . . . . . . . . . . . . . . . . . . . . . . . 19<br />
About customizing . . . . . . . . . . . . . . . . . . . . . . . . . . . . . . . . . . . . . . . . . . . . . . . . . . . . . . 19<br />
Changing color theme . . . . . . . . . . . . . . . . . . . . . . . . . . . . . . . . . . . . . . . . . . . . . . . . . . . . 19<br />
Previewing messages . . . . . . . . . . . . . . . . . . . . . . . . . . . . . . . . . . . . . . . . . . . . . . . . . . . . . 20<br />
Hiding the folders menu . . . . . . . . . . . . . . . . . . . . . . . . . . . . . . . . . . . . . . . . . . . . . . . . . 20<br />
Configuring the Out of Office message . . . . . . . . . . . . . . . . . . . . . . . . . . . . . . . . . . . . . . . . 22<br />
Configuring the Out of Office message . . . . . . . . . . . . . . . . . . . . . . . . . . . . . . . . . . . . 22<br />
Sorting email messages in <strong>Kerio</strong> <strong>Connect</strong> client . . . . . . . . . . . . . . . . . . . . . . . . . . . . . . . . 24<br />
About sorting . . . . . . . . . . . . . . . . . . . . . . . . . . . . . . . . . . . . . . . . . . . . . . . . . . . . . . . . . . . 24<br />
Sorting messages within a folder . . . . . . . . . . . . . . . . . . . . . . . . . . . . . . . . . . . . . . . . . 24<br />
Sorting messages into folders . . . . . . . . . . . . . . . . . . . . . . . . . . . . . . . . . . . . . . . . . . . . 25<br />
Creating filters . . . . . . . . . . . . . . . . . . . . . . . . . . . . . . . . . . . . . . . . . . . . . . . . . . . . . . . . . . 25<br />
Using filters . . . . . . . . . . . . . . . . . . . . . . . . . . . . . . . . . . . . . . . . . . . . . . . . . . . . . . . . . . . . . 26<br />
Enabling notifications in <strong>Kerio</strong> <strong>Connect</strong> . . . . . . . . . . . . . . . . . . . . . . . . . . . . . . . . . . . . . . . . 29<br />
How to get notified about upcoming events and tasks . . . . . . . . . . . . . . . . . . . . . 29<br />
Event and task reminders . . . . . . . . . . . . . . . . . . . . . . . . . . . . . . . . . . . . . . . . . . . . . . . . 29<br />
Desktop notifications . . . . . . . . . . . . . . . . . . . . . . . . . . . . . . . . . . . . . . . . . . . . . . . . . . . . 30<br />
3
Pop-up notifications . . . . . . . . . . . . . . . . . . . . . . . . . . . . . . . . . . . . . . . . . . . . . . . . . . . . . 31<br />
Using contacts in <strong>Kerio</strong> <strong>Connect</strong> client . . . . . . . . . . . . . . . . . . . . . . . . . . . . . . . . . . . . . . . . 32<br />
Creating contacts . . . . . . . . . . . . . . . . . . . . . . . . . . . . . . . . . . . . . . . . . . . . . . . . . . . . . . . . 32<br />
Editing contacts . . . . . . . . . . . . . . . . . . . . . . . . . . . . . . . . . . . . . . . . . . . . . . . . . . . . . . . . . 33<br />
Sorting contacts . . . . . . . . . . . . . . . . . . . . . . . . . . . . . . . . . . . . . . . . . . . . . . . . . . . . . . . . . 33<br />
Sorting contacts into folders . . . . . . . . . . . . . . . . . . . . . . . . . . . . . . . . . . . . . . . . . . . . . 34<br />
Sharing your contact folders . . . . . . . . . . . . . . . . . . . . . . . . . . . . . . . . . . . . . . . . . . . . . 34<br />
Displaying shared contact folders . . . . . . . . . . . . . . . . . . . . . . . . . . . . . . . . . . . . . . . . 34<br />
Using tasks in <strong>Kerio</strong> <strong>Connect</strong> client . . . . . . . . . . . . . . . . . . . . . . . . . . . . . . . . . . . . . . . . . . . . 35<br />
Creating tasks . . . . . . . . . . . . . . . . . . . . . . . . . . . . . . . . . . . . . . . . . . . . . . . . . . . . . . . . . . . 35<br />
Working with tasks . . . . . . . . . . . . . . . . . . . . . . . . . . . . . . . . . . . . . . . . . . . . . . . . . . . . . . 36<br />
Sorting tasks into folders . . . . . . . . . . . . . . . . . . . . . . . . . . . . . . . . . . . . . . . . . . . . . . . . 36<br />
Sharing your task folders . . . . . . . . . . . . . . . . . . . . . . . . . . . . . . . . . . . . . . . . . . . . . . . . 36<br />
Displaying shared folders . . . . . . . . . . . . . . . . . . . . . . . . . . . . . . . . . . . . . . . . . . . . . . . . 37<br />
Using delegation in <strong>Kerio</strong> <strong>Connect</strong> client . . . . . . . . . . . . . . . . . . . . . . . . . . . . . . . . . . . . . . 38<br />
About delegation . . . . . . . . . . . . . . . . . . . . . . . . . . . . . . . . . . . . . . . . . . . . . . . . . . . . . . . . 38<br />
Delegating users . . . . . . . . . . . . . . . . . . . . . . . . . . . . . . . . . . . . . . . . . . . . . . . . . . . . . . . . . 38<br />
Accepting delegation . . . . . . . . . . . . . . . . . . . . . . . . . . . . . . . . . . . . . . . . . . . . . . . . . . . . 39<br />
Using delegation . . . . . . . . . . . . . . . . . . . . . . . . . . . . . . . . . . . . . . . . . . . . . . . . . . . . . . . . . 40<br />
Sending and receiving emails . . . . . . . . . . . . . . . . . . . . . . . . . . . . . . . . . . . . . . 41<br />
Creating and accepting calendar events . . . . . . . . . . . . . . . . . . . . . . . . . . . . 42<br />
Sharing in <strong>Kerio</strong> <strong>Connect</strong> client . . . . . . . . . . . . . . . . . . . . . . . . . . . . . . . . . . . . . . . . . . . . . . . . 45<br />
About sharing . . . . . . . . . . . . . . . . . . . . . . . . . . . . . . . . . . . . . . . . . . . . . . . . . . . . . . . . . . . 45<br />
Sharing email folders . . . . . . . . . . . . . . . . . . . . . . . . . . . . . . . . . . . . . . . . . . . . . . . . . . . . 45<br />
Sharing calendars . . . . . . . . . . . . . . . . . . . . . . . . . . . . . . . . . . . . . . . . . . . . . . . . . . . . . . . . 46<br />
Sharing contacts, notes and task folders . . . . . . . . . . . . . . . . . . . . . . . . . . . . . . . . . . 47<br />
Removing sharing rights . . . . . . . . . . . . . . . . . . . . . . . . . . . . . . . . . . . . . . . . . . . . . . . . . 47<br />
Subscribe to shared folders . . . . . . . . . . . . . . . . . . . . . . . . . . . . . . . . . . . . . . . . . . . . . . 48<br />
Unsubscribing shared folders . . . . . . . . . . . . . . . . . . . . . . . . . . . . . . . . . . . . . . . . . . . . 48<br />
Synchronizing folders with mobile devices . . . . . . . . . . . . . . . . . . . . . . . . . . . . . . . . . . . . 50<br />
Overview . . . . . . . . . . . . . . . . . . . . . . . . . . . . . . . . . . . . . . . . . . . . . . . . . . . . . . . . . . . . . . . . 50<br />
Selecting folders to synchronize . . . . . . . . . . . . . . . . . . . . . . . . . . . . . . . . . . . . . . . . . . 50<br />
Configuring clients for instant messaging . . . . . . . . . . . . . . . . . . . . . . . . . . . . . . . . . . . . . 52<br />
Recommended IM clients . . . . . . . . . . . . . . . . . . . . . . . . . . . . . . . . . . . . . . . . . . . . . . . . . 52<br />
Supported features . . . . . . . . . . . . . . . . . . . . . . . . . . . . . . . . . . . . . . . . . . . . . . . . . . . . . . 52<br />
Configuring Pidgin for Microsoft Windows . . . . . . . . . . . . . . . . . . . . . . . . . . . . . . . . 52<br />
Configuring Messages on Mac OS X . . . . . . . . . . . . . . . . . . . . . . . . . . . . . . . . . . . . . . . 54<br />
Configuring Psi on Linux . . . . . . . . . . . . . . . . . . . . . . . . . . . . . . . . . . . . . . . . . . . . . . . . . 55<br />
Contact lists . . . . . . . . . . . . . . . . . . . . . . . . . . . . . . . . . . . . . . . . . . . . . . . . . . . . . . . . . . . . . 56<br />
4
Troubleshooting . . . . . . . . . . . . . . . . . . . . . . . . . . . . . . . . . . . . . . . . . . . . . . . . . . . . . . . . . 57<br />
Initiating group chat in instant messaging . . . . . . . . . . . . . . . . . . . . . . . . . . . . . . . . . . . . . 58<br />
About group chat in instant messaging . . . . . . . . . . . . . . . . . . . . . . . . . . . . . . . . . . . 58<br />
Pidgin for Microsoft Windows . . . . . . . . . . . . . . . . . . . . . . . . . . . . . . . . . . . . . . . . . . . . 58<br />
Initiating group chat in Pidgin . . . . . . . . . . . . . . . . . . . . . . . . . . . . . . . . . . . . . 58<br />
Inviting people to group chat in Pidgin . . . . . . . . . . . . . . . . . . . . . . . . . . . . 59<br />
Joining and leaving group chats in Pidgin . . . . . . . . . . . . . . . . . . . . . . . . . . 60<br />
Messages for Mac OS X . . . . . . . . . . . . . . . . . . . . . . . . . . . . . . . . . . . . . . . . . . . . . . . . . . . 60<br />
Initiating group chats in Messages . . . . . . . . . . . . . . . . . . . . . . . . . . . . . . . . . 60<br />
Inviting people to group chats in Pidgin . . . . . . . . . . . . . . . . . . . . . . . . . . . 61<br />
Joining and leaving group chats in Messages . . . . . . . . . . . . . . . . . . . . . . . 61<br />
Psi for Linux . . . . . . . . . . . . . . . . . . . . . . . . . . . . . . . . . . . . . . . . . . . . . . . . . . . . . . . . . . . . . 62<br />
Initiating group chat in Psi . . . . . . . . . . . . . . . . . . . . . . . . . . . . . . . . . . . . . . . . 62<br />
Inviting people to group chat in Psi . . . . . . . . . . . . . . . . . . . . . . . . . . . . . . . . 63<br />
Joining and leaving group chats in Psi . . . . . . . . . . . . . . . . . . . . . . . . . . . . . 64<br />
<strong>Kerio</strong> <strong>Connect</strong> Account Assistant . . . . . . . . . . . . . . . . . . . . . . . . . . . . . . . . . . . . . . . . . . . . . . 66<br />
About <strong>Kerio</strong> <strong>Connect</strong> Account Assistant . . . . . . . . . . . . . . . . . . . . . . . . . . . . . . . . . . 66<br />
Using <strong>Kerio</strong> <strong>Connect</strong> Account Assistant . . . . . . . . . . . . . . . . . . . . . . . . . . . . . . . . . . . 66<br />
Support for Apple iCal/Calendar using the CalDAV standard . . . . . . . . . . . . . . . . . . 70<br />
About CalDAV and Apple iCal/Calendar . . . . . . . . . . . . . . . . . . . . . . . . . . . . . . . . . . 70<br />
Configuring CalDAV account . . . . . . . . . . . . . . . . . . . . . . . . . . . . . . . . . . . . . . . . . . . . . 70<br />
Sharing calendars . . . . . . . . . . . . . . . . . . . . . . . . . . . . . . . . . . . . . . . . . . . . . . . . . . . . . . . . 71<br />
Assigning delegates . . . . . . . . . . . . . . . . . . . . . . . . . . . . . . . . . . . . . . . . . . . . . . . . . . . . . . 73<br />
Upgrading to <strong>Kerio</strong> <strong>Connect</strong> 8.2 . . . . . . . . . . . . . . . . . . . . . . . . . . . . . . . . . . . . . . . . . . 73<br />
Configuring Microsoft Windows 8 Mail using Exchange ActiveSync . . . . . . . . . . . . 74<br />
Overview . . . . . . . . . . . . . . . . . . . . . . . . . . . . . . . . . . . . . . . . . . . . . . . . . . . . . . . . . . . . . . . . 74<br />
Configuring <strong>Kerio</strong> <strong>Connect</strong> . . . . . . . . . . . . . . . . . . . . . . . . . . . . . . . . . . . . . . . . . . . . . . . 74<br />
Installing SSL certificate on your desktop . . . . . . . . . . . . . . . . . . . . . . . . . . . . . . . . . 74<br />
Configuring Mail on Windows 8 . . . . . . . . . . . . . . . . . . . . . . . . . . . . . . . . . . . . . . . . . . 75<br />
Synchronizing data with mobile devices . . . . . . . . . . . . . . . . . . . . . . . . . . . . . . . . . . . . . . . 77<br />
Overview . . . . . . . . . . . . . . . . . . . . . . . . . . . . . . . . . . . . . . . . . . . . . . . . . . . . . . . . . . . . . . . . 77<br />
Supported mobile devices . . . . . . . . . . . . . . . . . . . . . . . . . . . . . . . . . . . . . . . . . . . . . . . . 77<br />
SSL Certificates . . . . . . . . . . . . . . . . . . . . . . . . . . . . . . . . . . . . . . . . . . . . . . . . . . . . . . . . . . 77<br />
Windows Mobile 5.0 . . . . . . . . . . . . . . . . . . . . . . . . . . . . . . . . . . . . . . . . . . . . . . . . . . . . . 79<br />
Windows Mobile 5.0 AKU2 . . . . . . . . . . . . . . . . . . . . . . . . . . . . . . . . . . . . . . . . . . . . . . . 79<br />
ActiveSync settings in Pocket PC Edition . . . . . . . . . . . . . . . . . . . . . . . . . . . 80<br />
ActiveSync settings in Smartphone Edition . . . . . . . . . . . . . . . . . . . . . . . . . 86<br />
Windows Mobile 6.0 . . . . . . . . . . . . . . . . . . . . . . . . . . . . . . . . . . . . . . . . . . . . . . . . . . . . . 91<br />
Nokia Eseries . . . . . . . . . . . . . . . . . . . . . . . . . . . . . . . . . . . . . . . . . . . . . . . . . . . . . . . . . . . . 92<br />
Mail For Exchange Settings . . . . . . . . . . . . . . . . . . . . . . . . . . . . . . . . . . . . . . . . 93<br />
5
Nokia N73 and N95 . . . . . . . . . . . . . . . . . . . . . . . . . . . . . . . . . . . . . . . . . . . . . . . . . . . . . . 99<br />
RoadSync . . . . . . . . . . . . . . . . . . . . . . . . . . . . . . . . . . . . . . . . . . . . . . . . . . . . . . . . . . . . . 100<br />
Apple iPhone . . . . . . . . . . . . . . . . . . . . . . . . . . . . . . . . . . . . . . . . . . . . . . . . . . . . . . . . . . 100<br />
Apple iPhone 2.0 . . . . . . . . . . . . . . . . . . . . . . . . . . . . . . . . . . . . . . . . . . . . . . . . 100<br />
Apple iPhone 3.0 . . . . . . . . . . . . . . . . . . . . . . . . . . . . . . . . . . . . . . . . . . . . . . . . 102<br />
Apple iPhone 4.0 . . . . . . . . . . . . . . . . . . . . . . . . . . . . . . . . . . . . . . . . . . . . . . . . 107<br />
Apple iOS . . . . . . . . . . . . . . . . . . . . . . . . . . . . . . . . . . . . . . . . . . . . . . . . . . . . . . . . . . . . . 108<br />
Configuring Microsoft Windows Phone 8 using Exchange ActiveSync . . . . . . . . . 110<br />
Overview . . . . . . . . . . . . . . . . . . . . . . . . . . . . . . . . . . . . . . . . . . . . . . . . . . . . . . . . . . . . . . 110<br />
Configuring <strong>Kerio</strong> <strong>Connect</strong> . . . . . . . . . . . . . . . . . . . . . . . . . . . . . . . . . . . . . . . . . . . . . 110<br />
Configuring Windows Phone 8 . . . . . . . . . . . . . . . . . . . . . . . . . . . . . . . . . . . . . . . . . . 111<br />
Installing <strong>Kerio</strong> Outlook <strong>Connect</strong>or . . . . . . . . . . . . . . . . . . . . . . . . . . . . . . . . . . . . . . . . . . . 117<br />
Downloading <strong>Kerio</strong> Outlook <strong>Connect</strong>or (Offline Edition) . . . . . . . . . . . . . . . . . 117<br />
Installing <strong>Kerio</strong> Outlook <strong>Connect</strong>or (Offline Edition) . . . . . . . . . . . . . . . . . . . . . 117<br />
Switching from the online version to the offline version of the <strong>Kerio</strong><br />
Outlook <strong>Connect</strong>or . . . . . . . . . . . . . . . . . . . . . . . . . . . . . . . . . . . . . . . . . . . . . . . . . . . . . 118<br />
Upgrading <strong>Kerio</strong> Outlook <strong>Connect</strong>or . . . . . . . . . . . . . . . . . . . . . . . . . . . . . . . . . . . . 118<br />
Upgrading Microsoft Outlook . . . . . . . . . . . . . . . . . . . . . . . . . . . . . . . . . . . . . . . . . . 118<br />
Creating profiles in MS Outlook . . . . . . . . . . . . . . . . . . . . . . . . . . . . . . . . . . . . . . . . . . . . . . 119<br />
About profiles . . . . . . . . . . . . . . . . . . . . . . . . . . . . . . . . . . . . . . . . . . . . . . . . . . . . . . . . . 119<br />
Creating user profiles . . . . . . . . . . . . . . . . . . . . . . . . . . . . . . . . . . . . . . . . . . . . . . . . . . 119<br />
Converting old profiles to profiles for <strong>Kerio</strong> Outlook <strong>Connect</strong>or<br />
(Offline Edition) . . . . . . . . . . . . . . . . . . . . . . . . . . . . . . . . . . . . . . . . . . . . . . . . . . . . . . . . 122<br />
Synchronizing Microsoft Outlook with <strong>Kerio</strong> <strong>Connect</strong> . . . . . . . . . . . . . . . . . . . . . . . . 124<br />
Online and offline modes . . . . . . . . . . . . . . . . . . . . . . . . . . . . . . . . . . . . . . . . . . . . . . 124<br />
About synchronization . . . . . . . . . . . . . . . . . . . . . . . . . . . . . . . . . . . . . . . . . . . . . . . . . 124<br />
Setting folder synchronization . . . . . . . . . . . . . . . . . . . . . . . . . . . . . . . . . . . . . . . . . 125<br />
Solving synchronization conflicts . . . . . . . . . . . . . . . . . . . . . . . . . . . . . . . . . . . . . . . 126<br />
6
<strong>Kerio</strong> <strong>Connect</strong> client<br />
<strong>Kerio</strong> <strong>Connect</strong> client<br />
<strong>Kerio</strong> <strong>Connect</strong> client is a brand new web client - designed to speed up your work!<br />
The following sections will guide you through all the features of our new interface.<br />
<strong>Kerio</strong> <strong>Connect</strong> client with all the features described below is available in <strong>Kerio</strong> <strong>Connect</strong><br />
8.0 and newer.<br />
To see all articles about <strong>Kerio</strong> <strong>Connect</strong> client, visit <strong>Kerio</strong> Knowledge Base.<br />
Email<br />
In the Email section in <strong>Kerio</strong> <strong>Connect</strong> client you can:<br />
• Use fulltext search — Just type in what you need and search through messages, email<br />
addresses, subjects<br />
• Receive less spam — Have you received a spam message? Just click on the Spam<br />
button and <strong>Kerio</strong> <strong>Connect</strong> will remember<br />
• Add attachments easily — Just drag & drop an attachment into any grey area<br />
• Get automatic email address suggestions<br />
• Save drafts automatically — start a message, go to another folder and come back to<br />
finish the message<br />
• Customize your out of office message with text and exact time<br />
• Create filters to sort your messages to folders as they arrive<br />
• Stay on top of new messages with desktop notifications even if you are not currently<br />
working with <strong>Kerio</strong> <strong>Connect</strong> client<br />
7
<strong>Kerio</strong> <strong>Connect</strong> client<br />
Calendar<br />
In the Calendar section in <strong>Kerio</strong> <strong>Connect</strong> client you can:<br />
• Create events in seconds — just double-click inside your calendar and create an event<br />
• Invite other people to your meeting<br />
• See immediately who’s available (Free/Busy calendar)<br />
• Set reminders for your events<br />
• Create repeated events<br />
• Share calendars with other people<br />
• See calendars that other people have shared with you<br />
8
1.4 Contacts<br />
Contacts<br />
In the Contacts section in <strong>Kerio</strong> <strong>Connect</strong> client you can:<br />
• Create contacts easily<br />
• Organize contacts into groups<br />
• Share contacts with other people<br />
• See contacts that other people have shared with you<br />
9
<strong>Kerio</strong> <strong>Connect</strong> client<br />
Tasks<br />
In the Tasks section in <strong>Kerio</strong> <strong>Connect</strong> client you can:<br />
• Create tasks and sort them into groups<br />
• Share task groups with other people<br />
10
1.6 Notes<br />
Notes<br />
In the Notes section in <strong>Kerio</strong> <strong>Connect</strong> client you can:<br />
• Write color-coded (multi-colored) notes<br />
• Share notes with others<br />
• Send notes as email messages with one click<br />
11
Configuring your <strong>Kerio</strong> <strong>Connect</strong> client<br />
What to configure in your <strong>Kerio</strong> <strong>Connect</strong> client<br />
<strong>Kerio</strong> <strong>Connect</strong> client is available in <strong>Kerio</strong> <strong>Connect</strong> 8.0 and newer.<br />
In <strong>Kerio</strong> <strong>Connect</strong> client, users can configure the following settings:<br />
• email signature<br />
• Out of Office message (read article Configuring the Out of Office message)<br />
• mail filters (read article Sorting email messages in <strong>Kerio</strong> <strong>Connect</strong> client)<br />
• interface language and time zone<br />
• customize the appearance<br />
• notifications for new messages and event/task reminders (read article Enabling<br />
notification in <strong>Kerio</strong> <strong>Connect</strong> client)<br />
• their password (if allowed) and view their store quota<br />
Configuring email signature<br />
In <strong>Kerio</strong> <strong>Connect</strong> client, you can create a signature which will be automatically appended to<br />
every message you write.<br />
1. Click on your name in <strong>Kerio</strong> <strong>Connect</strong> client and select Settings.<br />
2. Go to section Email → Signature.<br />
3. Enter whatever you wish to be appended to each of your messages and confirm.<br />
You can also use HTML code to append your signature (new in <strong>Kerio</strong> <strong>Connect</strong> 8.1).<br />
12
2.3 Setting messages as read<br />
Setting messages as read<br />
New in <strong>Kerio</strong> <strong>Connect</strong> 8.1!<br />
You can specify time after which each message will be marked as read.<br />
1. Click on your name in <strong>Kerio</strong> <strong>Connect</strong> client and select Settings.<br />
2. Go to section Email → Reading.<br />
3. Check option Mark displayed messages as read and select Immediately or set time<br />
interval.<br />
13
Configuring your <strong>Kerio</strong> <strong>Connect</strong> client<br />
4. Save.<br />
You can also mark messages as read manually by clicking the colored dot next to the message.<br />
Setting language<br />
<strong>Kerio</strong> <strong>Connect</strong> client is available in the following languages: Czech, English (US and UK),<br />
Chinese, Croatian, Dutch, French, German, Hungarian, Italian, Japanese, Polish, Portuguese,<br />
Russian, Slovak, Spanish, and Swedish.<br />
To select a language for your interface:<br />
1. Click on your name in <strong>Kerio</strong> <strong>Connect</strong> client and select Settings.<br />
2. In section Language and time, select your preferred language.<br />
3. Save the settings.<br />
14
2.5 Configuring time<br />
All items, such as messages, contacts, events and tasks, in all folder types will also<br />
be sorted by the alphabet of this language.<br />
Each language also has its own rules for displaying time and date. See the following section<br />
for more details.<br />
Configuring time<br />
Time settings are important for correct time when sending and receiving messages.<br />
By default, Time zone settings are based on <strong>Kerio</strong> <strong>Connect</strong> server. If you plan to use <strong>Kerio</strong><br />
<strong>Connect</strong> client in a time zone different from the server location, you can change the time<br />
settings:.<br />
1. Click on your name in <strong>Kerio</strong> <strong>Connect</strong> client and select Settings.<br />
2. In section Language and time, select your preferred time zone.<br />
3. Select Set your locales according to ... to display date and time (i.e. locales) according to<br />
your preferred language.<br />
If you wish to use other rules, select the language for your locale.<br />
4. Save the settings.<br />
15
Configuring your <strong>Kerio</strong> <strong>Connect</strong> client<br />
Setting email addresses<br />
In <strong>Kerio</strong> <strong>Connect</strong> client, you can set you From and Reply-To addresses.<br />
1. Click on your name in <strong>Kerio</strong> <strong>Connect</strong> client and select Settings.<br />
2. Go to section Email → Composing.<br />
3. Enter Default From address and/or Special Reply-To address.<br />
4. Save.<br />
When you compose a message, you can select the From address from a drop-down menu.<br />
Changing your password<br />
To change your account password:<br />
1. Login to <strong>Kerio</strong> <strong>Connect</strong> client securely via HTTPS.<br />
2. Click on your name in <strong>Kerio</strong> <strong>Connect</strong> client and select Settings.<br />
16
2.8 Displaying account quotas<br />
3. In section Password Change, type in your current and your new password.<br />
4. Save the settings.<br />
If this option is not available at all, contact your administrator.<br />
Displaying account quotas<br />
If you receive messages with large attachments or have a lot of contacts, you may soon use up<br />
the quotas assigned for your account.<br />
The limitations include:<br />
• space available for you<br />
• number of items allowed<br />
If you wish to see how much space you use:<br />
1. Click on your name in <strong>Kerio</strong> <strong>Connect</strong> client and select Settings.<br />
2. Go to section My Quota.<br />
3. There you can see how much space your account occupies, how many items you have and<br />
what are you limitations.<br />
What to do when the quota is used up<br />
If you reach any of the limits set for your account, you will not be able to receive new messages.<br />
Once you reach 90% of a quota, a warning message will be displayed in the top bar of <strong>Kerio</strong><br />
<strong>Connect</strong> client.<br />
17
Configuring your <strong>Kerio</strong> <strong>Connect</strong> client<br />
To solve this problem, we recommend the following:<br />
• delete messages in folders Sent and Trash (unless you need them)<br />
• delete any other messages you do not need (especially with large attachments)<br />
• ask your administrator to turn on automatic items clean-out (which will automatically<br />
delete old messages and messages from Trash)<br />
• ask your administrator to add some space for your account<br />
18
Customizing appearance of <strong>Kerio</strong> <strong>Connect</strong> client<br />
About customizing<br />
To customize the appearance of their <strong>Kerio</strong> <strong>Connect</strong> client, users can:<br />
• change the color theme<br />
• select the position of message preview pane<br />
• hide the folders menu<br />
Changing color theme<br />
Default color of <strong>Kerio</strong> <strong>Connect</strong> client is blue. To select a different color theme, click your name<br />
in <strong>Kerio</strong> <strong>Connect</strong> client and select Change theme.<br />
19
Customizing appearance of <strong>Kerio</strong> <strong>Connect</strong> client<br />
This feature is available in <strong>Kerio</strong> <strong>Connect</strong> 8.1 and newer.<br />
Previewing messages<br />
New in <strong>Kerio</strong> <strong>Connect</strong> 8.2!<br />
In <strong>Kerio</strong> <strong>Connect</strong> client, you can select whether you want to display previews of email messages<br />
and where.<br />
1. Click your name in <strong>Kerio</strong> <strong>Connect</strong> client and select Settings.<br />
2. Go section Email.<br />
3. In Preview pane, select the position of the pane.<br />
You can also disable it.<br />
4. Save the settings.<br />
Hiding the folders menu<br />
New in <strong>Kerio</strong> <strong>Connect</strong> 8.2!<br />
20
3.4 Hiding the folders menu<br />
To save some space, you can hide the folder tree on the left.<br />
Click on the blue arrow<br />
button<br />
under the Search box.<br />
You can hide the tree regardless of the position of the preview pane.<br />
21
Configuring the Out of Office message<br />
Configuring the Out of Office message<br />
Out of Office message is an automatic reply which is sent from your account when you receive<br />
a message.<br />
If you plan to go on holiday, you may want to let your business partners and customer know<br />
that you are away. To do so, you can configure an out of office message.<br />
1. Click your name in <strong>Kerio</strong> <strong>Connect</strong> client and select Settings.<br />
2. In section Out of Office, check option Send "Out of Office" messages .<br />
3. Write your message.<br />
4. You can specify a time period when this automatic reply will be sent.<br />
5. Save the settings.<br />
22
4.1 Configuring the Out of Office message<br />
<strong>Kerio</strong> <strong>Connect</strong> sends the out of office message to each sender only once.<br />
23
Sorting email messages in <strong>Kerio</strong> <strong>Connect</strong> client<br />
About sorting<br />
In <strong>Kerio</strong> <strong>Connect</strong> client, you can sort:<br />
• messages in individual folders according to different criteria.<br />
• received messages into folders in your mailbox, or<br />
Sorting messages within a folder<br />
New in <strong>Kerio</strong> <strong>Connect</strong> 8.2!<br />
In <strong>Kerio</strong> <strong>Connect</strong> client, you can sort messages according to various criteria.<br />
<strong>Kerio</strong> <strong>Connect</strong> client remembers your sorting preferences in each individual folder.<br />
Preview pane on the right<br />
1. Go to a folder where you want to sort the messages.<br />
2. Click on the sorting icon<br />
3. Select how to sort the messages.<br />
24
5.3 Sorting messages into folders<br />
If you want to sort messages in the reversed order, repeat the same procedure (e.g. if you sort<br />
messages by clicking on Date and you want to reverse the order, click on Date again).<br />
Preview pane on the bottom or hidden<br />
To sort messages, click on any header of the message list.<br />
If you want to sort messages in the reversed order, repeat the same procedure (e.g. if you sort<br />
messages by clicking on the Received header and you want to reverse the order, click on the<br />
Received header again).<br />
Sorting messages into folders<br />
Messages delivered to <strong>Kerio</strong> <strong>Connect</strong> client are stored in folder Inbox.<br />
If you have additional folders, you can move messages:<br />
• manually — drag messages to folders<br />
• automatically — sort messages using filters<br />
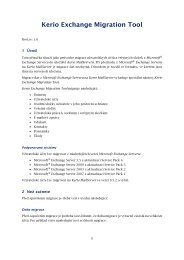
Creating filters<br />
To sort messages to folders automatically, you can create filters:<br />
1. Click on your name in <strong>Kerio</strong> <strong>Connect</strong> client and select Settings.<br />
2. In section Filters, click New Filter.<br />
3. To display all filter settings, click icon<br />
4. Set the filter.<br />
25
Sorting email messages in <strong>Kerio</strong> <strong>Connect</strong> client<br />
Figure 1<br />
Filter settings<br />
5. You can check option Skip other rules.<br />
6. Save the settings.<br />
You can drag filters to sort the list.<br />
Using filters<br />
<strong>Kerio</strong> <strong>Connect</strong> client checks all delivered messages against all the filters.<br />
Figure 2<br />
List of filters<br />
26
5.5 Using filters<br />
• The order of filters is important — the filter on top of the list is applied first.<br />
• If Skip other rules is active, no more filters are applied.<br />
Example 1:<br />
Mr. Powaro receives message Dept. meeting from Hector Mouse (email address<br />
mouse@feelmorelaw.com).<br />
<strong>Kerio</strong> <strong>Connect</strong> checks the filters from 1 to 4:<br />
1. Filter 1 forwards messages with subject Press conference to regret@feelmorelaw.com.<br />
As the subject is not Press conference, this filter does not apply and <strong>Kerio</strong> <strong>Connect</strong><br />
continues with filter 2.<br />
2. Filter 2 marks messages from archive@feelmorelaw.com as read.<br />
As the sender is not archive@feelmorelaw.com, this filter does not apply and <strong>Kerio</strong><br />
<strong>Connect</strong> continues with filter 3.<br />
3. Filter 3 moves messages from mouse@feelmorelaw.com to folder Pathology<br />
department.<br />
This condition is met. The message is moved to folder Pathology department.<br />
In the filter 3 definition, option Skip other rules is enabled. <strong>Kerio</strong> <strong>Connect</strong> applies filter<br />
3 and skips other filters.<br />
27
Sorting email messages in <strong>Kerio</strong> <strong>Connect</strong> client<br />
Example 2:<br />
Creating a filter for forwarding incoming messages to another address.<br />
28
Enabling notifications in <strong>Kerio</strong> <strong>Connect</strong><br />
How to get notified about upcoming events and tasks<br />
<strong>Kerio</strong> <strong>Connect</strong> client can remind you about<br />
• upcoming events and tasks via reminders<br />
• new messages and upcoming events and task via desktop notifications and pop-up<br />
notifications<br />
Event and task reminders<br />
Reminders for your calendar events and tasks are displayed automatically in the top bar of<br />
your <strong>Kerio</strong> <strong>Connect</strong> client — no additional settings are required.<br />
The reminders can be accompanied by a sound. To enable or disable the sound reminders:<br />
1. Click on your name in <strong>Kerio</strong> <strong>Connect</strong> client and select Settings.<br />
2. In section Reminders, select option Use sound when reminding about events and tasks.<br />
3. The settings are saved automatically.<br />
29
Enabling notifications in <strong>Kerio</strong> <strong>Connect</strong><br />
Once a reminder appears:<br />
• click on it to be guided to the appropriate section in <strong>Kerio</strong> <strong>Connect</strong> client (Mail,<br />
Calendar, Task) and display it in detail<br />
• move mouse over the reminder for options to dismiss or postpone the reminder<br />
Desktop notifications<br />
Desktop notifications are small pop-up windows which appear on your screen when using the<br />
following browsers:<br />
• Chrome<br />
• Safari 6 and newer<br />
To display desktop notifications:<br />
1. Enable the desktop notifications in your browser. The following links will guide you to the<br />
individual browser settings for enabling desktop notifications:<br />
• Google Chrome<br />
• Safari<br />
2. Click on your name in <strong>Kerio</strong> <strong>Connect</strong> client and select Settings.<br />
3. In section Reminders, select the types of notifications (messages and/or events and tasks).<br />
These options are visible only if notifications are enabled in your browser.<br />
4. Test Notification to make sure it works.<br />
5. The settings are saved automatically.<br />
30
6.4 Pop-up notifications<br />
Once a notification appears on your screen, click on it and the new message (event/task) will<br />
be displayed in detail.<br />
Pop-up notifications<br />
Pop-up notifications are small pop-up windows which appear on your screen when using the<br />
following browsers:<br />
• Safari 5 and older<br />
• Mozilla Firefox<br />
• Microsoft Internet Explorer<br />
To display pop-up notifications:<br />
1. Disable the pop-up blocker in your browser (or add an exception for your <strong>Kerio</strong> <strong>Connect</strong><br />
address). The following links will guide you to the individual browser settings for disabling<br />
pop-up blockers:<br />
• Mozilla Firefox<br />
• Microsoft Internet Explorer<br />
• Safari<br />
2. Click on your name in <strong>Kerio</strong> <strong>Connect</strong> client and select Settings.<br />
3. In section Reminders, select the types of notifications (messages and/or events and tasks).<br />
These options are not visible unless you disable the pop-up blocker.<br />
4. Test Notification to make sure it works.<br />
5. The settings are saved automatically.<br />
Once a notification appears on your screen, click on it and the new message (event/task) will<br />
be displayed in detail.<br />
31
Using contacts in <strong>Kerio</strong> <strong>Connect</strong> client<br />
Creating contacts<br />
To create a new contact:<br />
1. In <strong>Kerio</strong> <strong>Connect</strong> client, go to the Contacts section .<br />
2. Click New → Contact.<br />
3. Fill in any information.<br />
4. Click Add to add additional information (see figure).<br />
To add items of already displayed information, click the plus sign at the right of an item.<br />
5. Click add photo and select the contact photo.<br />
The image file must be in the JPG format and cannot exceed 256 kB.<br />
6. Save the settings.<br />
32
7.2 Editing contacts<br />
Figure 1<br />
New contact<br />
Editing contacts<br />
To edit your contacts, double-click the contact in the list.<br />
To edit public contacts, you must be a public folder administrator.<br />
Sorting contacts<br />
In <strong>Kerio</strong> <strong>Connect</strong> client, contacts are sorted according to contact’s Last name.<br />
If the last name entry contains more names, the first one is used for sorting.<br />
33
Using contacts in <strong>Kerio</strong> <strong>Connect</strong> client<br />
Sorting contacts into folders<br />
Your default contact folder is My contacts.<br />
To add another folder, click the plus sign next to Folders and specify a name.<br />
To move contacts to different folders, drag & drop a contact from its original folder to another<br />
in the navigation tree on the left.<br />
Sharing your contact folders<br />
You can share your contact folders with other users.<br />
1. Right-click a folder and click on Sharing.<br />
2. To share with a single user, select User and type their name or email.<br />
To share with a group, select Group of users and select a group.<br />
To share with everyone in your company, select Everyone from .<br />
3. Specify the sharing rights:<br />
• can view<br />
• can change — user can add, delete and edit the contacts<br />
• is owner — can set sharing, can add, delete and edit the contacts<br />
4. Repeat steps 2 and 3 as needed.<br />
5. Click OK.<br />
Displaying shared contact folders<br />
If someone shares a contact folder with you:<br />
1. In the <strong>Kerio</strong> <strong>Connect</strong> client, go to the Contacts section .<br />
2. Click the plus sign next to Shared folders.<br />
3. In the list of available folders, click those you want to display.<br />
Now you can work with the shared contacts.<br />
34
Using tasks in <strong>Kerio</strong> <strong>Connect</strong> client<br />
Creating tasks<br />
To create a new task:<br />
1. In <strong>Kerio</strong> <strong>Connect</strong> client, go to the Task section .<br />
2. Specify the task in the Enter a new task field.<br />
3. Click Add.<br />
Double-click the task to:<br />
• add reminder date and time (for info on reminders, read article Configuring your <strong>Kerio</strong><br />
<strong>Connect</strong> client)<br />
• add notes about the task<br />
Once you are done, Save the task.<br />
Figure 1<br />
Tasks<br />
35
Using tasks in <strong>Kerio</strong> <strong>Connect</strong> client<br />
Working with tasks<br />
The task section allows you to:<br />
• sort your task into folders.<br />
• mark tasks as complete (click the white square on the left side)<br />
Finished tasks can be viewed in the Completed tasks section.<br />
To remove a task, right-click the task and select Delete.<br />
Sorting tasks into folders<br />
Your default task folder is My tasks.<br />
To add another folder, click the plus sign next to Folders and specify a name.<br />
To move tasks to different folders, drag & drop a task from its original folder to another in<br />
the tree on the left.<br />
Sharing your task folders<br />
You can share your tasks folders with other users.<br />
1. Right-click a folder and click on Sharing.<br />
2. To share with a single user, select User and type their name or email.<br />
To share with a group, select Group of users and select a group.<br />
To share with everyone in your company, select Everyone from .<br />
3. Specify action users can do:<br />
• can view<br />
• can change — user can add, delete and edit the tasks<br />
• is owner — can set sharing, can add, delete and edit the tasks<br />
4. Repeat steps 2 and 3 as needed.<br />
5. Click OK.<br />
36
8.5 Displaying shared folders<br />
Displaying shared folders<br />
If someone shares you a task folder:<br />
1. In <strong>Kerio</strong> <strong>Connect</strong> client, go to the Task section .<br />
2. Click the plus sign next to Shared folders.<br />
3. In the list of available folders, click those you want to see in your task section.<br />
Now you can work with the shared task.<br />
37
Using delegation in <strong>Kerio</strong> <strong>Connect</strong> client<br />
About delegation<br />
Delegation is an advanced typed of sharing. A delegate can act on your behalf.<br />
Delegation includes:<br />
• Inbox<br />
• Main calendar<br />
Use the traditional sharing feature to share contacts, notes and tasks.<br />
You must assign delegation rights to users. Delegates can then act on your behalf.<br />
Delegating users<br />
1. In <strong>Kerio</strong> <strong>Connect</strong> client, click your name and select Settings.<br />
2. Go to section Delegation.<br />
3. In the Delegates who can act on my behalf box, type the name or email address of a user.<br />
<strong>Kerio</strong> <strong>Connect</strong> client will offer users as you type → select a delegate.<br />
4. Save the settings.<br />
You can delegate as many users as you wish.<br />
38
9.3 Accepting delegation<br />
Removing delegation<br />
If you want to remove delegation rights from a user, click the x sign next to a delegate’s name.<br />
Accepting delegation<br />
When somebody delegates you to act on their behalf, you automatically become a delegate.<br />
<strong>Kerio</strong> <strong>Connect</strong> client will display the person’s Inbox and Calendar (see section Using<br />
delegation).<br />
You cannot reject delegation, however you can hide the delegated folders:<br />
Hiding a delegated Inbox<br />
Right-click a delegated Inbox and select Hide.<br />
You are still a delegate, i.e. you can send messages on the person’s behalf, but you cannot see<br />
their Inbox.<br />
39
Using delegation in <strong>Kerio</strong> <strong>Connect</strong> client<br />
Hiding all delegated folders<br />
1. In <strong>Kerio</strong> <strong>Connect</strong> client, click your name and select Settings.<br />
2. Go to section Delegation.<br />
3. In the People I am a delegate for box, uncheck the appropriate box.<br />
4. Save the settings.<br />
You cannot send messages and create/accept events on another person’s behalf.<br />
Check this box again to renew your delegation rights.<br />
Using delegation<br />
See the following examples on how to use delegation in <strong>Kerio</strong> <strong>Connect</strong>.<br />
R.Cul Powaro has delegated Meg Regret to act on his behalf.<br />
40
9.4 Using delegation<br />
Meg automatically become delegates and her <strong>Kerio</strong> <strong>Connect</strong> client displays Mr. Powaro’s Inbox<br />
and Calendar.<br />
Sending and receiving emails<br />
Meg Regret wants to send a message on behalf of Mr. Powaro. She selects Mr. Powaro’s address<br />
from the drop-down menu when composing a message.<br />
41
Using delegation in <strong>Kerio</strong> <strong>Connect</strong> client<br />
When Mr. Maison receives the message, he can see that Mr. Powaro has delegated Meg Regret<br />
to act on his behalf.<br />
Creating and accepting calendar events<br />
Meg Regret wants to create an event on behalf of Mr. Powaro. She selects Mr. Powaro’s<br />
calendar from the drop-down menu when creating an event.<br />
When Mr. Maison receives the invitation, he can see it was sent by Mr. Powaro.<br />
42
9.4 Using delegation<br />
Mr. Maison invites Mr. Powaro to a meeting. Meg Regret sees the invitation sent to Mr. Powaro<br />
and can accept it on Mr. Powaro’s behalf.<br />
43
Using delegation in <strong>Kerio</strong> <strong>Connect</strong> client<br />
A delegate cannot create private events on another person’s behalf.<br />
see/edit the person’s other private events.<br />
Nor can they<br />
44
Sharing in <strong>Kerio</strong> <strong>Connect</strong> client<br />
About sharing<br />
In <strong>Kerio</strong> <strong>Connect</strong> client you can share any folder in any section with other users.<br />
First, you assign sharing rights to used. Second, users subscribe to shared folders.<br />
Sharing email folders<br />
1. In your email section in <strong>Kerio</strong> <strong>Connect</strong> client, right-click a folders and select Sharing.<br />
2. Select with whom to share:<br />
• user — type a name or email address (<strong>Kerio</strong> <strong>Connect</strong> client will offer a list of users)<br />
• group of users — select from a list of groups<br />
• everyone from your domain<br />
• everyone from server — only available if public folders are set as Global for all<br />
domains<br />
3. Select the level of rights:<br />
• can view — users cannot edit messages<br />
• can change — users can edit messages<br />
• is owner — users can edit messages and change sharing rights<br />
4. You can Set the rights also for subfolders.<br />
Any subfolders create after you set sharing will not be included.<br />
5. Save the settings.<br />
45
Sharing in <strong>Kerio</strong> <strong>Connect</strong> client<br />
Sharing calendars<br />
1. In your calendar section in <strong>Kerio</strong> <strong>Connect</strong> client, right-click a calendar and select Sharing.<br />
2. Select with whom to share:<br />
• user — type a name or email address (<strong>Kerio</strong> <strong>Connect</strong> client will offer a list of users)<br />
• group of users — select from a list of groups<br />
• everyone from your domain<br />
• public — no login required for displaying the calendar<br />
3. Select the level of rights:<br />
• can view — users cannot edit events<br />
• can change — users can edit events<br />
• is owner — users can edit events and change sharing rights<br />
If you share your calendar publicly, <strong>Kerio</strong> <strong>Connect</strong> client assigns the can view rights (these<br />
settings cannot be changed).<br />
4. Save the settings.<br />
46
10.4 Sharing contacts, notes and task folders<br />
Sharing contacts, notes and task folders<br />
1. In your calendars/notes/tasks section in <strong>Kerio</strong> <strong>Connect</strong> client, right-click a folders and<br />
select Sharing.<br />
2. Select with whom to share:<br />
• user — type a name or email address (<strong>Kerio</strong> <strong>Connect</strong> client will offer a list of users)<br />
• group of users — select from a list of groups<br />
• everyone from your domain<br />
3. Select the level of rights:<br />
• can view — users cannot edit contacts/notes/tasks<br />
• can change — users can edit contacts/notes/tasks<br />
• is owner — users can edit contacts/notes/tasks and change sharing rights<br />
4. Save the settings.<br />
Removing sharing rights<br />
Go to the sharing dialog of a folder and click the x sign next to the user you wish to remove<br />
from sharing.<br />
47
Sharing in <strong>Kerio</strong> <strong>Connect</strong> client<br />
Subscribe to shared folders<br />
• email, calendar, note and task folders — click the plus sign next to Shared Folders in<br />
the left hand tree and select the folder to subscribe.<br />
• calendar folders — click the plus sign next to People in the calendar list on the left<br />
and select the calendar to subscribe.<br />
Unsubscribing shared folders<br />
Right-click a shared folder and select Hide.<br />
48
49<br />
10.7 Unsubscribing shared folders
Synchronizing folders with mobile devices<br />
Overview<br />
New In <strong>Kerio</strong> <strong>Connect</strong> 8.2!<br />
Selecting folders to synchronize<br />
In <strong>Kerio</strong> <strong>Connect</strong> client, you can select which folders will synchronize to your<br />
iCal/CalDAV/CardDAV/Exchange ActiveSync clients.<br />
1. Click your name in <strong>Kerio</strong> <strong>Connect</strong> client and select Settings.<br />
2. Go to section Folders to Sync.<br />
3. Select which folders will synchronize.<br />
The icon will help you identify the type of each folder (emails, contacts, tasks, notes)<br />
4. Save.<br />
50
51<br />
11.2 Selecting folders to synchronize
Configuring clients for instant messaging<br />
Recommended IM clients<br />
<strong>Kerio</strong> instant messaging service is based on XMPP, an open technology for real-time<br />
communication.<br />
<strong>Kerio</strong> <strong>Connect</strong> recommends the following instant messaging clients:<br />
• Pidgin for Microsoft Windows<br />
• Psi for Linux<br />
• Messages (iChat) for Mac OS X<br />
Supported features<br />
<strong>Kerio</strong> instant messaging service supports the following features:<br />
• sending rich text messages<br />
• presence notifications<br />
• sharing files<br />
• auto-populated contact list of your colleagues<br />
• synchronization of contact photos<br />
• auto-configuration on Mac<br />
• audio/video calls (availability depends on your IM client)<br />
• talking with multiple users in a single chat room (for more information on group chat,<br />
read article Initiating group chat in instant messaging)<br />
Configuring Pidgin for Microsoft Windows<br />
To configure the Pidgin client, follow these steps:<br />
1. Download and install Pidgin.<br />
2. Run the application and click Accounts → Manage Accounts → Add.<br />
52
12.3 Configuring Pidgin for Microsoft Windows<br />
3. Fill in the information — protocol (XMPP), your username and password, your domain.<br />
4. Save the account.<br />
53
Configuring clients for instant messaging<br />
54<br />
Configuring Messages on Mac OS X
12.5 Configuring Psi on Linux<br />
For manual configuration, follow these steps:<br />
1. Go to Messages to Preferences → Accounts. and click the plus sign.<br />
2. Fill in the information — protocol (Jabber), account name (you username including the<br />
domain) and password.<br />
3. Save the account.<br />
Use similar settings for iChat.<br />
Configuring Psi on Linux<br />
1. Download and install Psi.<br />
2. Run the application and click General → Account Setup → Add.<br />
55
Configuring clients for instant messaging<br />
3. Fill in the information — XMPP address (your username including the domain) and<br />
password.<br />
4. Save the account.<br />
Contact lists<br />
When you login to your account in an IM client for the first time, a list of all your Colleagues<br />
will be created. You can move them into other folders or delete them (see section<br />
Troubleshooting on how to restore this contact list).<br />
You can create additional contact lists and add other contacts depending on the client you<br />
use.<br />
56
12.7 Troubleshooting<br />
Troubleshooting<br />
Contact list<br />
If you have problems with your company contacts (Colleagues), ask your administrator to<br />
restore your contact list.<br />
Any change you have previously made to the Colleagues list will be lost.<br />
external contacts will remain preserved.<br />
Your<br />
Cannot connect to your account<br />
If you cannot connect to your account, check your DNS settings for client auto-configuration<br />
or configure the clients manually:<br />
Pidgin<br />
Go to Modify Account → tab Advanced and use one the following configurations:<br />
• uncheck option Require encryption, add your server address and port 5222, or<br />
• set <strong>Connect</strong>ion Security to Use old-style SSL, add your server address and port<br />
5223<br />
Messages<br />
Go to Account Settings → tab Server Settings and use one the following configurations:<br />
• uncheck option Use SSL, add your server address and port 5222, or<br />
• check option Use SSL, add your server address and port 5223<br />
Psi<br />
Go to Modify Account → tab <strong>Connect</strong>ion, check option Manually Specify Host/Port and<br />
use one the following configurations:<br />
• set Encryption <strong>Connect</strong>ion to Always, add your server address (Host) and port<br />
5222, or<br />
• set Encryption <strong>Connect</strong>ion to Legacy SSL, add your server address (Host) and<br />
port 5223<br />
57
Initiating group chat in instant messaging<br />
About group chat in instant messaging<br />
New in <strong>Kerio</strong> <strong>Connect</strong> 8.2!<br />
If you use instant messaging in <strong>Kerio</strong> <strong>Connect</strong> and want to chat with multiple users and share<br />
thoughts with all of them together, you can create a temporary chat room, i.e. group chat.<br />
<strong>Kerio</strong> <strong>Connect</strong> does not require any additional settings to use group chats.<br />
The server address for group chats is conference.[your_domain_name] , for example<br />
conference.feelmorelaw.com.<br />
This article describes group chat in:<br />
• Pidgin for Microsoft Windows<br />
• Messages for Mac OS X<br />
• Psi for Linux<br />
For information on initial configuration of instant messaging clients, read article Configuring<br />
clients for instant messaging.<br />
Pidgin for Microsoft Windows<br />
Initiating group chat in Pidgin<br />
1. In your Pidgin, click Buddies → Join a Chat.<br />
2. Select account, type a room name, server, your nickname (Handle).<br />
58
13.2 Pidgin for Microsoft Windows<br />
3. Click Join.<br />
4. To configure the chat room (e.g. secure the room with a password), click Configure Room<br />
and set parameters.<br />
You cannot change the parameters later.<br />
5. Confirm the settings.<br />
Inviting people to group chat in Pidgin<br />
To invite people to a group chat, drag them from your contact list to the room list or click<br />
Conversation → Invite.<br />
59
Initiating group chat in instant messaging<br />
Joining and leaving group chats in Pidgin<br />
If you receive an invitation, click Accept to join the group chat.<br />
You can also search through existing chat groups by clicking on Buddies → Join a Chat →<br />
Room List → Find Rooms.<br />
To leave a room, close the chatroom window.<br />
Messages for Mac OS X<br />
Initiating group chats in Messages<br />
To create a group chat, add at least two users to a conversation.<br />
1. Initiate a conversation in Messages.<br />
2. Add users to this conversation.<br />
Users receive an invitation and you can start chatting.<br />
60
13.3 Messages for Mac OS X<br />
Inviting people to group chats in Pidgin<br />
To invite people to a multi user chat room, click the blue plus icon and invite users.<br />
Joining and leaving group chats in Messages<br />
To join a group chat, select it from the list of chats and click Accept.<br />
61
Initiating group chat in instant messaging<br />
To leave a chat room, delete it from the list of chats.<br />
Psi for Linux<br />
Initiating group chat in Psi<br />
1. In your Psi, click General → Join Groupchat.<br />
2. Type a conference host, room name, server, your nickname.<br />
If you want to protect the chat room, type a password.<br />
3. Click Join.<br />
4. To configure the chat room (e.g. secure the room with a password), click the down arrow<br />
above the user list and select Configure Room.<br />
62
13.4 Psi for Linux<br />
5. Apply the settings.<br />
Inviting people to group chat in Psi<br />
To invite people to a group chat, select a person in your contact list and click Invite To.<br />
63
Initiating group chat in instant messaging<br />
Joining and leaving group chats in Psi<br />
To accept an invitation to a group chat, double-click the invitation text inside the event dialog<br />
and click Join.<br />
64
13.4 Psi for Linux<br />
To leave a room, close the chatroom window.<br />
65
<strong>Kerio</strong> <strong>Connect</strong> Account Assistant<br />
About <strong>Kerio</strong> <strong>Connect</strong> Account Assistant<br />
<strong>Kerio</strong> <strong>Connect</strong> Account Assistant is a single autoconfig tool which enables one-time<br />
auto-configuration of the following applications on Mac OS 10.5 or newer:<br />
• Apple Mail<br />
• Apple iCal<br />
• Apple Address Book<br />
• Microsoft Outlook<br />
• Microsoft Entourage<br />
Using <strong>Kerio</strong> <strong>Connect</strong> Account Assistant<br />
<strong>Kerio</strong> <strong>Connect</strong> Account Assistant is unique for each user.<br />
download it from your own integration page.<br />
Therefore, it is necessary to<br />
1. Open the Mac OS X integration page (e.g. http://mail.feelmorelaw.com/integration).<br />
You can also click your name in <strong>Kerio</strong> <strong>Connect</strong> client and select Integration with Mac.<br />
66
14.2 Using <strong>Kerio</strong> <strong>Connect</strong> Account Assistant<br />
2. Click on Set up my Mac and download <strong>Kerio</strong> <strong>Connect</strong> Account Assistant to your computer.<br />
67
<strong>Kerio</strong> <strong>Connect</strong> Account Assistant<br />
3. Once the download finishes, the installation program gets started — confirm installation<br />
and run it.<br />
4. Select which products installed on your computer to configure (you can configure any of<br />
them later) and Continue.<br />
68
14.2 Using <strong>Kerio</strong> <strong>Connect</strong> Account Assistant<br />
5. Enter your <strong>Kerio</strong> <strong>Connect</strong> user account password and Continue.<br />
Now the configuration application verifies your identity and server connection.<br />
6. Click on Configure to run configuration of the selected applications.<br />
Now the configured applications are available and ready.<br />
All previous configuration modules are available at the integration page, upon<br />
clicking on See other options.<br />
69
Support for Apple iCal/Calendar using the CalDAV<br />
standard<br />
About CalDAV and Apple iCal/Calendar<br />
CalDAV is an Internet standard which allows applications such as Apple iCal and Apple<br />
Calendar to manage calendaring information on a remote server (<strong>Kerio</strong> <strong>Connect</strong>).<br />
<strong>Kerio</strong> <strong>Connect</strong> supports the following CalDAV features:<br />
• calendar availability (free/busy information)<br />
• events with privacy tag<br />
• scheduling (invitation requests)<br />
New in <strong>Kerio</strong> <strong>Connect</strong> 8.2!<br />
• per-folder sharing (without delegation)<br />
• folder sharing notifications<br />
• full delegation support<br />
• custom labels for shared calendars<br />
Configuring CalDAV account<br />
Automatic configuration<br />
Use <strong>Kerio</strong> <strong>Connect</strong> Account Assistant to automatically configure Apple iCal/Calendar accounts<br />
on Mac OS X 10.5 or later.<br />
Manual configuration<br />
1. Run the Apple iCal/Calendar application.<br />
2. In the menu, select iCal/Calendar→ Preferences and go to tab Accounts.<br />
3. Click on the + button to create a new account.<br />
70
15.3 Sharing calendars<br />
4. Type your credentials and the location of your <strong>Kerio</strong> <strong>Connect</strong> server.<br />
5. Confirm.<br />
Sharing calendars<br />
If you configure Apple iCal/Calendar with CalDAV, you can share individual calendars with<br />
other users.<br />
You can also use an advanced type of sharing — delegation. A delegate has full control over<br />
your calendar and can also create and accept meeting invitations on your behalf.<br />
To share a calendar:<br />
1. Select a calendar you want to share from the list of your calendars.<br />
2. In the menu, select Calendar → Share Calendar (Edit → Share Calendar on 10.8 and<br />
above).<br />
3. Click the + button to add users.<br />
4. In the Privilege column, assign rights — Read only or Read & Write.<br />
71
Support for Apple iCal/Calendar using the CalDAV standard<br />
Adding shared, public or resource calendar<br />
Users assigned sharing rights receives a notification which invites them to join the shared<br />
calendar.<br />
If you accept the invitation, the calendar will be added to your calendar list.<br />
It is possible to add other calendars (e.g. public calendars or resources). This is necessary<br />
if the initial invitation was either declined, or never received. Adding or removing calendars<br />
72
15.4 Assigning delegates<br />
for synchronization can be configured in the settings of the <strong>Kerio</strong> <strong>Connect</strong> client in section<br />
Folders to Sync.<br />
Assigning delegates<br />
You can also use an advanced type of sharing — delegation. A delegate has full control over<br />
your calendar and can also create and accept meeting invitations on your behalf.<br />
Delegates are assigned in the account settings, under the Delegation tab.<br />
button to add a delegate.<br />
Choose the Edit<br />
Upgrading to <strong>Kerio</strong> <strong>Connect</strong> 8.2<br />
Due to the changes in calendar sharing in <strong>Kerio</strong> <strong>Connect</strong> 8.2, users with currently delegated<br />
calendars in Apple iCal/Calendar will need to restart their computer. After re-launching<br />
Apple iCal/Calendar, the user will receive an invitation to join each shared calendar that was<br />
previously added using the delegation feature.<br />
73
Configuring Microsoft Windows 8 Mail using Exchange<br />
ActiveSync<br />
Overview<br />
<strong>Kerio</strong> <strong>Connect</strong> 8.1 and above supports the ability to synchronize mail, contacts, and calendars<br />
to the Microsoft Windows 8 operating system via the Exchange ActiveSync protocol.<br />
Beginning May 1, 2013, the support of Exchange ActiveSync in <strong>Kerio</strong> <strong>Connect</strong> is<br />
available as an add-on. For detailed information, read the Exchange ActiveSync FAQs.<br />
Configuring <strong>Kerio</strong> <strong>Connect</strong><br />
There is no additional configuration necessary to support Exchange ActiveSync (EAS) from<br />
Microsoft Windows 8.<br />
Check the following items:<br />
• Exchange ActiveSync add-on in <strong>Kerio</strong> <strong>Connect</strong><br />
• HTTPS service running and port 443 open on your firewall<br />
• SSL certificate signed by a certification authority to simplify desktop configuration<br />
Installing SSL certificate on your desktop<br />
Users need to install a certificate if <strong>Kerio</strong> <strong>Connect</strong> uses a self-signed certificate.<br />
1. Go to the <strong>Kerio</strong> <strong>Connect</strong> client login page and click Integration with Windows.<br />
2. Click the Download SSL certificate link.<br />
74
16.4 Configuring Mail on Windows 8<br />
3. Open the file and select Install the certificate.<br />
4. Select either the current user of local machine.<br />
5. Browse for the Certificate store and select Trusted Root Certification Authorities.<br />
6. Confirm.<br />
Configuring Mail on Windows 8<br />
Before you add an Exchange ActiveSync account, you must configure a Microsoft<br />
account (e.g. Hotmail, Windows Live, Outlook.com)<br />
1. In the Mail application, go to Settings → Accounts → Add an account.<br />
2. Select Outlook and Show more details.<br />
3. Fill in the information.<br />
4. <strong>Connect</strong>.<br />
75
Configuring Microsoft Windows 8 Mail using Exchange ActiveSync<br />
Now you can start using the Mail application and synchronize your <strong>Kerio</strong> <strong>Connect</strong> emails,<br />
contacts and calendars.<br />
76
Synchronizing data with mobile devices<br />
Overview<br />
<strong>Kerio</strong> <strong>Connect</strong> supports the ActiveSync which is used to synchronize data between the<br />
computer (server or workstation) and mobile devices.<br />
ActiveSync is a protocol but it is also an application generally included in mobile devices<br />
with Windows Mobile operating systems. It is also a desktop application installed to desktop<br />
computers and used to synchronize data with mobile devices connected to the computer via<br />
a so called “cradle”.<br />
<strong>Kerio</strong> <strong>Connect</strong> uses the ActiveSync protocol for direct synchronization of data saved on the<br />
server with data stored in mobile devices. It supports synchronization of email folders,<br />
calendar, contacts and, in case of some devices, also tasks.<br />
Supported mobile devices<br />
<strong>Kerio</strong> <strong>Connect</strong> supports several mobile devices. See the product website for an overview of<br />
supported devices.<br />
SSL Certificates<br />
HTTP protocol is used for direct communication between <strong>Kerio</strong> <strong>Connect</strong> and mobile devices.<br />
This protocol is not secured and the connection might be wiretapped. This might lead to<br />
misuse of your fragile information such as username and password. For this reason, SSL<br />
(Secure Socket Layer) encryption is often used for traffic to protect the communication from<br />
wiretapping. The HTTP protocol secured by SSL encryption is called HTTPS.<br />
SSL encryption is based on so called SSL certificates. Mailserver disposes of the certificate of<br />
the server against which the certificate in your mobile device is suppose to authenticate. There<br />
are two types of certificates:<br />
• certificates signed by a trustworthy commercial certification authority,<br />
• self-signed certificates.<br />
If your certificate is signed by a commercial authority, there exists a great chance that the<br />
device already includes the certificate and no installation will be required. However, if you use<br />
the <strong>Kerio</strong> <strong>Connect</strong>’s self-signed certificate or a certificate signed by an authority not supported<br />
by the device, it is necessary to download and install the certificate in your device. The<br />
instructions for this procedure are provided below..<br />
77
Synchronizing data with mobile devices<br />
To encrypt your traffic by SSL, download and install the certificate before configuring the<br />
ActiveSync.<br />
The following guidelines suppose there is a working Internet connection set in your mobile<br />
device:<br />
1. In the browser, enter your <strong>Kerio</strong> <strong>Connect</strong>’s URL to open the <strong>Kerio</strong> WebMail’s login page.<br />
2. Click on Download SSL certificate.<br />
3. Installation of the certificate should be offered by the device. Install it.<br />
The suggested guidelines work on most of mobile devices.<br />
installation of the certificate is a bit more difficult:<br />
However, on some devices<br />
Allowing installation of a root certificate in WM 5.0 Smartphone Edition<br />
The security policy of Smartphone devices with Windows Mobile 5.0 or Windows Mobile 5.0<br />
AKU2 forbids installation of certificates issued by other than trusted certification authorities.<br />
To allow installation of certificates issued by authorities not supported by the particular device<br />
(an internal certificate or the <strong>Kerio</strong> <strong>Connect</strong>’s self-signed certificate), it is necessary to install<br />
a mobile device registry editor on the mobile device and use this editor to allow installation<br />
of untrustworthy certificates. One of the options is for example application regeditSTG.zip<br />
(24.01 KB).<br />
In this editor, follow these instructions:<br />
1. Find and download regeditSTG.zip (available for free) and unpack it.<br />
2. Move the editor to the mobile phone (e.g. by using the MS ActiveSync desktop application).<br />
It is necessary that the file is saved in the phone, not on the memory card.<br />
3. On the telephone, click on the file and run it.<br />
4. Run regeditSTG.exe and find HKLM\Security\Policies\Policies<br />
5. Change the following registry items:<br />
• 00001001 overwrite the 2 with 1<br />
• 00001005 overwrite the 16 with 40<br />
• 00001017 overwrite the 128 with 144<br />
6. Now you can download the certificate from the server and install it.<br />
78
17.4 Windows Mobile 5.0<br />
So called “hard reset” removes the registry changes (it is necessary to<br />
repeat the settings if needed).<br />
SSL encryption in Sony Ericsson devices<br />
If the <strong>Kerio</strong> <strong>Connect</strong>’s self-signed certificate is installed, the device does not require<br />
confirmation for each synchronization with the server:<br />
[Security Information ?] The certificate could not be verified. Select<br />
’Certificate details’ to get more information about the certificate. Do<br />
you want to accept the certificate and proceed? [ Yes ] [ No ] [ Details ]<br />
Therefore, it is recommended to install a certificate signed by a trustworthy certification<br />
authority.<br />
Windows Mobile 5.0<br />
In cooperation with <strong>Kerio</strong> <strong>Connect</strong>, Windows Mobile 5.0 provides many additional features:<br />
• Windows Mobile 5.0 supports the following folder types:<br />
• email<br />
• calendar<br />
• contacts<br />
• tasks<br />
• Wipe — implementation of the ActiveSync protocol allows the <strong>Kerio</strong> <strong>Connect</strong><br />
administrator remote removal of all synchronized folders and user login data from<br />
the device.<br />
The following options are not supported by <strong>Kerio</strong> <strong>Connect</strong>:<br />
• SMS-based Always Up-To-Date (AUTD)<br />
Setting of ActiveSync on Windows Mobile 5.0 is identical with settings on Windows Mobile 5.0<br />
AKU2.<br />
Windows Mobile 5.0 AKU2<br />
In cooperation with <strong>Kerio</strong> <strong>Connect</strong>, Windows Mobile 5.0 AKU2 provides these features:<br />
• Windows Mobile 5.0 AKU2 supports the following folder types:<br />
79
Synchronizing data with mobile devices<br />
• email<br />
• calendar<br />
• contacts<br />
• tasks<br />
• DirectPush Technology — this technology allows mobile devices to keep open HTTP(S)<br />
connection with the server. Whenever a new item is received or any change is<br />
performed in any folder, changes are synchronized immediately.<br />
• <strong>Kerio</strong> <strong>Connect</strong> supports Global Address Lookup — this feature allows to look up<br />
email addresses in all contact folders available to the particular user (including public<br />
folders).<br />
• Wipe — so called “wipe” allows <strong>Kerio</strong> <strong>Connect</strong> administrators reset remote devices.<br />
This reset clears all user data out of the device. Only default files and settings will be<br />
kept on the mobile device.<br />
The following features of Windows Mobile 5.0 AKU2 are not supported by <strong>Kerio</strong> <strong>Connect</strong>:<br />
• Setting of security policy from the server (Enforce Security Policy)<br />
• SMS-based Always Up-To-Date (AUTD)<br />
ActiveSync settings in Pocket PC Edition<br />
It is not necessary to install the ActiveSync application since it is included in the Windows<br />
Mobile operating system (it can be found under Start → Programs).<br />
Before the starting to configure, it is necessary to check if connection of the device to network<br />
is set correctly (required for connection to the mailserver). This can be tested for example by<br />
using Internet Explorer to connect to <strong>Kerio</strong> WebMail.<br />
If the connection does not fail, you can start to set the ActiveSync application:<br />
1. In Start → Programs, use the ActiveSync icon to run the application.<br />
Figure 1<br />
ActiveSync icon<br />
80
17.5 Windows Mobile 5.0 AKU2<br />
2. When setting the ActiveSync device for the first time, an informative tips are displayed to<br />
guide you through. Click on the set up your device to sync with it link.<br />
If you already know how to set ActiveSync, open same dialog from Menu → Add Server<br />
Source. This method can be also used whenever you need to change the configuration.<br />
Figure 2<br />
ActiveSync menu<br />
In case that the ActiveSync application has already synchronized data with<br />
another mailserver, remove the settings by clicking on the Delete button in Menu<br />
→ Options.<br />
3. This opens the first page of the configuration wizard used for specification of the <strong>Kerio</strong><br />
<strong>Connect</strong>’s Internet name.<br />
The This server requires an encrypted (SSL) connection option allows encryption of any<br />
traffic between the server and the device. It is highly recommended to keep the option<br />
enabled to protect your connections from debugging and misuse.<br />
To allow the encryption, it is required that an SSL certificate is installed on the device.<br />
If your company uses certificates authorized by a commercial certification authority, it<br />
is possible that your device already includes support for SSL encryption. If the company<br />
uses a certificate generated by <strong>Kerio</strong> <strong>Connect</strong> or another internal certificate, it is necessary<br />
to install another certificate on the device.<br />
Once the server name is set and SSL encryption enabled, click on Next to open the<br />
following page of the configuration wizard.<br />
4. On the second page, set your login data:<br />
81
Synchronizing data with mobile devices<br />
Figure 3<br />
ActiveSync — specification of a mailserver and setting secure traffic<br />
Figure 4<br />
ActiveSync — user login data definition<br />
User name<br />
Use this entry to specify the user name used for authentication to <strong>Kerio</strong> <strong>Connect</strong>.<br />
Password<br />
Use this entry to specify the password used for authentication to <strong>Kerio</strong> <strong>Connect</strong>.<br />
82
17.5 Windows Mobile 5.0 AKU2<br />
Domain<br />
Use this textfield to enter the email domain name (usually it is the part of your email<br />
address after the @ symbol).<br />
Save password<br />
If you do not wish to be asked for the login data by each startup of the<br />
synchronization, enable this option. If you want to use the feature of automatic<br />
synchronization, this option is required to be enabled.<br />
Figure 5<br />
ActiveSync — the Advanced dialog box<br />
Besides login data items, the Advanced button is included in this dialog. It<br />
can be used to set optional parameters. The dialog allows to set measures to be<br />
taken in case that a collision occurs during the synchronization.<br />
Collisions might occur when some folders to be synchronized have been changed both on<br />
the server and on the device since the last synchronization. According to the parameters<br />
set here, ActiveSync will either beat the change performed on the server with the one<br />
applied on the device or the other way round. By default, the server beats the device. It is<br />
recommended to keep these settings.<br />
Once the settings are done, click on Next.<br />
5. The following dialog provides a list of all folder types which can be synchronized. Check<br />
only those folders that will be synchronized and leave unchecked or uncheck the others.<br />
83
Synchronizing data with mobile devices<br />
Figure 6<br />
ActiveSync — folder synchronization settings<br />
The Settings button also included in the dialog is active only upon clicking on the Calendar<br />
or E-mail folder and it opens a dialog where synchronization parameters for calendar<br />
and email folders can be set. The Contacts and Tasks folders do not contain any other<br />
parameters.<br />
Calendar Sync Options<br />
Selection of the Calendar folder and a consequent clicking on Settings opens a dialog<br />
with synchronization settings. The dialog includes a menu where it can be set how<br />
old data will be synchronized.<br />
New events will be synchronized without exception. However, to shorten the time<br />
needed for synchronization, it is possible to set the maximum age of events to be<br />
synchronized (it is not necessary to synchronize old data where the information will<br />
not be needed any longer).<br />
By default, data up to two weeks old is synchronized. If you need to synchronized<br />
also older data, change the settings. In such a case, bear in mind that at least the first<br />
synchronization may take longer.<br />
E-mail Sync Options<br />
Selection of the Calendar folder and a consequent clicking on Settings opens a dialog<br />
with synchronization settings. The dialog includes several options to customize<br />
synchronization:<br />
84
17.5 Windows Mobile 5.0 AKU2<br />
Figure 7<br />
ActiveSync — calendar synchronization settings<br />
Figure 8 ActiveSync — email synchronization settings<br />
• Include the previous — this option allows to set how old messages will be<br />
synchronized. By default, messages up to three days old are included in the<br />
synchronization.<br />
• Limit e-mail size to — only messages of size up to the value set will be<br />
synchronized.<br />
• Include file attachments — if this option is enabled, attachments are also<br />
included in synchronization.<br />
• Only if smaller than — the value entered in this option sets the maximum<br />
size of email attachments to be synchronized. Larger attachments are<br />
excluded from synchronization.<br />
The settings described above help decrease time needed for synchronization as well as<br />
the load of the synchronization on network connection.<br />
6. Once the settings are done, save the configuration by clicking on Finish. Now, the first<br />
synchronization between the device and <strong>Kerio</strong> <strong>Connect</strong> will be started.<br />
During the synchronization, a dialog appears requiring confirmation of appliance of the<br />
security policy. Use the OK button for confirmation, otherwise the synchronization will<br />
not be completed correctly.<br />
85
Synchronizing data with mobile devices<br />
Figure 9<br />
Wipe confirmation<br />
Other ActiveSync settings are focused in your device’s user’s guide.<br />
ActiveSync settings in Smartphone Edition<br />
It is not necessary to install the ActiveSync application since it is included in the Windows<br />
Mobile operating system (it can be found under Start → ActiveSync).<br />
Before the starting to configure, it is necessary to check if connection of the device to network<br />
is set correctly (required for connection to the mailserver). This can be tested for example by<br />
using Internet Explorer to connect to <strong>Kerio</strong> WebMail.<br />
If the connection does not fail, you can start to set the ActiveSync application:<br />
1. In Start Programs, use the ActiveSync icon to run the application.<br />
Figure 10<br />
ActiveSync icon<br />
2. Click on Menu and select Add Server Source.<br />
Figure 11<br />
ActiveSync menu<br />
86
17.5 Windows Mobile 5.0 AKU2<br />
In case that the ActiveSync application has already synchronized data with<br />
another mailserver, remove the settings by clicking on the Delete button in Menu<br />
→ Options.<br />
3. This opens the synchronization’s configuration wizard.<br />
On the first page of the wizard, use the Server address entry to specify the server’s<br />
Internet name.<br />
Figure 12<br />
ActiveSync — specification of a mailserver and setting secure traffic<br />
The This server requires an encrypted (SSL) connection option allows encryption of any<br />
traffic between the server and the device. It is highly recommended to keep the option<br />
enabled to protect your connections from debugging and misuse.<br />
To allow the encryption, it is required that an SSL certificate is installed on the device.<br />
If your company uses certificates authorized by a commercial certification authority, it is<br />
possible that your device already includes support for SSL encryption. If the company uses<br />
a certificate generated by <strong>Kerio</strong> <strong>Connect</strong> or a certificate signed by an internal authority, it<br />
is necessary to install another certificate on the device.<br />
Once the server name is set and SSL encryption enabled, click on Next to open the<br />
following page of the configuration wizard.<br />
4. On the second page, set your login data:<br />
User name<br />
Use this entry to specify the user name used for authentication to <strong>Kerio</strong> <strong>Connect</strong>.<br />
Password<br />
Use this entry to specify the password used for authentication to <strong>Kerio</strong> <strong>Connect</strong>.<br />
87
Synchronizing data with mobile devices<br />
Figure 13<br />
ActiveSync — user login data definition<br />
Domain<br />
Use this textfield to enter the email domain name (usually it is the part of your email<br />
address after the @ symbol).<br />
Save password<br />
If you do not wish to be asked for the login data by each startup of the<br />
synchronization, enable this option. This option is required to be enabled especially<br />
if you want to use the feature of automatic synchronization.<br />
5. The following dialog provides a list of all folder types which can be synchronized. Check<br />
only those folders that will be synchronized and leave unchecked or uncheck the others.<br />
Figure 14<br />
ActiveSync — folder synchronization settings<br />
Synchronization of email and calendar allows additional settings. Select Calendar or<br />
E-mail and click on Menu. In the menu just opened, select Settings. This opens<br />
a dialog providing options in accordance with type of item to be synchronized:<br />
88
17.5 Windows Mobile 5.0 AKU2<br />
Figure 15<br />
Folder synchronization settings — Menu<br />
Calendar Sync Options<br />
The Calendar Sync Options dialog includes a menu where is can be set how old data<br />
will be synchronized.<br />
Figure 16 Folder synchronization settings — calendar<br />
New events will be synchronized without exception. However, to shorten the time<br />
needed for synchronization, it is possible to set the maximum age of events to be<br />
synchronized (it is not necessary to synchronize old data where the information will<br />
not be needed any longer).<br />
By default, data up to two weeks old is synchronized. If you need to synchronized<br />
also older data, change the settings. In such a case, bear in mind that at least the first<br />
synchronization may take longer.<br />
E-mail Sync<br />
The E-mail Sync dialog includes two parameters to be customized:<br />
Figure 17<br />
Folder synchronization settings — email<br />
89
Synchronizing data with mobile devices<br />
• Include the previous — this option allows to set how old messages will be<br />
synchronized. By default, messages up to three days old are included in the<br />
synchronization.<br />
• Limit e-mail size to — only messages of size up to the value set will be<br />
synchronized.<br />
The settings described above help decrease time needed for synchronization as well as<br />
the load of the synchronization on network connection.<br />
6. Before closing the wizard, click on the Menu button and select the Advanced option. It<br />
allows setting of optional parameters. The dialog allows to set measures to be taken in<br />
case that a collision occurs during the synchronization.<br />
Figure 18<br />
ActiveSync — the Advanced dialog box<br />
Collisions might occur when some folders to be synchronized have been changed both on<br />
the server and on the device since the last synchronization. According to the parameters<br />
set here, ActiveSync will either beat the change performed on the server with the one<br />
applied on the device or the other way round. By default, the server beats the device. It is<br />
recommended to keep these settings.<br />
Once the settings are done, click on Next and consequently on the Finish button to save<br />
settings.<br />
7. Once the settings are done, save the configuration by clicking on Finish. Now, the first<br />
synchronization between the device and <strong>Kerio</strong> <strong>Connect</strong> will be started.<br />
During the synchronization, a dialog appears requiring confirmation of appliance of the<br />
security policy. Use the OK button for confirmation, otherwise the synchronization will<br />
not be completed correctly.<br />
Other ActiveSync settings are focused in your device’s user’s guide.<br />
90
17.6 Windows Mobile 6.0<br />
Figure 19<br />
Wipe confirmation<br />
Windows Mobile 6.0<br />
In cooperation with <strong>Kerio</strong> <strong>Connect</strong>, Windows Mobile 6.0 provides the following features:<br />
• Windows Mobile 6.0 supports the following folder types:<br />
• email<br />
• calendar<br />
• contacts<br />
• tasks<br />
• DirectPush Technology — this technology allows mobile devices to keep open HTTP(S)<br />
connection with the server. Whenever a new item is received or any change is<br />
performed in any folder, changes are synchronized immediately.<br />
• <strong>Kerio</strong> <strong>Connect</strong> supports Global Address Lookup — this feature allows to look up<br />
email addresses in all contact folders available to the particular user (including public<br />
folders).<br />
• Wipe — so called “wipe” allows <strong>Kerio</strong> <strong>Connect</strong> administrators reset remote devices.<br />
This reset clears all user data out of the device. Only default files and settings will be<br />
kept on the mobile device.<br />
If you perform synchronization via ActiveSync 12, your device will also support:<br />
• HTML emails,<br />
• message flags,<br />
• the “Out of office” feature.<br />
91
Synchronizing data with mobile devices<br />
The following features of Windows Mobile 6.0 are not supported by <strong>Kerio</strong> <strong>Connect</strong>:<br />
• Setting of security policy from the server (Enforce Security Policy)<br />
• SMS-based Always Up-To-Date (AUTD)<br />
Setting of ActiveSync on Windows Mobile 6.0 is identical with settings on Windows Mobile 5.0<br />
AKU2.<br />
Nokia Eseries<br />
Nokia Eseries allows folder synchronization by the ActiveSync protocol if the Nokia’s Mail For<br />
Exchange application is installed on the device.<br />
Devices E52, E55, E72 and E75 already have Mail for Exchange installed.<br />
Mail For Exchange with <strong>Kerio</strong> <strong>Connect</strong> provide the following options and features:<br />
• Nokia Eseries supports the ActiveSync protocol, version 2.5.<br />
• Nokia Eseries supports synchronization of the following folder types:<br />
• Inbox — other email folders are not synchronized.<br />
• Other folders and subfolders (only Nokia E52 — E75 with integrated Mail for<br />
Exchange).<br />
• Calendar — the default private calendar.<br />
• Contacts — the default private contact folder.<br />
• DirectPush Technology — this technology allows mobile devices to keep open HTTP(S)<br />
connection with the server. Whenever a new item is received or any change is<br />
performed in any folder, changes are synchronized immediately.<br />
• <strong>Kerio</strong> <strong>Connect</strong> supports Global Address Lookup — this feature allows to look up<br />
email addresses in all contact folders available to the particular user (including public<br />
folders).<br />
• This version allows installation of the root certificate on the device — this implies that<br />
it is also possible to use the <strong>Kerio</strong> <strong>Connect</strong>’s self-signed certificate for encryption.<br />
Mail For Exchange does not support the following features:<br />
• It is not possible to synchronize public and shared folders.<br />
• It is not possible to accept/reject an invitation. Invitations can be viewed in Inbox but<br />
it cannot be manipulated — it does not offer the Accept and Reject buttons and it is<br />
not displayed in the calendar.<br />
92
17.7 Nokia Eseries<br />
Mail For Exchange Settings<br />
The Mail for Exchange application is not included in the mobile device set. Therefore, it<br />
is necessary to install it. Import and installation of the application is described in the<br />
application’s guide which is available at the Nokia website.<br />
This chapter describes settings for devices Nokia E60 and Mail For Exchange 1.3.0. It<br />
can, therefore, slightly differ on other versions.<br />
1. After installation of Mail for Exchange, locate the application and open it.<br />
Figure 20 Icon of Mail For Exchange 1.3.0<br />
2. In the application, select the Sync mode option.<br />
Figure 21<br />
Mail For Exchange welcome page<br />
3. In the menu just opened, select the Edit profile option.<br />
4. In the Profile menu, select <strong>Connect</strong>ion.<br />
93
Synchronizing data with mobile devices<br />
Figure 22<br />
Options → Edit profile<br />
Figure 23<br />
The Edit profile menu<br />
5. This opens a dialog for connection to the server. The first section to be set is the <strong>Connect</strong>ion<br />
tab. The following parameters are to be set here:<br />
Figure 24<br />
The <strong>Connect</strong>ion dialog<br />
94
17.7 Nokia Eseries<br />
Exchange server<br />
Enter the server’s internet name or IP address.<br />
Secure connection<br />
The Secure connection option allows encryption of any traffic between the server<br />
and the device. It is highly recommended to keep the option enabled to protect your<br />
connections from debugging and misuse.<br />
To allow the encryption, it is required that an SSL certificate is installed on the device.<br />
If your company uses certificates authorized by a commercial certification authority,<br />
it is possible that your device already includes support for SSL encryption. If the<br />
company uses a certificate generated by <strong>Kerio</strong> <strong>Connect</strong> or another internal certificate,<br />
it is necessary to install another certificate on the device.<br />
Now, save settings of the tab.<br />
6. In the Profiles menu, select Credentials. Enter login information used for connection to<br />
your mailbox:<br />
Figure 25<br />
The Credentials dialog<br />
Username<br />
Use the Username textfield to enter username used for connection to the mailbox in<br />
<strong>Kerio</strong> <strong>Connect</strong>.<br />
Password<br />
Use the Password textfield to enter password used for connection to the mailbox in<br />
<strong>Kerio</strong> <strong>Connect</strong>.<br />
Domain<br />
Use the Domain textfield to enter the name of the email domain (if you are not sure<br />
about this part, contact your administrator).<br />
Save the settings.<br />
7. In the Profiles menu, select Sync content. On this tab, set folders to be synchronized.<br />
The tab also allows selection of preferred store for possible collisions. Collisions might<br />
95
Synchronizing data with mobile devices<br />
occur when some folders to be synchronized have been changed both on the server and<br />
on the device since the last synchronization. In accordance with the settings, either the<br />
changes performed on the server will beat and overwrite the changes in performed on the<br />
device (the Server wins option) or the other way round (the Phone wins option) within<br />
the ActiveSync. By default, the server beats the device. It is recommended to keep these<br />
settings.<br />
Figure 26<br />
The Sync content dialog<br />
8. In the Profiles menu, select Sync schedule. On this tab it is possible to schedule automatic<br />
synchronization:<br />
Figure 27<br />
The Sync Schedule dialog<br />
Peak sync schedule<br />
Sets the synchronization interval for peak time (the time when you need as fresh<br />
information as possible, usually this time includes the working hours).<br />
96
17.7 Nokia Eseries<br />
Off-peak sync schedule<br />
Sets the synchronization interval for off-peak time (usually at night).<br />
Peak start time<br />
Setting of the peak time start.<br />
Peak end time<br />
Setting of the peak time end.<br />
Peak days<br />
Setting of peak days (all working days are set by default).<br />
9. Return to the Profiles menu and select the Calendar option. On this tab it is possible to<br />
set parameters for automatic synchronization (see figure 27):<br />
Figure 28<br />
The Calendar dialog<br />
Sync calendar back<br />
All upcoming events are included in the synchronization. However, to shorten the<br />
time needed for synchronization, it is possible to set the maximum age of events to<br />
be synchronized (it is not necessary to synchronize old data where the information<br />
will not be needed any longer).<br />
By default, data up to two weeks old is synchronized. If you need to synchronized<br />
also older data, change the settings. In such a case, bear in mind that at least the first<br />
synchronization may take longer.<br />
Initial sync<br />
Before the first synchronization of the server with the device, it is necessary to<br />
remove one of the stores to avoid collisions. The Initial sync option specifies whether<br />
data on the server (Keep items on phone) or on the device (Delete items on phone)<br />
will be removed during the first synchronization.<br />
97
Synchronizing data with mobile devices<br />
10. In the Profiles menu, select the Contacts option. This tab allows setting of solution for<br />
possible initial collision. Before the first synchronization of the server with the device, it is<br />
necessary to remove one of the stores to avoid collisions. The Initial sync option specifies<br />
whether data on the server (Keep items on phone) or on the device (Delete items on<br />
phone) will be removed during the first synchronization.<br />
Figure 29<br />
The Contacts dialog<br />
11. In the Profiles menu, select the Email option. On this tab, it is possible to set parameters<br />
of synchronization of email folders:<br />
Figure 30<br />
The Email dialog<br />
Email address<br />
The option requires entering of the email address.<br />
Show new mail pop-up<br />
Enables/disables new mail notifications.<br />
98
17.8 Nokia N73 and N95<br />
Use signature<br />
Allows adding of a footer to email messages.<br />
Signature<br />
Footer definition.<br />
When sending mail<br />
Setting of time when email is sent (immediately or during the upcoming<br />
synchronization).<br />
Sync messages back<br />
All unread messages are included in the synchronization. However, to shorten the<br />
time needed for synchronization, it is possible to set the maximum age of messages<br />
to be synchronized (it is not necessary to synchronize old data where the information<br />
will not be needed any longer).<br />
By default, synchronization is set to messages up to three days old. If you need to<br />
synchronized also older data, change the settings. In such a case, bear in mind that<br />
at least the first synchronization may take longer.<br />
Nokia N73 and N95<br />
Nokia N73 and N95 allows folder synchronization by the ActiveSync protocol if the Nokia’s<br />
Mail For Exchange 1.6.1 or higher is installed on the device.<br />
Mail For Exchange with <strong>Kerio</strong> <strong>Connect</strong> provide the following options and features:<br />
• Nokia N73 and N95 supports the ActiveSync protocol, version 2.5.<br />
• Nokia N73 and N95 supports synchronization of the following folder types:<br />
• Inbox — other email folders are not synchronized.<br />
• Calendar — the default private calendar.<br />
• Contacts — the default private contact folder.<br />
• DirectPush Technology — this technology allows mobile devices to keep open HTTP(S)<br />
connection with the server. Whenever a new item is received or any change is<br />
performed in any folder, changes are synchronized immediately.<br />
• <strong>Kerio</strong> <strong>Connect</strong> supports Global Address Lookup — this feature allows to look up<br />
email addresses in all contact folders available to the particular user (including public<br />
folders).<br />
• This version allows installation of the root certificate on the device — this implies that<br />
it is also possible to use the <strong>Kerio</strong> <strong>Connect</strong>’s self-signed certificate for encryption.<br />
99
Synchronizing data with mobile devices<br />
Mail For Exchange does not support the following features:<br />
• It is not possible to synchronize public and shared folders.<br />
• It is not possible to accept/reject an invitation. Invitations can be viewed in Inbox but<br />
it cannot be manipulated — it does not offer the Accept and Reject buttons and it is<br />
not displayed in the calendar.<br />
RoadSync<br />
<strong>Kerio</strong> <strong>Connect</strong> supports the RoadSync 2.0 application developed by DataViz. RoadSync enables<br />
synchronization between <strong>Kerio</strong> <strong>Connect</strong> and mobile devices.<br />
RoadSync supports synchronization of the following folder types:<br />
• Email,<br />
• Calendar,<br />
• Contacts,<br />
The RoadSync application can be installed on the following mobile devices:<br />
• Symbian UIQ,<br />
• Symbian S80,<br />
• Symbian S60 3rd Edition,<br />
• Palm OS (synchronization is available for email only),<br />
• Java MIDP 2.0 (synchronization is available for email only),<br />
For details on RoadSync and supported devices, see the DataViz website at<br />
http://www.dataviz.com/.<br />
Apple iPhone<br />
Apple iPhone 2.0<br />
This section addresses both Apple iPhone 3G and Apple iPhone 1.0 with the OS X 2.0 firmware.<br />
In additions to all options available also for OS X 1.0, Apple iPhone with OS X 2.0 supports the<br />
ActiveSync protocol for direct data synchronization. This implies that now <strong>Kerio</strong> <strong>Connect</strong> in<br />
cooperation with Apple iPhone 2.0 provides the following options:<br />
• Apple iPhone allows synchronization of:<br />
100
17.10 Apple iPhone<br />
• email,<br />
• calendar,<br />
• contacts.<br />
• Apple iPhone fully supports the device clean-up feature, so called “Device Wipe”. In<br />
short, the device can be cleared (deletion of all data and settings) remotely in case that<br />
it gets lost or stolen.<br />
If you happen to lose your Apple iPhone or it gets stolen,<br />
contact your network administrator immediately to get the device wiped<br />
remotely.<br />
• DirectPush Technology — this technology allows mobile devices to keep open HTTP(S)<br />
connection with the server. Whenever a new item is received or any change is<br />
performed in any folder, changes are synchronized immediately.<br />
• Global Address Lookup — this feature allows look-up of email addressed in contact<br />
folders.<br />
Account settings<br />
To configure ActiveSync (Exchange), follow these guidelines:<br />
1. In Apple iPhone, go to Settings → Mail, Contacts, Calendars.<br />
2. Select Add Account.<br />
3. Select the Microsoft Exchange account type.<br />
4. Enter the following account data:<br />
Email<br />
Enter the primary email address consisting of username and domain (e.g.<br />
jflyhigh@company.com, where jflyhigh is a username and company.com is an email<br />
domain).<br />
Server<br />
Enter DNS name of <strong>Kerio</strong> <strong>Connect</strong>.<br />
Username<br />
Enter username for login to your <strong>Kerio</strong> <strong>Connect</strong> mailbox.<br />
101
Synchronizing data with mobile devices<br />
Password<br />
Enter password for your mailbox.<br />
Description<br />
This is an optional entry. The description is helpful especially if you intend to use<br />
multiple accounts.<br />
Use SSL<br />
This option allows encryption of any traffic between the server and the device. It is<br />
highly recommended to keep the option enabled to protect your connections from<br />
debugging and misuse.<br />
To enable traffic encryption, it is necessary that an SSL certificate is installed in <strong>Kerio</strong><br />
<strong>Connect</strong>. To get the certificate, go to the <strong>Kerio</strong> WebMail login page in Safari and click<br />
on Download SSL certificate.<br />
5. In the dialog opened, select which folder types will be synchronized. Uncheck only items<br />
you would really not use.<br />
6. Once the settings are saved, the Mail days to sync item appears — open it and set<br />
how old items will be involved in synchronization. This measure helps avoid that the<br />
synchronization takes too long and that too much needless data is downloaded.<br />
At the end, set how often the synchronization will be performed. This can be done in Settings<br />
→ Fetch New Data. On the Advanced tab, you can also find setting of synchronization type<br />
for your Exchange account.<br />
Apple iPhone 3.0<br />
In Apple iPhone OS 3.0, all features of previous Apple iPhone OS versions are available.<br />
Newly, the following features have been introduced for Apple iPhone:<br />
• CalDAV protocol (allows calendar synchronization),<br />
• standard iCalendar (allows to download shared and public calendars for reading),<br />
• LDAP protocol (allows to access contacts via LDAP).<br />
• support for ActiveSync 12.1 (allows direct search in emails stored in <strong>Kerio</strong> <strong>Connect</strong> via<br />
Exchange account).<br />
Once the upgrade is completed successfully, it is necessary to<br />
remove and reconfigure the Exchange account, otherwise the device will<br />
keep attempting to connect to <strong>Kerio</strong> <strong>Connect</strong> via ActiveSync 2.5<br />
102
17.10 Apple iPhone<br />
In addition to features described above, the system introduces other improvements, such as:<br />
• the Copy&Paste method both for text and graphic items during email composition,<br />
• while composing an email message, it is possible to switch the client to the horizontal<br />
position,<br />
• notifications of new email delivered to other folders than the Inbox,<br />
• creating and sending invitations from ActiveSync account (including showing of<br />
availability of individual users),<br />
• notes synchronization with desktop applications Apple Mail and MS Outlook via Apple<br />
iTunes.<br />
For details on individual enhancements and their implementation options, refer to the Apple<br />
website. In the following sections, you will find settings applying to the very communication<br />
with <strong>Kerio</strong> <strong>Connect</strong>:<br />
Configuration of CalDAV account<br />
To configure CalDAV account, follow these guidelines:<br />
1. In Apple iPhone, go to Settings → Mail, Contacts, Calendars.<br />
2. Select Add Account → Other → Add CalDAV Account.<br />
3. Enter the following account data:<br />
Server<br />
Enter DNS name of <strong>Kerio</strong> <strong>Connect</strong>.<br />
User<br />
Enter username for login to your <strong>Kerio</strong> <strong>Connect</strong> mailbox.<br />
Password<br />
Enter password for your mailbox.<br />
Description<br />
This is an optional entry. The description is helpful especially if you intend to use<br />
multiple accounts.<br />
4. Click on Next to open the Unable to Verify Certificate dialog. If you continue, the<br />
connection either fails due to the server’s security policy or it is established successfully<br />
but the traffic is not protected from tapping. Therefore, it is strongly unrecommended<br />
to use unencrypted traffic. To switch to secured connection, click on Cancel and go to<br />
Advanced Settings:<br />
103
Synchronizing data with mobile devices<br />
Use SSL<br />
This option allows encryption of any traffic between the server and the device. It is<br />
highly recommended to keep the option enabled to protect your connections from<br />
debugging and misuse.<br />
To enable traffic encryption, it is necessary that an SSL certificate is installed in <strong>Kerio</strong><br />
<strong>Connect</strong>. To get the certificate, go to the <strong>Kerio</strong> WebMail login page in Safari and click<br />
on Download SSL certificate.<br />
Port<br />
Default ports for communication must be changed as follows:<br />
For HTTPS: 8443 → 443 (to enable the Use SSL option, use port 443)<br />
For HTTP: 8008 → 80<br />
The settings apply if standard ports for HTTP protocol are set on<br />
the server. If connection to the server with these settings fails, contact<br />
your network administrator an check that non-standard ports are not<br />
used for <strong>Kerio</strong> <strong>Connect</strong> traffic.<br />
Account URL<br />
Enter URL of the calendar account including the port number specified in the Port<br />
entry.<br />
For example, the URL will be as follows for domain company.com and port 80:<br />
• for your personal account:<br />
http(s)//mail.company.com:80/caldav<br />
• for a shared calendar of user wsmith:<br />
http(s)//mail.company.com:80/caldav/users/company.com/wsmith<br />
• for the calendar of the resource car1:<br />
http(s)//mail.company.com:80/caldav/users/company.com/car1<br />
• for public calendar:<br />
http(s)//mail.company.com:80/caldav/users/company.com/.public<br />
To view new calendars, go to the Calendar application by clicking on Calendars. In the list,<br />
simply click on the calendar you want to open.<br />
Subscription to calendars<br />
To subscribe calendar in the iCalendar format, follow these steps:<br />
1. In Apple iPhone, go to Settings → Mail, Contacts, Calendars.<br />
2. Select Add Account → Other → Add Subscribed Calendar.<br />
3. Enter the following account data:<br />
104
17.10 Apple iPhone<br />
Server<br />
Insert URL in this pattern: servername/ical<br />
4. If the account authentication fails, check the following items:<br />
Server<br />
Enter URL in a format compatible with calendar subscription. Basic URL follows<br />
this pattern: servername/ical The basic URL can be used to subscribe to the main<br />
calendar of your account. To subscribe to other calendars, use the following (derived)<br />
URL patterns:<br />
servername/ical/users/domain/user@domain — URL modified<br />
for the purpose of subscription to a shared calendar (e.g.<br />
mail.company.com/ical/users/company.com/wsmith@company.com).<br />
servername/ical/users/domain/room@domain — URL modified<br />
for the purpose of subscription to a resource calendar (e.g.<br />
mail.company.com/ical/users/company.com/meetingroom1@company.com).<br />
Description<br />
This is an optional entry. The description is helpful especially if you intend to use<br />
multiple calendars.<br />
User<br />
Enter username for login to your <strong>Kerio</strong> <strong>Connect</strong> mailbox.<br />
Password<br />
Enter password for your mailbox.<br />
Use SSL<br />
This option allows encryption of any traffic between the server and the device. It is<br />
highly recommended to keep the option enabled to protect your connections from<br />
debugging and misuse.<br />
To enable traffic encryption, it is necessary that an SSL certificate is installed in <strong>Kerio</strong><br />
<strong>Connect</strong>. To get the certificate, go to the <strong>Kerio</strong> WebMail login page in Safari and click<br />
on Download SSL certificate.<br />
Remove alarms<br />
It is recommended to enable this option, as it will not be possible to disable alarms<br />
after having downloaded the calendar to the device.<br />
To view new calendars, go to the Calendar application by clicking on Calendars. In the list,<br />
simply click on the calendar you want to open.<br />
Download of large shared or public calendars via slow connection (GPRS, EDGE) can<br />
result in temporary unavailability of the calendar to other users.<br />
105
Synchronizing data with mobile devices<br />
LDAP client configuration<br />
To configure LDAP account, follow these guidelines:<br />
1. In Apple iPhone, go to Settings → Mail, Contacts, Calendars.<br />
2. Select Add Account → Other → Add LDAP Account.<br />
3. Enter the following account data:<br />
Server<br />
Enter DNS name of <strong>Kerio</strong> <strong>Connect</strong>.<br />
User<br />
Enter username for login to your <strong>Kerio</strong> <strong>Connect</strong> mailbox.<br />
Password<br />
Enter password for your mailbox.<br />
Description<br />
This is an optional entry. The description is helpful especially if you intend to use<br />
multiple calendars.<br />
The application cannot read some types of SSL certificates, so it is recommended to<br />
connect only via an unsecured version of the LDAP protocol.<br />
LDAP search is available in the Contacts application. Simply click on Groups to go to contact<br />
lists and select an item to view.<br />
Meeting scheduling and availability settings in Exchange account<br />
To create an invitation, follow these instructions:<br />
1. On Apple iPhone, run the Calendar application.<br />
2. Create a calendar event.<br />
3. Enter standard information, such as name and location of the event as well as its start and<br />
end times.<br />
4. Click on Invitees.<br />
5. Enter or select contact of persons to invite and click on Done.<br />
6. Click on Availability.<br />
7. Select free/busy mode of the appointment to be showed in your free/busy calendar.<br />
106
17.10 Apple iPhone<br />
Apple iPhone 4.0<br />
In Apple iPhone OS 4.0, all features of previous Apple iPhone OS versions are available.<br />
Newly, Apple iPhone supports synchronization of contacts via the CardDAV protocol.<br />
CardDAV account settings<br />
To configure CardDAV account, follow these guidelines:<br />
1. In Apple iPhone, go to Settings → Mail, Contacts, Calendars.<br />
2. Select Add Account → Other → Add CardDAV Account.<br />
3. Enter the following account data:<br />
Server<br />
Enter DNS name of <strong>Kerio</strong> <strong>Connect</strong>.<br />
User<br />
Enter username for login to your <strong>Kerio</strong> <strong>Connect</strong> mailbox.<br />
Password<br />
Enter password for your mailbox.<br />
Description<br />
This is an optional entry.<br />
4. Upon clicking on Save, iPhone attempts to establish connection.<br />
By default, iPhone is set to encrypted traffic (HTTPS) on standard ports. If connection over<br />
HTTPS fails, iPhone attempts to connect via HTTP (unsecured connection).<br />
If connection to the server fails, contact your network administrator an check that<br />
non-standard ports are not used for <strong>Kerio</strong> <strong>Connect</strong> traffic. If they are, it is necessary<br />
to set ports manually.<br />
Go to Advanced Settings and set the following parameters:<br />
Use SSL<br />
This option allows encryption of any traffic between the server and the device. It is<br />
highly recommended to keep the option enabled to protect your connections from<br />
debugging and misuse.<br />
To enable traffic encryption, it is necessary that an SSL certificate is installed in <strong>Kerio</strong><br />
<strong>Connect</strong>. To get the certificate, go to the <strong>Kerio</strong> WebMail login page in Safari and click<br />
on Download SSL certificate.<br />
Port<br />
Set ports for HTTP and HTTPS traffic by using information provided by your network<br />
administrator.<br />
107
Synchronizing data with mobile devices<br />
New contacts are located in the Contacts application.<br />
button.<br />
To get there, click on the Contacts<br />
CardDAV account can be used for synchronization of the user’s personal contacts — shared<br />
and public contacts are not involved in the synchronization.<br />
Apple iOS<br />
<strong>Kerio</strong> <strong>Connect</strong> now comes with an autoconfig tool for iOS systems. This tool enables simple<br />
setting of automatic synchronization of:<br />
• mailboxes<br />
• contacts<br />
• calendars<br />
How to use the autoconfig tool?<br />
1. In a browser running on an iOS system, enter the address of your mailserver. On the<br />
login page, click on Set up my phone (below the login dialog) and then on Mail, Contacts,<br />
Calendars.<br />
Figure 31<br />
iOS configuration<br />
108
17.11 Apple iOS<br />
2. To create an Exchange ActiveSync account, click on Continue.<br />
For your security, it is recommended to use secured connection.<br />
To configure your device with CalDAV, CardDAV and IMAP, use the link<br />
below the Continue button.<br />
3. This opens the installation page. Click on Install to run installation. You will be asked for<br />
your account’s password.<br />
Figure 32<br />
Installation page<br />
You can click on More details to view what will be included in the installation.<br />
4. Once the installation is completed, you can start using your mailbox immediately.<br />
109
Configuring Microsoft Windows Phone 8 using Exchange<br />
ActiveSync<br />
Overview<br />
<strong>Kerio</strong> <strong>Connect</strong> 8.0.1 and above supports the ability to synchronize mail, contacts, calendars,<br />
and tasks to Microsoft Windows Phone 8 devices via the Exchange ActiveSync protocol (EAS).<br />
Beginning May 1, 2013, the support of Exchange ActiveSync in <strong>Kerio</strong> <strong>Connect</strong> is<br />
available as an add-on. For detailed information, read the Exchange ActiveSync FAQs.<br />
Configuring <strong>Kerio</strong> <strong>Connect</strong><br />
There is no additional configuration necessary to support Exchange ActiveSync (EAS) from<br />
Microsoft Windows Phone 8.<br />
Check the following items:<br />
• Exchange ActiveSync add-on in <strong>Kerio</strong> <strong>Connect</strong><br />
• HTTPS service running and port 443 open on your firewall<br />
The status of configured EAS devices can be viewed from the users dialog once the account<br />
has been successfully added. In the administration interface, go to Accounts → Users, right<br />
click on a user and select More Actions → Mobile Devices. . ..<br />
110
18.3 Configuring Windows Phone 8<br />
Configuring Windows Phone 8<br />
1. Launch the mail application from the home screen.<br />
2. If it is the first time, create a new account. Otherwise, choose add email account from the<br />
menu options.<br />
3. Select advanced setup.<br />
111
Configuring Microsoft Windows Phone 8 using Exchange ActiveSync<br />
4. Enter your email address and password and click next.<br />
112
113<br />
18.3 Configuring Windows Phone 8
Configuring Microsoft Windows Phone 8 using Exchange ActiveSync<br />
5. Select Exchange ActiveSync as the account type.<br />
6. Enter the name of your domain (e.g. feelmorelaw.com) and server address (e.g.<br />
mail.feelmorelaw.com).<br />
114
115<br />
18.3 Configuring Windows Phone 8
Configuring Microsoft Windows Phone 8 using Exchange ActiveSync<br />
7. Click Sign in.<br />
If you are using a self-signed SSL certificate, you will receive an Untrusted Certificate<br />
warning. Click continue to add the account. To avoid this warning, install a signed SSL<br />
certificate on the <strong>Kerio</strong> <strong>Connect</strong> server. For details, refer to Configuring SSL certificates in<br />
<strong>Kerio</strong> <strong>Connect</strong>.<br />
116
Installing <strong>Kerio</strong> Outlook <strong>Connect</strong>or<br />
Downloading <strong>Kerio</strong> Outlook <strong>Connect</strong>or (Offline Edition)<br />
For supported versions of operating systems and Microsoft Outlook, visit <strong>Kerio</strong> <strong>Connect</strong><br />
product pages.<br />
To download the installation package, follow these steps:<br />
1. Open the Integration with Windows page in your browser:<br />
• on the <strong>Kerio</strong> <strong>Connect</strong> client login page, click on the Integration with Windows<br />
link, or<br />
• click your name in <strong>Kerio</strong> <strong>Connect</strong> client and select Integration with Windows.<br />
2. Click on Download <strong>Kerio</strong> Outlook <strong>Connect</strong>or.<br />
Installing <strong>Kerio</strong> Outlook <strong>Connect</strong>or (Offline Edition)<br />
Before you install <strong>Kerio</strong> Outlook <strong>Connect</strong>or (Offline Edition), install and run at least<br />
once the MS Outlook application.<br />
A standard installation wizard is used to install <strong>Kerio</strong> Outlook <strong>Connect</strong>or (Offline Edition).<br />
After the installation, you must create a profile for each user.<br />
117
Installing <strong>Kerio</strong> Outlook <strong>Connect</strong>or<br />
Switching from the online version to the offline version of the <strong>Kerio</strong> Outlook<br />
<strong>Connect</strong>or<br />
<strong>Kerio</strong> Outlook <strong>Connect</strong>or (Offline Edition) includes a special utility which converts old profiles<br />
to new profiles.<br />
Upgrading <strong>Kerio</strong> Outlook <strong>Connect</strong>or<br />
If the administrator has turned on automatic updates, MS Outlook will check for new versions<br />
automatically upon each startup.<br />
If a new version is available, we recommend to update <strong>Kerio</strong> Outlook <strong>Connect</strong>or.<br />
Read article <strong>Kerio</strong> Updater Service installation for information on how <strong>Kerio</strong> Technologies has<br />
improved the upgrade process.<br />
Upgrading Microsoft Outlook<br />
When you upgrade or downgrade MS Outlook, you must reinstall <strong>Kerio</strong> Outlook <strong>Connect</strong>or<br />
manually.<br />
118
Creating profiles in MS Outlook<br />
About profiles<br />
After installing <strong>Kerio</strong> Outlook <strong>Connect</strong>or (Offline Edition), or KOFF, you must create user<br />
profiles before using Microsoft Outlook.<br />
A single <strong>Kerio</strong> Outlook <strong>Connect</strong>or account is allowed for each profile.<br />
If you install KOFF on a computer with <strong>Kerio</strong> Outlook <strong>Connect</strong>or, you can convert old<br />
profiles to new ones.<br />
If you are switching to <strong>Kerio</strong> <strong>Connect</strong> from another mailserver (e.g. Exchange), you must<br />
create new profiles in MS Outlook.<br />
Creating user profiles<br />
You can create profiles automatically or manually.<br />
Automatic configuration<br />
<strong>Kerio</strong> <strong>Connect</strong> has a special tool for automatic configuration of your MS Outlook account.<br />
1. Open the Integration with Windows page in your browser:<br />
• on the <strong>Kerio</strong> <strong>Connect</strong> client login page, click on the Integration with Windows<br />
link, or<br />
• click your name in <strong>Kerio</strong> <strong>Connect</strong> client and select Integration with Windows.<br />
2. Download the auto-configuration profile creator which is specific for each user account.<br />
119
Creating profiles in MS Outlook<br />
3. Run the profile creator tool.<br />
The tool creates a Microsoft Outlook profile and synchronizes your <strong>Kerio</strong> <strong>Connect</strong> account to<br />
Microsoft Outlook.<br />
Manual configuration<br />
To create a profile manually, go to the computer’s Control Panel → Mail and click Show<br />
Profiles:<br />
1. Click Add, enter a name for the profile and confirm.<br />
2. Select Manually configure server settings or additional server types and continue.<br />
120
20.2 Creating user profiles<br />
3. Select Other service and <strong>Kerio</strong> <strong>Connect</strong> (KOC Offline Edition) and continue.<br />
4. Enter the server name (or IP address) of <strong>Kerio</strong> <strong>Connect</strong>, your account name (<strong>Kerio</strong> <strong>Connect</strong><br />
username) and password.<br />
If the user is not from the primary domain, the username must include the domain (e.g.<br />
maison@feelmorelaw.com).<br />
To check the connection, click on Retrieve Info — if the data is correct, the dialog displays<br />
the name and email address of the user.<br />
121
Creating profiles in MS Outlook<br />
5. Confirm.<br />
Converting old profiles to profiles for <strong>Kerio</strong> Outlook <strong>Connect</strong>or (Offline<br />
Edition)<br />
1. Install <strong>Kerio</strong> Outlook <strong>Connect</strong>or (Offline Edition).<br />
2. Run Start → All Programs → <strong>Kerio</strong> → Outlook Profile Conversion Utility which converts<br />
all <strong>Kerio</strong> profiles to profiles for <strong>Kerio</strong> Outlook <strong>Connect</strong>or (Offline Edition).<br />
122
20.3 Converting old profiles to profiles for <strong>Kerio</strong> Outlook <strong>Connect</strong>or (Offline Edition)<br />
One workstation is shared by multiple users<br />
Install KOFF only once and run the Outlook Profile Conversion Utility for each user.<br />
<strong>Kerio</strong> Outlook <strong>Connect</strong>or is installed without connection to <strong>Kerio</strong> <strong>Connect</strong><br />
Run the Outlook Profile Conversion Utility.<br />
To finish the conversion when you connect to the server, follow these steps for each <strong>Kerio</strong><br />
profile:<br />
1. In the profiles dialog (in Control Panel → Mail), select the <strong>Kerio</strong> profile and click on Properties.<br />
2. Click on User Accounts.<br />
3. On the following page, double-click on the <strong>Kerio</strong> account and confirm the settings.<br />
Conversion to the <strong>Kerio</strong> Outlook <strong>Connect</strong>or profile is finished automatically<br />
123
Synchronizing Microsoft Outlook with <strong>Kerio</strong> <strong>Connect</strong><br />
Online and offline modes<br />
<strong>Kerio</strong> Outlook <strong>Connect</strong>or supports both modes, online and offline:<br />
Online mode<br />
is the standard MS Outlook mode which requires connection to <strong>Kerio</strong> <strong>Connect</strong><br />
Offline mode<br />
allows working with MS Outlook without connection to <strong>Kerio</strong> <strong>Connect</strong><br />
This requires all email, events, tasks, etc. are stored in the local message store on the<br />
client station. When you switch to online mode, all new messages, events and tasks are<br />
synchronized with the server’s store automatically.<br />
About synchronization<br />
<strong>Kerio</strong> Outlook <strong>Connect</strong> can synchronize any folder in <strong>Kerio</strong> <strong>Connect</strong> in one of the following<br />
modes:<br />
• full synchronization of the folder<br />
• synchronization of header and message body in plain text — with this option,<br />
attachments are not downloaded automatically<br />
The default synchronization works as follows:<br />
• Inbox — whole messages are synchronized.<br />
• Other email folders — only message headers and body in plain text are synchronized.<br />
• Events — whole events are synchronized.<br />
• Contacts — whole contacts are synchronized.<br />
• Tasks — whole tasks are synchronized.<br />
• Notes — whole notes are synchronized.<br />
Upon each startup of Microsoft Outlook, <strong>Kerio</strong> Outlook <strong>Connect</strong>or synchronizes the currently<br />
opened folder first.<br />
124
21.3 Setting folder synchronization<br />
Setting folder synchronization<br />
To enable/disable synchronization and select a synchronization mode of individual folders,<br />
follow these steps:<br />
1. Right-click a folder and select Properties.<br />
2. On tab Folder Synchronization, select the synchronization mode (or enable/disable the<br />
synchronization).<br />
3. Confirm the settings.<br />
If you disable synchronization of a previously synchronized folder, all present items<br />
will remain synchronized.<br />
125
Solving synchronization conflicts<br />
Synchronization conflict occurs when a message, event or any other item is changed both on<br />
the server and in <strong>Kerio</strong> Outlook <strong>Connect</strong>or between synchronization.<br />
If a conflict occurs during the synchronization:<br />
• the item saved on the server overrules the item in Microsoft Outlook (<strong>Kerio</strong> Outlook<br />
<strong>Connect</strong>or).<br />
• you receive a special message with information about the conflict<br />
The item from Microsoft Outlook is saved in a special folder called Conflicts (available only in<br />
MS Outlook). If you prefer to keep the item in MS Outlook, move it from the Conflicts folder<br />
and replace the synchronized item from the server to the original folder.<br />
126