FS-C8026N Service Manual - kyocera
FS-C8026N Service Manual - kyocera
FS-C8026N Service Manual - kyocera

You also want an ePaper? Increase the reach of your titles
YUMPU automatically turns print PDFs into web optimized ePapers that Google loves.
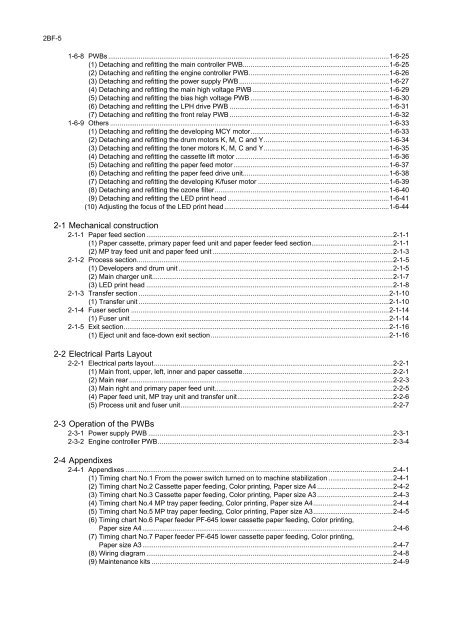
2BF-5<br />
1-6-8 PWBs ....................................................................................................................................................1-6-25<br />
(1) Detaching and refitting the main controller PWB.............................................................................1-6-25<br />
(2) Detaching and refitting the engine controller PWB..........................................................................1-6-26<br />
(3) Detaching and refitting the power supply PWB...............................................................................1-6-27<br />
(4) Detaching and refitting the main high voltage PWB........................................................................1-6-29<br />
(5) Detaching and refitting the bias high voltage PWB .........................................................................1-6-30<br />
(6) Detaching and refitting the LPH drive PWB ....................................................................................1-6-31<br />
(7) Detaching and refitting the front relay PWB ....................................................................................1-6-32<br />
1-6-9 Others ...................................................................................................................................................1-6-33<br />
(1) Detaching and refitting the developing MCY motor.........................................................................1-6-33<br />
(2) Detaching and refitting the drum motors K, M, C and Y..................................................................1-6-34<br />
(3) Detaching and refitting the toner motors K, M, C and Y..................................................................1-6-35<br />
(4) Detaching and refitting the cassette lift motor .................................................................................1-6-36<br />
(5) Detaching and refitting the paper feed motor..................................................................................1-6-37<br />
(6) Detaching and refitting the paper feed drive unit.............................................................................1-6-38<br />
(7) Detaching and refitting the developing K/fuser motor .....................................................................1-6-39<br />
(8) Detaching and refitting the ozone filter............................................................................................1-6-40<br />
(9) Detaching and refitting the LED print head .....................................................................................1-6-41<br />
(10) Adjusting the focus of the LED print head.......................................................................................1-6-44<br />
2-1 Mechanical construction<br />
2-1-1 Paper feed section ..................................................................................................................................2-1-1<br />
(1) Paper cassette, primary paper feed unit and paper feeder feed section...........................................2-1-1<br />
(2) MP tray feed unit and paper feed unit ...............................................................................................2-1-3<br />
2-1-2 Process section.......................................................................................................................................2-1-5<br />
(1) Developers and drum unit .................................................................................................................2-1-5<br />
(2) Main charger unit...............................................................................................................................2-1-7<br />
(3) LED print head ..................................................................................................................................2-1-8<br />
2-1-3 Transfer section ....................................................................................................................................2-1-10<br />
(1) Transfer unit ....................................................................................................................................2-1-10<br />
2-1-4 Fuser section ........................................................................................................................................2-1-14<br />
(1) Fuser unit ........................................................................................................................................2-1-14<br />
2-1-5 Exit section............................................................................................................................................2-1-16<br />
(1) Eject unit and face-down exit section..............................................................................................2-1-16<br />
2-2 Electrical Parts Layout<br />
2-2-1 Electrical parts layout..............................................................................................................................2-2-1<br />
(1) Main front, upper, left, inner and paper cassette...............................................................................2-2-1<br />
(2) Main rear ...........................................................................................................................................2-2-3<br />
(3) Main right and primary paper feed unit..............................................................................................2-2-5<br />
(4) Paper feed unit, MP tray unit and transfer unit..................................................................................2-2-6<br />
(5) Process unit and fuser unit................................................................................................................2-2-7<br />
2-3 Operation of the PWBs<br />
2-3-1 Power supply PWB .................................................................................................................................2-3-1<br />
2-3-2 Engine controller PWB............................................................................................................................2-3-4<br />
2-4 Appendixes<br />
2-4-1 Appendixes .............................................................................................................................................2-4-1<br />
(1) Timing chart No.1 From the power switch turned on to machine stabilization ..................................2-4-1<br />
(2) Timing chart No.2 Cassette paper feeding, Color printing, Paper size A4........................................2-4-2<br />
(3) Timing chart No.3 Cassette paper feeding, Color printing, Paper size A3........................................2-4-3<br />
(4) Timing chart No.4 MP tray paper feeding, Color printing, Paper size A4..........................................2-4-4<br />
(5) Timing chart No.5 MP tray paper feeding, Color printing, Paper size A3..........................................2-4-5<br />
(6) Timing chart No.6 Paper feeder PF-645 lower cassette paper feeding, Color printing,<br />
Paper size A4....................................................................................................................................2-4-6<br />
(7) Timing chart No.7 Paper feeder PF-645 lower cassette paper feeding, Color printing,<br />
Paper size A3....................................................................................................................................2-4-7<br />
(8) Wiring diagram ..................................................................................................................................2-4-8<br />
(9) Maintenance kits ...............................................................................................................................2-4-9