- Page 1 and 2: FS-C8026N SERVICE MANUAL Published
- Page 3 and 4: Safety precautions This booklet pro
- Page 5 and 6: 1.Installation Precautions WARNING
- Page 7 and 8: • Do not remove the ozone filter,
- Page 9 and 10: 2BF-5 CONTENTS 1-1 Specifications 1
- Page 11 and 12: 2BF-5 Specifications 1-1-1 Specific
- Page 13 and 14: 2BF-5 1-1-2 Parts names (1) Printer
- Page 15 and 16: 2BF 1-1-3 Cross section view 22 18
- Page 17 and 18: 2BF-5 Handling Precautions 1-2-1 Dr
- Page 19 and 20: 2BF Installation 1-3-1 Unpacking an
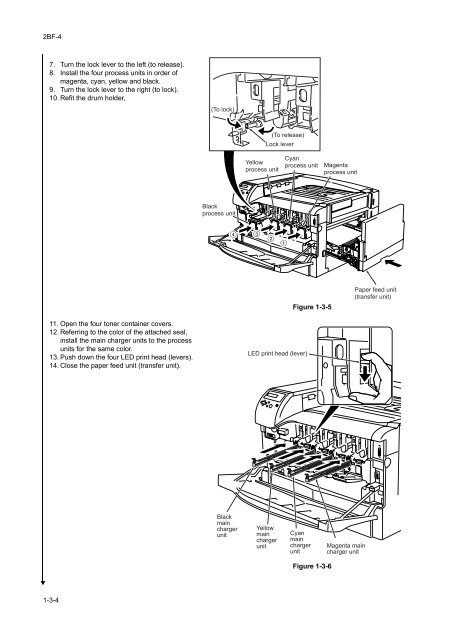
- Page 21: 2BF-5 Installing the process units
- Page 25 and 26: 2BF-5 Securing the fuser press scre
- Page 27 and 28: 2BF-5 Connecting the cable. 1. Conn
- Page 29 and 30: 2BF 1-3-3 Installing a memory card
- Page 31 and 32: 2BF-5 1-3-5 Installing the hard dis
- Page 33 and 34: 2BF 7. Remove the connectors for pr
- Page 35 and 36: 2BF Maintenance Mode 1-4-1 Service
- Page 37 and 38: 2BF-3 Service items Description Ser
- Page 39 and 40: 2BF-5 Service items Description Ite
- Page 41 and 42: 2BF Service items >>Print Event Log
- Page 43 and 44: 2BF Service items >>High Density Mo
- Page 45 and 46: 2BF-5 Service items >>Maintenance [
- Page 47 and 48: 2BF-5 Continue from the previous pa
- Page 49 and 50: 2BF-5 U No. U031 Description Checki
- Page 51 and 52: 2BF-5 U No. U033 Description Checki
- Page 53 and 54: 2BF U No. U037 Description Checking
- Page 55 and 56: 2BF-5 U No. U052 Adjusting the dupl
- Page 57 and 58: 2BF-5 U No. U053 (continue) U100 4.
- Page 59 and 60: 2BF-5 U No. U101 (continue) Descrip
- Page 61 and 62: 2BF-5 U No. U116 (continue) Descrip
- Page 63 and 64: 2BF-5 U No. U131 Adjusting toner se
- Page 65 and 66: 2BF-5 U No. U147 Description Settin
- Page 67 and 68: 2BF-5 U No. U156 (continue) Descrip
- Page 69 and 70: 2BF-5 U No. U208 Setting paper feed
- Page 71 and 72: 2BF-5 U No. U248 3. Press the [ENTE
- Page 73 and 74:
2BF U No. U410 (continue) Descripti
- Page 75 and 76:
2BF-3 U No. U464 Setting the image
- Page 77 and 78:
2BF-5 U No. U467 Setting color regi
- Page 79 and 80:
2BF-5 Troubleshooting 1-5-1 Paper m
- Page 81 and 82:
2BF-2 1-5-2 Self-diagnosis (1) Self
- Page 83 and 84:
2BF Code Contents 0310 LPH drive PW
- Page 85 and 86:
2BF Code Contents 1110 Cassette lif
- Page 87 and 88:
2BF-3 Code Contents 2202 Drum motor
- Page 89 and 90:
2BF Code Contents 6000 Upper fuser
- Page 91 and 92:
2BF Code Contents 6050 Upper fuser
- Page 93 and 94:
2BF Code Contents 6150 Lower fuser
- Page 95 and 96:
2BF Code Contents 7301 Toner hopper
- Page 97 and 98:
2BF Code Contents 8040 Optional doc
- Page 99 and 100:
2BF Code Contents 8180 Optional doc
- Page 101 and 102:
2BF Code Contents 8240 Optional doc
- Page 103 and 104:
2BF-4 Code Contents Causes Remarks
- Page 105 and 106:
2BF-4 Problem Causes Check procedur
- Page 107 and 108:
2BF-5 Problem Causes Check procedur
- Page 109 and 110:
2BF-5 Problem Causes Check procedur
- Page 111 and 112:
2BF-4 Problem Causes Check procedur
- Page 113 and 114:
2BF-4 Problem Causes Check procedur
- Page 115 and 116:
2BF-3 (1) No image appears (entirel
- Page 117 and 118:
2BF-3 (4) Image is too light. Cause
- Page 119 and 120:
2BF-5 (6) A white line appears long
- Page 121 and 122:
2BF (9) Black dots appear on the im
- Page 123 and 124:
2BF-5 (14)Fuser is poor. Causes 1.
- Page 125 and 126:
2BF-4 Assembly and Disassembly 1-6-
- Page 127 and 128:
2BF-5 5. Push the lever and remove
- Page 129 and 130:
2BF (2) Detaching and refitting the
- Page 131 and 132:
2BF-5 1-6-3 Primary paper feed unit
- Page 133 and 134:
2BF (2) Detaching and refitting the
- Page 135 and 136:
2BF 1-6-4 MP tray feed unit (1) Det
- Page 137 and 138:
2BF-5 If the unusual noise occurs f
- Page 139 and 140:
2BF-5 1-6-6 Process section (1) Det
- Page 141 and 142:
2BF (2) Detaching and refitting the
- Page 143 and 144:
2BF-5 1-6-7 Fuser unit (1) Detachin
- Page 145 and 146:
2BF 5. Remove the upper fuser cover
- Page 147 and 148:
2BF 13. Remove one screw and then r
- Page 149 and 150:
2BF 19. Remove the upper fuser fram
- Page 151 and 152:
2BF 1-6-8 PWBs (1) Detaching and re
- Page 153 and 154:
2BF (3) Detaching and refitting the
- Page 155 and 156:
2BF (4) Detaching and refitting the
- Page 157 and 158:
2BF (6) Detaching and refitting the
- Page 159 and 160:
2BF 1-6-9 Others (1) Detaching and
- Page 161 and 162:
2BF (3) Detaching and refitting the
- Page 163 and 164:
2BF (5) Detaching and refitting the
- Page 165 and 166:
2BF (7) Detaching and refitting the
- Page 167 and 168:
2BF (9) Detaching and refitting the
- Page 169 and 170:
2BF 17. Remove the two spring and L
- Page 171 and 172:
2BF 6. Remove the front and rear to
- Page 173 and 174:
2BF-5 Mechanical construction 2-1-1
- Page 175 and 176:
2BF-5 (2) MP tray feed unit and pap
- Page 177 and 178:
2BF 2-1-2 Process section The proce
- Page 179 and 180:
2BF (2) Main charger unit The main
- Page 181 and 182:
2BF Main controller PWB Engine cont
- Page 183 and 184:
2BF Transfer roller Y Transfer roll
- Page 185 and 186:
2BF A full color image is developed
- Page 187 and 188:
2BF-3 Power supply PWB Fuser unit Y
- Page 189 and 190:
3 2 1 3 2 1 2BF Face-down tray pape
- Page 191 and 192:
2BF Electrical Parts Layout 2-2-1 E
- Page 193 and 194:
2BF-3 (2) Main rear 23 20 21 6 15 1
- Page 195 and 196:
2BF-5 (3) Main right and primary pa
- Page 197 and 198:
2BF (5) Process unit and fuser unit
- Page 199 and 200:
2BF Operation of the PWBs 2-3-1 Pow
- Page 201 and 202:
2BF Connector Pin No. Signal I/O Vo
- Page 203 and 204:
2BF-3 Connector Pin No. Signal I/O
- Page 205 and 206:
2BF Connector Pin No. Signal I/O Vo
- Page 207 and 208:
2BF-5 Connector Pin No. Signal I/O
- Page 209 and 210:
2BF-5 Connector Pin No. Signal I/O
- Page 211 and 212:
2BF-5 Connector Pin No. Signal I/O
- Page 213 and 214:
2BF Connector Pin No. Signal I/O Vo
- Page 215 and 216:
2BF-5 Appendixes 2-4-1 Appendixes (
- Page 217 and 218:
2BF (3) Timing chart No.3 Cassette
- Page 219 and 220:
2BF (5) Timing chart No.5 MP tray p
- Page 221 and 222:
2BF-4 (7) Timing chart No.7 Paper f
- Page 223 and 224:
2BF-5 (9) Maintenance kits Maintena
- Page 225 and 226:
MEMO