Star Trek V: The Final Frontier Star Trek VI: The ... - Roddenberry.com
Star Trek V: The Final Frontier Star Trek VI: The ... - Roddenberry.com
Star Trek V: The Final Frontier Star Trek VI: The ... - Roddenberry.com

Create successful ePaper yourself
Turn your PDF publications into a flip-book with our unique Google optimized e-Paper software.
10<br />
#PRP1777 - St a r Tr e k V a n d <strong>VI</strong> As s a u l t Ph a s e r Pr o p Kit As s e m b l y Ma n u a l<br />
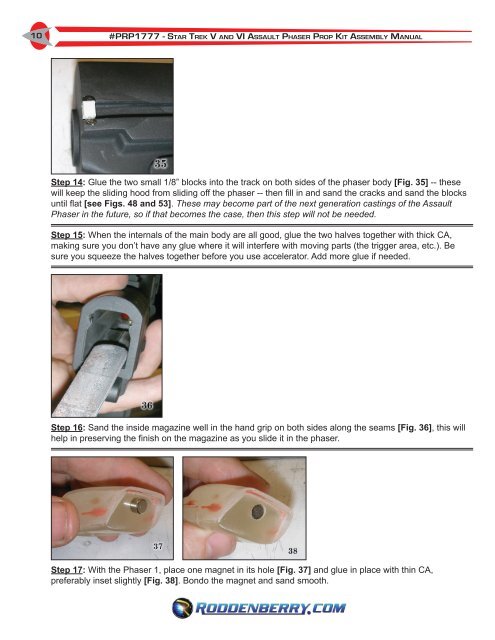
Step 14: Glue the two small 1/8” blocks into the track on both sides of the phaser body [Fig. 35] -- these<br />
will keep the sliding hood from sliding off the phaser -- then fill in and sand the cracks and sand the blocks<br />
until flat [see Figs. 48 and 53]. <strong>The</strong>se may be<strong>com</strong>e part of the next generation castings of the Assault<br />
Phaser in the future, so if that be<strong>com</strong>es the case, then this step will not be needed.<br />
Step 15: When the internals of the main body are all good, glue the two halves together with thick CA,<br />
making sure you don’t have any glue where it will interfere with moving parts (the trigger area, etc.). Be<br />
sure you squeeze the halves together before you use accelerator. Add more glue if needed.<br />
Step 16: Sand the inside magazine well in the hand grip on both sides along the seams [Fig. 36], this will<br />
help in preserving the finish on the magazine as you slide it in the phaser.<br />
Step 17: With the Phaser 1, place one magnet in its hole [Fig. 37] and glue in place with thin CA,<br />
preferably inset slightly [Fig. 38]. Bondo the magnet and sand smooth.