Star Trek V: The Final Frontier Star Trek VI: The ... - Roddenberry.com
Star Trek V: The Final Frontier Star Trek VI: The ... - Roddenberry.com
Star Trek V: The Final Frontier Star Trek VI: The ... - Roddenberry.com

Create successful ePaper yourself
Turn your PDF publications into a flip-book with our unique Google optimized e-Paper software.
4<br />
#PRP1777 - St a r Tr e k V a n d <strong>VI</strong> As s a u l t Ph a s e r Pr o p Kit As s e m b l y Ma n u a l<br />
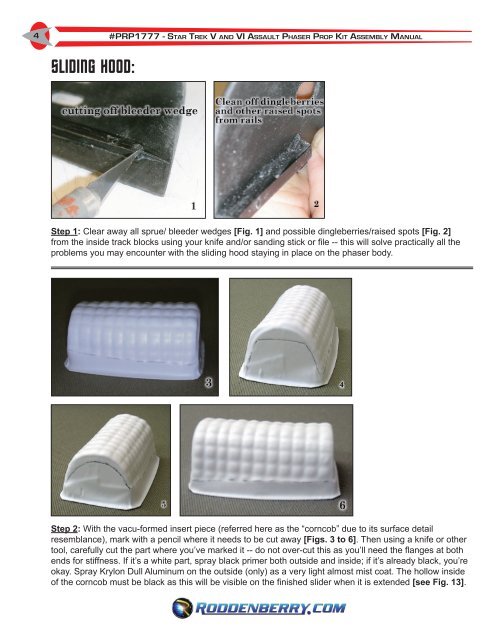
SLIDING HOOD:<br />
Step 1: Clear away all sprue/ bleeder wedges [Fig. 1] and possible dingleberries/raised spots [Fig. 2]<br />
from the inside track blocks using your knife and/or sanding stick or file -- this will solve practically all the<br />
problems you may encounter with the sliding hood staying in place on the phaser body.<br />
Step 2: With the vacu-formed insert piece (referred here as the “corncob” due to its surface detail<br />
resemblance), mark with a pencil where it needs to be cut away [Figs. 3 to 6]. <strong>The</strong>n using a knife or other<br />
tool, carefully cut the part where you’ve marked it -- do not over-cut this as you’ll need the flanges at both<br />
ends for stiffness. If it’s a white part, spray black primer both outside and inside; if it’s already black, you’re<br />
okay. Spray Krylon Dull Aluminum on the outside (only) as a very light almost mist coat. <strong>The</strong> hollow inside<br />
of the corncob must be black as this will be visible on the finished slider when it is extended [see Fig. 13].