Nice Robus Kit 1 - Rolling Center
Nice Robus Kit 1 - Rolling Center
Nice Robus Kit 1 - Rolling Center

You also want an ePaper? Increase the reach of your titles
YUMPU automatically turns print PDFs into web optimized ePapers that Google loves.
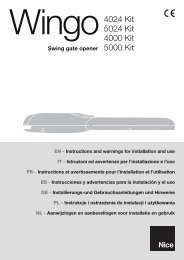
Control of the number of manoeuvres performed<br />
The number of manoeuvres performed as a percentage on the set limit can be verified by means of the “Maintenance warning” function. Follow<br />
the indications in table 17 for this control.<br />
Tabella 17: control of the number of manoeuvres performed<br />
1. Press the key [Set] and hold it down (approx. 3 s)<br />
2. Release the [Set] key when L1 LED starts flashing<br />
3. Press key [▲] or [▼] to move the flashing LED onto the input LED L7<br />
representing the “Maintenance warning” parameter or L7<br />
4. Press the key [Set],and hold it down during step 5, 6 and 7<br />
5. Wait approx. 3 seconds, after which the LED representing the current<br />
level of the parameter “Maintenance warning” will light up<br />
6. Press and immediately release the [▲] and [▼] keys.<br />
7. The LED that corresponds to the selected level flashes. The number of flashes indicates the percentage<br />
of manoeuvres performed(in multiples of 10%) in relation to the set limit.<br />
For example: with the maintenance warning set on L6 being 10000, 10% is equal to 1000 manoeuvres;<br />
if the LED flashes 4 times, this means that 40% of the manoeuvres have been reached (being between<br />
4000 and 4999 manoeuvres). The LED will not flash if 10% of the manoeuvres hasn’t been reached.<br />
8. Release the key [Set]<br />
Example<br />
L1<br />
and<br />
SET<br />
SET<br />
SET<br />
3s<br />
SET<br />
3s<br />
.... n=?<br />
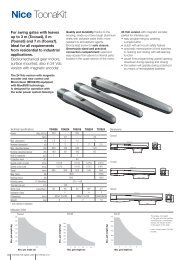
Manoeuvre counter reset<br />
After the maintenance of the system has been performed the manoeuvre counter must be reset. Proceed as described in table 18.<br />
Table 18: manoeuvre counter reset<br />
1. Press the key [Set] and hold it down (approx. 3 s)<br />
2. Release the [Set] key when L1 LED starts flashing<br />
3. Press key [▲] or [▼] to move the flashing LED onto the input LED L7 representing the<br />
“Maintenance warning” parameter or L7<br />
4. Press the key [Set], and hold it down during step 5 and 6<br />
5. Wait approx. 3 seconds, after which the LED representing the current<br />
level of the parameter “Maintenance warning” will light up.<br />
6. Press keys [▲] and [▼], hold them down for at least 5 seconds and then release them.<br />
The LED that corresponds to the selected level flashes rapidly indicating that the<br />
manoeuvre counter has been reset<br />
7. Release the key [Set]<br />
Example<br />
L1<br />
and<br />
SET<br />
SET<br />
SET<br />
3s<br />
SET<br />
3s<br />
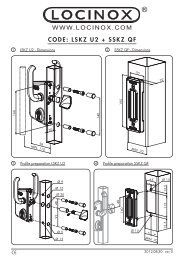
7.5 Connection of Other Devices<br />
If the user needs to feed external devices such as a proximity reader<br />
for transponder cards or the illumination light of the key-operated<br />
selector switch, it is possible to tap power as shown in Figure 27.<br />
The power supply voltage is 24Vdc -30% - +50% with a maximum<br />
available current of 100mA.<br />
27<br />
- +<br />
24Vcc<br />
20