The Compleat Distiller
The Compleat Distiller
The Compleat Distiller

You also want an ePaper? Increase the reach of your titles
YUMPU automatically turns print PDFs into web optimized ePapers that Google loves.
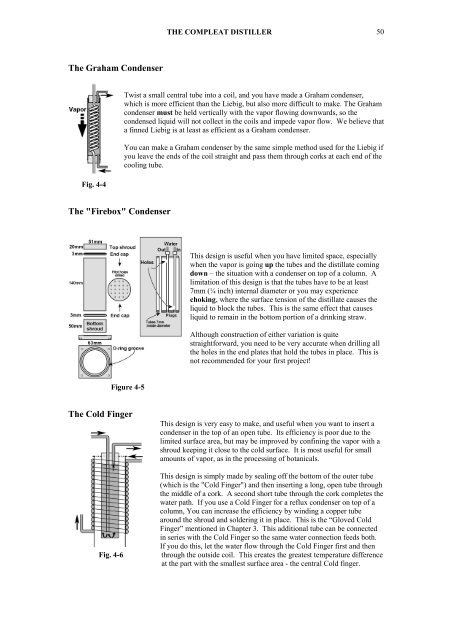
THE COMPLEAT DISTILLER 50<br />
<strong>The</strong> Graham Condenser<br />
Fig. 4-4<br />
Twist a small central tube into a coil, and you have made a Graham condenser,<br />
which is more efficient than the Liebig, but also more difficult to make. <strong>The</strong> Graham<br />
condenser must be held vertically with the vapor flowing downwards, so the<br />
condensed liquid will not collect in the coils and impede vapor flow. We believe that<br />
a finned Liebig is at least as efficient as a Graham condenser.<br />
You can make a Graham condenser by the same simple method used for the Liebig if<br />
you leave the ends of the coil straight and pass them through corks at each end of the<br />
cooling tube.<br />
<strong>The</strong> "Firebox" Condenser<br />
This design is useful when you have limited space, especially<br />
when the vapor is going up the tubes and the distillate coming<br />
down – the situation with a condenser on top of a column. A<br />
limitation of this design is that the tubes have to be at least<br />
7mm (¼ inch) internal diameter or you may experience<br />
choking, where the surface tension of the distillate causes the<br />
liquid to block the tubes. This is the same effect that causes<br />
liquid to remain in the bottom portion of a drinking straw.<br />
Although construction of either variation is quite<br />
straightforward, you need to be very accurate when drilling all<br />
the holes in the end plates that hold the tubes in place. This is<br />
not recommended for your first project!<br />
Figure 4-5<br />
<strong>The</strong> Cold Finger<br />
Fig. 4-6<br />
This design is very easy to make, and useful when you want to insert a<br />
condenser in the top of an open tube. Its efficiency is poor due to the<br />
limited surface area, but may be improved by confining the vapor with a<br />
shroud keeping it close to the cold surface. It is most useful for small<br />
amounts of vapor, as in the processing of botanicals.<br />
This design is simply made by sealing off the bottom of the outer tube<br />
(which is the "Cold Finger") and then inserting a long, open tube through<br />
the middle of a cork. A second short tube through the cork completes the<br />
water path. If you use a Cold Finger for a reflux condenser on top of a<br />
column, You can increase the efficiency by winding a copper tube<br />
around the shroud and soldering it in place. This is the “Gloved Cold<br />
Finger” mentioned in Chapter 3. This additional tube can be connected<br />
in series with the Cold Finger so the same water connection feeds both.<br />
If you do this, let the water flow through the Cold Finger first and then<br />
through the outside coil. This creates the greatest temperature difference<br />
at the part with the smallest surface area - the central Cold finger.