The Compleat Distiller
The Compleat Distiller
The Compleat Distiller

Create successful ePaper yourself
Turn your PDF publications into a flip-book with our unique Google optimized e-Paper software.
THE COMPLEAT DISTILLER 51<br />
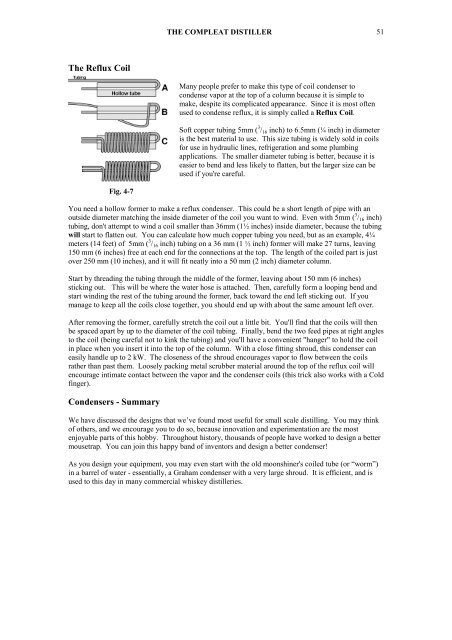
<strong>The</strong> Reflux Coil<br />
Many people prefer to make this type of coil condenser to<br />
condense vapor at the top of a column because it is simple to<br />
make, despite its complicated appearance. Since it is most often<br />
used to condense reflux, it is simply called a Reflux Coil.<br />
Soft copper tubing 5mm ( 3 / 16 inch) to 6.5mm (¼ inch) in diameter<br />
is the best material to use. This size tubing is widely sold in coils<br />
for use in hydraulic lines, refrigeration and some plumbing<br />
applications. <strong>The</strong> smaller diameter tubing is better, because it is<br />
easier to bend and less likely to flatten, but the larger size can be<br />
used if you're careful.<br />
Fig. 4-7<br />
You need a hollow former to make a reflux condenser. This could be a short length of pipe with an<br />
outside diameter matching the inside diameter of the coil you want to wind. Even with 5mm ( 3 / 16 inch)<br />
tubing, don't attempt to wind a coil smaller than 36mm (1½ inches) inside diameter, because the tubing<br />
will start to flatten out. You can calculate how much copper tubing you need, but as an example, 4¼<br />
meters (14 feet) of 5mm ( 3 / 16 inch) tubing on a 36 mm (1 ½ inch) former will make 27 turns, leaving<br />
150 mm (6 inches) free at each end for the connections at the top. <strong>The</strong> length of the coiled part is just<br />
over 250 mm (10 inches), and it will fit neatly into a 50 mm (2 inch) diameter column.<br />
Start by threading the tubing through the middle of the former, leaving about 150 mm (6 inches)<br />
sticking out. This will be where the water hose is attached. <strong>The</strong>n, carefully form a looping bend and<br />
start winding the rest of the tubing around the former, back toward the end left sticking out. If you<br />
manage to keep all the coils close together, you should end up with about the same amount left over.<br />
After removing the former, carefully stretch the coil out a little bit. You'll find that the coils will then<br />
be spaced apart by up to the diameter of the coil tubing. Finally, bend the two feed pipes at right angles<br />
to the coil (being careful not to kink the tubing) and you'll have a convenient "hanger" to hold the coil<br />
in place when you insert it into the top of the column. With a close fitting shroud, this condenser can<br />
easily handle up to 2 kW. <strong>The</strong> closeness of the shroud encourages vapor to flow between the coils<br />
rather than past them. Loosely packing metal scrubber material around the top of the reflux coil will<br />
encourage intimate contact between the vapor and the condenser coils (this trick also works with a Cold<br />
finger).<br />
Condensers - Summary<br />
We have discussed the designs that we’ve found most useful for small scale distilling. You may think<br />
of others, and we encourage you to do so, because innovation and experimentation are the most<br />
enjoyable parts of this hobby. Throughout history, thousands of people have worked to design a better<br />
mousetrap. You can join this happy band of inventors and design a better condenser!<br />
As you design your equipment, you may even start with the old moonshiner's coiled tube (or “worm”)<br />
in a barrel of water - essentially, a Graham condenser with a very large shroud. It is efficient, and is<br />
used to this day in many commercial whiskey distilleries.