
You also want an ePaper? Increase the reach of your titles
YUMPU automatically turns print PDFs into web optimized ePapers that Google loves.
SETTING UP<br />
English<br />
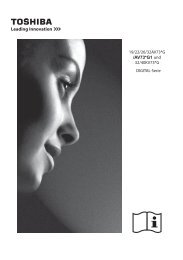
Controls and input connections<br />
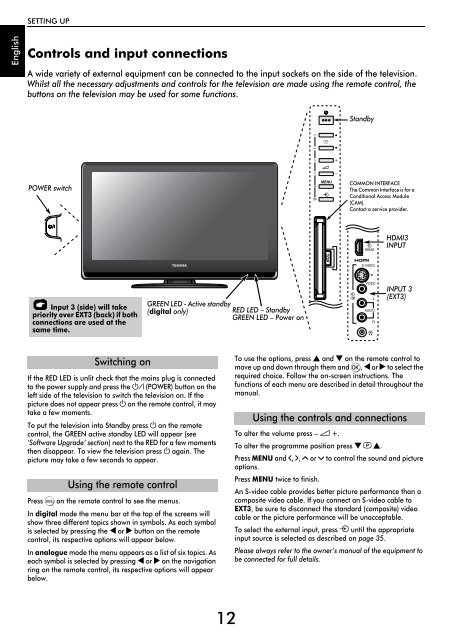
A wide variety of external equipment can be connected to the input sockets on the side of the television.<br />
Whilst all the necessary adjustments and controls for the television are made using the remote control, the<br />
buttons on the television may be used for some functions.<br />
Standby<br />
POWER switch<br />
C<strong>OM</strong>MON INTERFACE<br />
The Common Interface is for a<br />
Conditional Access Module<br />
(CAM).<br />
Contact a service provider.<br />
HDMI3<br />
INPUT<br />
Input 3 (side) will take<br />
priority over EXT3 (back) if both<br />
connections are used at the<br />
same time.<br />
GREEN LED - Active standby<br />
(digital only)<br />
RED LED – Standby<br />
GREEN LED – Power on<br />
INPUT 3<br />
(EXT3)<br />
Switching on<br />
If the RED LED is unlit check that the mains plug is connected<br />
to the power supply and press the ! (POWER) button on the<br />
left side of the television to switch the television on. If the<br />
picture does not appear press 1 on the remote control, it may<br />
take a few moments.<br />
To put the television into Standby press 1 on the remote<br />
control, the GREEN active standby LED will appear (see<br />
‘Software Upgrade’ section) next to the RED for a few moments<br />
then disappear. To view the television press 1 again. The<br />
picture may take a few seconds to appear.<br />
Using the remote control<br />
Press M on the remote control to see the menus.<br />
In digital mode the menu bar at the top of the screens will<br />
show three different topics shown in symbols. As each symbol<br />
is selected by pressing the C or c button on the remote<br />
control, its respective options will appear below.<br />
In analogue mode the menu appears as a list of six topics. As<br />
each symbol is selected by pressing C or c on the navigation<br />
ring on the remote control, its respective options will appear<br />
below.<br />
To use the options, press B and b on the remote control to<br />
move up and down through them and Q, C or c to select the<br />
required choice. Follow the on-screen instructions. The<br />
functions of each menu are described in detail throughout the<br />
manual.<br />
Using the controls and connections<br />
To alter the volume press – 2 +.<br />
To alter the programme position press b p B.<br />
Press MENU and I, i, U or u to control the sound and picture<br />
options.<br />
Press MENU twice to finish.<br />
An S-video cable provides better picture performance than a<br />
composite video cable. If you connect an S-video cable to<br />
EXT3, be sure to disconnect the standard (composite) video<br />
cable or the picture performance will be unacceptable.<br />
To select the external input, press o until the appropriate<br />
input source is selected as described on page 35.<br />
Please always refer to the owner’s manual of the equipment to<br />
be connected for full details.<br />
12