
You also want an ePaper? Increase the reach of your titles
YUMPU automatically turns print PDFs into web optimized ePapers that Google loves.
<strong>TTP</strong>-<strong>245</strong> / <strong>TTP</strong>-<strong>343</strong><br />
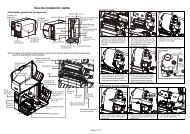
5. GAP AND BLACK MARK SENSOR SELECTION<br />
Gap Sensor selection<br />
<br />
<br />
Default setting. No extra action necessary.<br />
If you want to change sensor type from black mark sensor to gap sensor,<br />
please do printer initialization (refer to Initialization section).<br />
Black Mark Sensor<br />
<br />
<br />
<br />
<br />
Start Label View XLT+ or Nice Label LE software.<br />
Set label side in the software and select black mark sensor as sensor type.<br />
Install label media with black mark or hole for registration.<br />
Print one label to switch sensor from gap to black mark sensor.<br />
Remember, always do sensor calibration after sensor selection (refer to Gap and<br />
Black Mark Sensor Calibration section).<br />
6. BIOS Update<br />
If printer BIOS update is required, please do the following steps.<br />
Update the BIOS file and reset the printer.<br />
Update File<br />
1. Make sure the printer is at ready status and the LED is solid green.<br />
2. Copy the BIOS file to printer parallel port by the following command at<br />
MS-DOS prompt mode.<br />
C:\>COPY <strong>TTP</strong><strong>245</strong>.NEW /B LPT1 <br />
3. During BIOS updating process, the LED will blink red and orange alternately.<br />
When BIOS update is completed, printer will reset automatically and LED will<br />
become solid green.<br />
79