minimoog owners manual.pdf - Synth Zone
minimoog owners manual.pdf - Synth Zone
minimoog owners manual.pdf - Synth Zone

Create successful ePaper yourself
Turn your PDF publications into a flip-book with our unique Google optimized e-Paper software.
Minimoog Operation Manual<br />
GLIDE switch is off by depressing the switch button. The foot switch has no effect if<br />
the GLIDE switch is already on.<br />
The external control of the DECAY function works in an analogous fashion.<br />
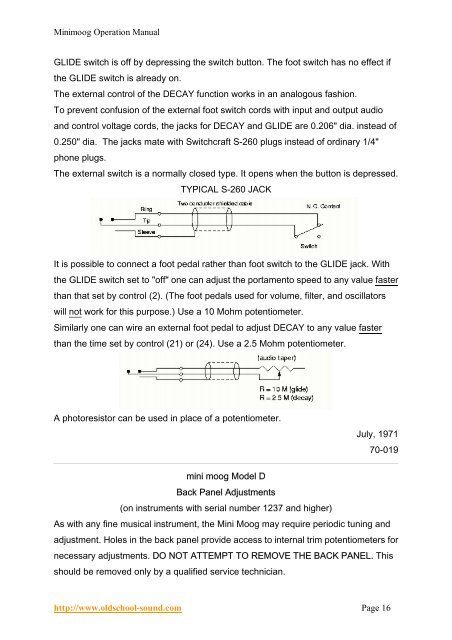
To prevent confusion of the external foot switch cords with input and output audio<br />
and control voltage cords, the jacks for DECAY and GLIDE are 0.206" dia. instead of<br />
0.250" dia. The jacks mate with Switchcraft S-260 plugs instead of ordinary 1/4"<br />
phone plugs.<br />
The external switch is a normally closed type. It opens when the button is depressed.<br />
TYPICAL S-260 JACK<br />
It is possible to connect a foot pedal rather than foot switch to the GLIDE jack. With<br />
the GLIDE switch set to "off" one can adjust the portamento speed to any value faster<br />
than that set by control (2). (The foot pedals used for volume, filter, and oscillators<br />
will not work for this purpose.) Use a 10 Mohm potentiometer.<br />
Similarly one can wire an external foot pedal to adjust DECAY to any value faster<br />
than the time set by control (21) or (24). Use a 2.5 Mohm potentiometer.<br />
A photoresistor can be used in place of a potentiometer.<br />
July, 1971<br />
70-019<br />
mini moog Model D<br />
Back Panel Adjustments<br />
(on instruments with serial number 1237 and higher)<br />
As with any fine musical instrument, the Mini Moog may require periodic tuning and<br />
adjustment. Holes in the back panel provide access to internal trim potentiometers for<br />
necessary adjustments. DO NOT ATTEMPT TO REMOVE THE BACK PANEL. This<br />
should be removed only by a qualified service technician.<br />
http://www.oldschool-sound.com Page 16