minimoog owners manual.pdf - Synth Zone
minimoog owners manual.pdf - Synth Zone
minimoog owners manual.pdf - Synth Zone

You also want an ePaper? Increase the reach of your titles
YUMPU automatically turns print PDFs into web optimized ePapers that Google loves.
Minimoog Operation Manual<br />
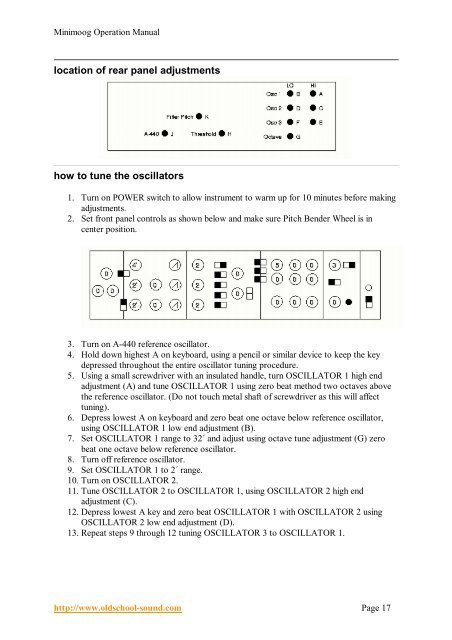
location of rear panel adjustments<br />
how to tune the oscillators<br />
1. Turn on POWER switch to allow instrument to warm up for 10 minutes before making<br />
adjustments.<br />
2. Set front panel controls as shown below and make sure Pitch Bender Wheel is in<br />
center position.<br />
3. Turn on A-440 reference oscillator.<br />
4. Hold down highest A on keyboard, using a pencil or similar device to keep the key<br />
depressed throughout the entire oscillator tuning procedure.<br />
5. Using a small screwdriver with an insulated handle, turn OSCILLATOR 1 high end<br />
adjustment (A) and tune OSCILLATOR 1 using zero beat method two octaves above<br />
the reference oscillator. (Do not touch metal shaft of screwdriver as this will affect<br />
tuning).<br />
6. Depress lowest A on keyboard and zero beat one octave below reference oscillator,<br />
using OSCILLATOR 1 low end adjustment (B).<br />
7. Set OSCILLATOR 1 range to 32´ and adjust using octave tune adjustment (G) zero<br />
beat one octave below reference oscillator.<br />
8. Turn off reference oscillator.<br />
9. Set OSCILLATOR 1 to 2´ range.<br />
10. Turn on OSCILLATOR 2.<br />
11. Tune OSCILLATOR 2 to OSCILLATOR 1, using OSCILLATOR 2 high end<br />
adjustment (C).<br />
12. Depress lowest A key and zero beat OSCILLATOR 1 with OSCILLATOR 2 using<br />
OSCILLATOR 2 low end adjustment (D).<br />
13. Repeat steps 9 through 12 tuning OSCILLATOR 3 to OSCILLATOR 1.<br />
http://www.oldschool-sound.com Page 17