2 - Weaver Leather
2 - Weaver Leather
2 - Weaver Leather

You also want an ePaper? Increase the reach of your titles
YUMPU automatically turns print PDFs into web optimized ePapers that Google loves.
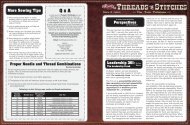
Sewing Machines & Such<br />
These instructions also featured on our Adler video shown at right.<br />
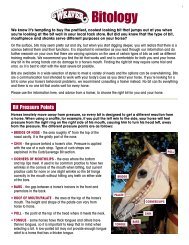
For proper sewing,<br />
your needle groove<br />
must be at a 90°<br />
angle (to the left) in<br />
the sewing position.<br />
C<br />
F<br />
G<br />
E<br />
A<br />
B<br />
D<br />
A great reference for<br />
your most commonly asked<br />
Adler Sewing Machine questions!<br />
Must-Have<br />
for Adler<br />
Operators<br />
L<br />
(inside<br />
machine)<br />
M<br />
H<br />
I<br />
H<br />
J<br />
P<br />
Q<br />
N<br />
O<br />
R<br />
Thread should run all<br />
the way around the<br />
side tensioner (H).<br />
Threading Your Adler 205 Machine<br />
Understanding and Troubleshooting<br />
the Adler 205-370 DVD<br />
This must-have DVD guides you through setting up,<br />
troubleshooting and caring for your Adler 205-370<br />
Covers threading, inserting needle, inserting<br />
bobbin, adjusting thread tensions, oiling, timing,<br />
installing roller guide, adjusting stitch length, mounting<br />
and threading bobbin winder, installing shield<br />
and an overview of foot pedals and functions.<br />
This 28-minute DVD is a necessity for any<br />
Adler operator.<br />
Also includes a FREE Machinery and Tool Demonstration<br />
DVD featuring over 2-1/2 hours of demos.<br />
65-9555. .............................<br />
Check out our complete selection of<br />
videos and books on page 248.<br />
Exclusive<br />
For precise, even stitches and to prevent skipped stitches, be sure to thread your machine properly. Simply follow these instructions for the proper threading of both your top and bottom spools.<br />
Top Spool<br />
1) Run your thread from spools (A) on the thread stand (B)<br />
8) Run the thread through the hole (O) in the bottom of the needle<br />
through the hole (C) in the upper bracket.<br />
bar, the needle’s eye (P), and the hole (Q) located on your walking<br />
2) Run thread through the second hole and back through the first<br />
foot. Make sure the needle groove is at a 90 degree angle to the<br />
hole of the thread stem (D).<br />
left from your view.<br />
3) Next, run your thread through wire loop 1 (E), the top of the top<br />
9) Your top thread is now threaded correctly.<br />
tensioner disk (F), and through wire loop 2 (G).<br />
Bottom Spool<br />
4) Now, run your thread straight down to the back of the side 1) Open the bobbin door (R) located on the left of your machine and<br />
tensioner (H) located on the left side of the machine and run all eject bobbin spool holder by pushing up the tab that holds it in.<br />
the way around the side tensioner. Please be sure to run the<br />
2) Insert thread spool into the spool holder so the thread unwinds<br />
thread all the way around the side tensioner as shown in<br />
from the bottom and run thread through the groove in the tension<br />
diagram (H).<br />
plate and into the hole.<br />
5) Next, run the thread over the black post (I) and through the<br />
3) Pull 8" - 10" of thread out and snap bobbin spool holder back into<br />
check spring (J).<br />
sewing position.<br />
6) Rotate the flywheel (K) until the take up arm (L) is at the bottom.<br />
4) While holding your top thread, turn the flywheel one complete turn<br />
Then, run the thread through the hole in the take up arm (L) and<br />
and the needle will pick up the bottom thread.<br />
out the hole (M) located on the front of the machine.<br />
5) Your bottom thread is now threaded correctly.<br />
7) Then, run the thread through the thread tube (N) located on the<br />
left of the machine that leads down to the needle bar.<br />
K<br />
Call Toll Free in the U.S. & Canada 800-932-8371 (800-WEAVER-1)<br />
281