

Spacewalker II 40 Manual - Horizon Hobby
Spacewalker II 40 Manual - Horizon Hobby
Spacewalker II 40 Manual - Horizon Hobby

You also want an ePaper? Increase the reach of your titles
YUMPU automatically turns print PDFs into web optimized ePapers that Google loves.
SPACE WALKER <strong>II</strong><br />
Instruction <strong>Manual</strong>.<br />
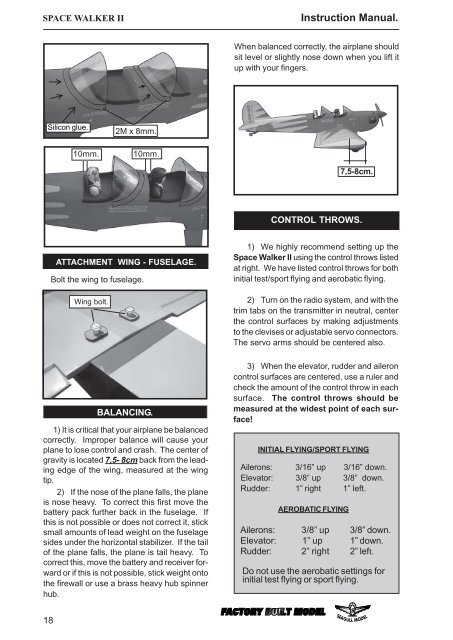
When balanced correctly, the airplane should<br />
sit level or slightly nose down when you lift it<br />
up with your fingers.<br />
Silicon glue.<br />
2M x 8mm.<br />
10mm.<br />
10mm.<br />
7,5-8cm.<br />
CONTROL THROWS.<br />
ATTACHMENT WING - FUSELAGE.<br />
Bolt the wing to fuselage.<br />
Wing bolt.<br />
1) We highly recommend setting up the<br />
Space Walker <strong>II</strong> using the control throws listed<br />
at right. We have listed control throws for both<br />
initial test/sport flying and aerobatic flying.<br />
2) Turn on the radio system, and with the<br />
trim tabs on the transmitter in neutral, center<br />
the control surfaces by making adjustments<br />
to the clevises or adjustable servo connectors.<br />
The servo arms should be centered also.<br />
BALANCING.<br />
1) It is critical that your airplane be balanced<br />
correctly. Improper balance will cause your<br />
plane to lose control and crash. The center of<br />
gravity is located 7,5- 8cm back from the leading<br />
edge of the wing, measured at the wing<br />
tip.<br />
2) If the nose of the plane falls, the plane<br />
is nose heavy. To correct this first move the<br />
battery pack further back in the fuselage. If<br />
this is not possible or does not correct it, stick<br />
small amounts of lead weight on the fuselage<br />
sides under the horizontal stabilizer. If the tail<br />
of the plane falls, the plane is tail heavy. To<br />
correct this, move the battery and receiver forward<br />
or if this is not possible, stick weight onto<br />
the firewall or use a brass heavy hub spinner<br />
hub.<br />
3) When the elevator, rudder and aileron<br />
control surfaces are centered, use a ruler and<br />
check the amount of the control throw in each<br />
surface. The control throws should be<br />
measured at the widest point of each surface!<br />
INITIAL FLYING/SPORT FLYING<br />
Ailerons: 3/16” up 3/16” down.<br />
Elevator: 3/8” up 3/8” down.<br />
Rudder: 1” right 1” left.<br />
AEROBATIC FLYING<br />
Ailerons: 3/8” up 3/8” down.<br />
Elevator: 1” up 1” down.<br />
Rudder: 2” right 2” left.<br />
Do not use the aerobatic settings for<br />
initial test flying or sport flying.<br />
18


