

Instruction Manual - GME
Instruction Manual - GME
Instruction Manual - GME

You also want an ePaper? Increase the reach of your titles
YUMPU automatically turns print PDFs into web optimized ePapers that Google loves.
Receiving Group Calls<br />
Receiving a Group Call is identical to receiving a normal<br />
Selcall except that the alarm sound is a LOW tone beep<br />
instead of the normal HIGH tone beep. The Callers Ident or<br />
ALPHA Name appears on the display in the usual way.<br />
LISTENING CHANNELS<br />
The TX3440 has provision for adding additional 59 user<br />
programmable ‘listening channels’ covering the frequency<br />
range between 403 MHz and 520 MHz. These channels can<br />
be programmed by you using the front panel keys, making<br />
the TX3440 a useful UHF scanning receiver.<br />
SETTING THE FREQUENCY STEP<br />
The listening channels can be programmed in 12.5 kHz or<br />
25 kHz steps. To toggle the current frequency step:<br />
1. Switch the radio OFF.<br />
2. Press and hold the SCAN key while switching the<br />
radio ON.<br />
3. 12.5 k or 25.0 k will be displayed briefly, indicating the<br />
current selected frequency step.<br />
ACTIVATING THE LISTENING CHANNELS<br />
By default, the listening channels are disabled and only the<br />
standard 40 UHF channels can be accessed. Later, once<br />
programmed, the listening channels will show up as CH41-<br />
CH99 and can be accessed and freely edited. However,<br />
to enable a channel for programming that has not been<br />
programmed yet (and therefore it can not be selected for<br />
editing using the or keys) the initial programming of<br />
the listening channel(s) has to be performed.<br />
To perform the Initial Programming<br />
of the listening channels<br />
1. Switch the radio OFF.<br />
2. Press and hold the PRI key while switching the radio<br />
ON again.<br />
The radio is now in the ‘All Visible’ mode. In this mode<br />
all channels are visible, including the currently inactive<br />
ones, allowing you to select any listening channel<br />
between 41 and 99 for subsequent editing.<br />
3. Using the or keys, select a listening channel that<br />
you wish to activate. At this stage, the display will show<br />
‘-OFF-’ indicating that the current listening channel is<br />
turned OFF.<br />
4. Program a desired frequency into the selected listening<br />
channel, as described in the next section.<br />
5. Repeat steps 3-4 to activate all the desired listening<br />
channels.<br />
6. Once you have enabled and programmed your additional<br />
listening channels, switch the radio OFF to end the<br />
initial programming operation. When you switch it ON<br />
again, normal operation will be restored and only the<br />
listening channels you have enabled will be available<br />
above channel 40.<br />
PROGRAMMING THE LISTENING CHANNELS<br />
The display can show the frequency of the listening channel<br />
when the radio is in NUMERIC mode, or an associated<br />
alpha tag in ALPHA mode. Before programming the channel<br />
frequencies, make sure the radio is in NUMERIC mode by<br />
pressing F (Function) followed by ALPHA until ‘NUMER’<br />
is displayed.<br />
To program a frequency<br />
into a listening channel<br />
1. Press the or keys to select the required listening<br />
channel to edit (41-99).<br />
2. Press and hold the MENU key until a beep is<br />
heard. The current frequency assigned to the listening<br />
channel will be displayed, or ‘OFF’ if the channel is<br />
currently inactive.<br />
3. Press or keys to select the desired frequency.<br />
4. A quick press of the PRI key will toggle the frequency<br />
step between 12.5 kHz/25 kHz and 1 MHz. The<br />
corresponding digit will be flashing, indicating the<br />
current frequency step.<br />
5. Once you have the correct frequency displayed, press<br />
and hold the MENU button to store the frequency and<br />
exit the menu, or alternatively, press and hold the PRI<br />
key to store the frequency, but stay in the frequency edit<br />
menu for further editing of the same listening channel.<br />
Please note however the menu will time out after 20<br />
seconds of inactivity.<br />
Notes:<br />
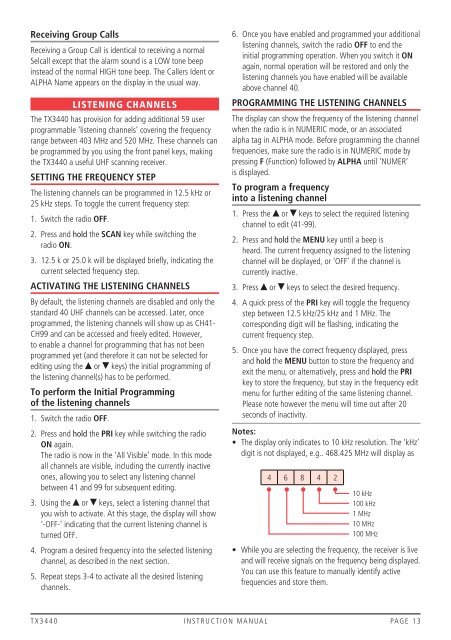
• The display only indicates to 10 kHz resolution. The ‘kHz’<br />
digit is not displayed, e.g.. 468.425 MHz will display as<br />
4 6 8 4 2<br />
10 kHz<br />
100 kHz<br />
1 MHz<br />
10 MHz<br />
100 MHz<br />
• While you are selecting the frequency, the receiver is live<br />
and will receive signals on the frequency being displayed.<br />
You can use this feature to manually identify active<br />
frequencies and store them.<br />
T X 3 4 4 0 i n s t r u c t i o n m a n ua l PA G E 1 3


