- Page 1 and 2:
-. i ! --.
- Page 3 and 4:
Important Notes About this Manual P
- Page 5 and 6:
How to Use this Manual Safety Warni
- Page 7 and 8:
Notes / ... 6
- Page 9 and 10:
Seats & Restraint Systems Seats and
- Page 11 and 12:
Seats & Restraint Systems Reclining
- Page 13 and 14:
Seats & Restraint Systems Replacing
- Page 15 and 16:
Seats & Restraint Systems Removing
- Page 17 and 18:
Seats & Restraint Systems I Replaci
- Page 19 and 20:
Seats & Restraint Systems Safety Be
- Page 21 and 22:
Seats & Restraint Systems Here Are
- Page 23 and 24:
Seats & Restraint Systems I Lapshou
- Page 25 and 26:
Seats & Restraint Systems Lap-Shoul
- Page 27 and 28:
Seats & Restraint Systems Supplemen
- Page 29 and 30:
Seats & Restraint Systems How The A
- Page 31 and 32:
Seats & Restraint Systems I Rear Se
- Page 33 and 34:
Seats & Restraint Systems The safet
- Page 35 and 36:
Seats & Restraint Systems Lap Belt
- Page 37 and 38:
Seats & Restraint Systems Smaller C
- Page 39 and 40:
Seats & Restraint Systems WARNING!
- Page 41 and 42:
Seats & Restraint Systems To Use th
- Page 43 and 44:
Seats & Restraint Systems To Store
- Page 45 and 46:
Seats & Restraint Systems Where to
- Page 47 and 48:
Seats & Restraint Systems Securing
- Page 49 and 50:
Seats & Restraint Systems Securing
- Page 51:
Seats & Restraint Systems Larger Ch
- Page 54 and 55:
Here you can learn about the many s
- Page 56 and 57:
Door Locks Front Doors There are se
- Page 58 and 59:
To lock the liftgate, use the power
- Page 60 and 61:
Operation The driver’s door will
- Page 62 and 63:
If the back of your transmitter has
- Page 64 and 65:
c Sliding Door Lock From inside the
- Page 66 and 67:
Objects caught in the path of the s
- Page 68 and 69:
~ ~ m 0 m 0 CHILD ECURIT Y LOCK 2.
- Page 70 and 71:
New Vehicle “Break-In” NOTICE:
- Page 72 and 73:
Wait 15 seconds to let the starter
- Page 74 and 75:
To use the coolant heater: 1. Turn
- Page 76 and 77:
I Neutral d (Neutral): In this posi
- Page 78 and 79:
1 (First Gear): This position gives
- Page 80 and 81:
Leaving Your Vehicle With the Engin
- Page 82 and 83:
I Tilt Wheel (OPTION) A tilt steeri
- Page 84 and 85:
Turn Signal and Lane Change Indicat
- Page 86 and 87:
3. Push in the set button at the en
- Page 88 and 89:
I Headlights 'ush the p' switch to
- Page 90 and 91:
. I interior Lights Control Slide t
- Page 92 and 93:
I To Turn the Wipers Off: Slide the
- Page 94 and 95:
Interior Lights Your vehicle has tw
- Page 96 and 97:
Air Inflator System (OPTION) Your v
- Page 98 and 99:
.' Manual Remote Control Mirrors Bo
- Page 100 and 101:
To remove the ashtray for cleaning,
- Page 102 and 103:
The side of the convenience net clo
- Page 104 and 105:
Don’t exceed the maximum vehicle
- Page 106 and 107:
I’ 6 I The Instrument Panel-Your
- Page 108 and 109:
1. HVAC Controls 2. Rear Window Def
- Page 110 and 111:
Speedometer and Odometer Your speed
- Page 112 and 113:
Fuel Gage Your fuel gage tells you
- Page 114 and 115:
I If -- the gage reads in the red w
- Page 116 and 117:
~~~ ~~~~ ~~ ~~~~~~~ ~ I A CAUTION:
- Page 118 and 119:
NOTICE: If you keep driving your ve
- Page 120 and 121:
Part 3 Comfort Controls & Audio Sys
- Page 122 and 123:
~ vehicle ~ described I Heater and
- Page 124 and 125:
(OPTION) Your vehicle’s heater an
- Page 127 and 128:
Comfort Controls & Audio Systems Re
- Page 129 and 130:
Comfort Controls & Audio Systems Do
- Page 131 and 132:
Comfort Controls & Audio Systems w
- Page 133 and 134:
Comfort Controls & Audio Systems AM
- Page 135 and 136:
Comfort Controls & Audio Systems AM
- Page 137 and 138:
Comfort Controls & Audio Systems AI
- Page 139 and 140:
Comfort Controls & Audio Systems AM
- Page 141 and 142:
Comfort Controls & Audio Systems AM
- Page 143 and 144:
Comfort Controls & Audio Systems CD
- Page 145 and 146:
Comfort Controls & Audio Systems ..
- Page 147 and 148:
Comfort Controls & Audio Systems NO
- Page 149 and 150:
Your Driving and the Road Defensive
- Page 151 and 152:
Your Driving and the Road Drunken D
- Page 153:
Your Driving and the Road Anti-Lock
- Page 156 and 157:
Suppose you’re steering through a
- Page 158 and 159:
0 Watch for traffic signs, pavement
- Page 160 and 161:
~ space ’ 0 Since you can’t see
- Page 162 and 163:
Hydroplaning usually happens at hig
- Page 164 and 165:
find experienced and able service e
- Page 167 and 168:
Your Driving and the Road Driving o
- Page 169 and 170:
Your Driving and the Road If You’
- Page 171 and 172:
Your Driving and the Road \ ... A 1
- Page 173 and 174:
Your Driving and the Road Trailer B
- Page 175 and 176:
Your Driving and the Road Parking o
- Page 177 and 178: Problems on the Road Hazard Warning
- Page 179 and 180: Problems on the Road 2. To Jump Sta
- Page 181 and 182: Problems on the Road To Jump Start
- Page 183 and 184: Problems on the Road Towing Your Po
- Page 185 and 186: Problems on the Road I AI Towing fr
- Page 187 and 188: Problems on the Road Engine Overhea
- Page 189 and 190: Problems on the Road The coolant le
- Page 191 and 192: Problems on the Road Uow to Add Coo
- Page 193 and 194: Problems on the Road 7. By this tim
- Page 195 and 196: Problems on the Road Changing a Fla
- Page 197 and 198: Problems on the Road Changing a Fla
- Page 199 and 200: Problems on the Road Changing a Fla
- Page 201 and 202: Problems on the Road NOTICE: Wheel
- Page 203 and 204: Problems on the Road Compact Spare
- Page 205 and 206: Notes 204
- Page 207 and 208: Service & Appearance Care I Service
- Page 209 and 210: Service & Appearance Care Gasolines
- Page 211 and 212: Service & Appearance Care Checking
- Page 213 and 214: Service & Appearance Care Wen to Ad
- Page 215 and 216: Service & Appearance Care Recommend
- Page 217 and 218: Service & Appearance Care 3.1L V6:
- Page 219 and 220: Service & Appearance Care How to Ch
- Page 221 and 222: Service & Appearance Care Engine Co
- Page 223 and 224: Service & Appearance Care What to A
- Page 225 and 226: Service & Appearance Care Brake Mas
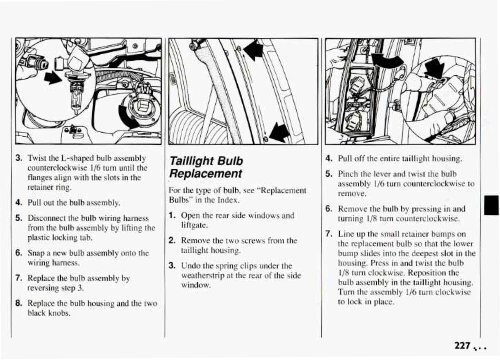
- Page 227: Service & Appearance Care Vehicle S
- Page 231 and 232: Service & Appearance Care Tires We
- Page 233 and 234: Service & Appearance Care TREAD WEA
- Page 235 and 236: Service & Appearance Care Temperatu
- Page 237 and 238: Service & Appearance Care Appearanc
- Page 239 and 240: Service & Appearance Care Care of S
- Page 241 and 242: Service & Appearance Care Aluminum
- Page 243 and 244: Service & Appearance Care Appearanc
- Page 245 and 246: Service & Appearance Care To identi
- Page 247 and 248: Service & Appearance Care r& TURN B
- Page 249 and 250: Service & Appearance Care - l nject
- Page 251 and 252: Service & Appearance Care Capacitie
- Page 253 and 254: Service & Appearance Care Replaceme
- Page 255 and 256: Notes . 254
- Page 257 and 258: Maintenance Schedule Introduction A
- Page 259 and 260: Maintenance Schedule Scheduled Main
- Page 261 and 262: Maintenance Schedule Scheduled Main
- Page 263 and 264: Maintenance Schedule Explanation of
- Page 265 and 266: Maintenance Schedule Section B: Own
- Page 267 and 268: Maintenance Schedule CHECKOR SERVIC
- Page 269 and 270: Maintenance Schedule CHECK OR SERVI
- Page 271 and 272: Maintenance Schedule Section E: Mai
- Page 273 and 274: Maintenance Schedule Maintenance Re
- Page 275 and 276: Customer Assistance Information I'
- Page 277 and 278: Customer Assistance Information GM
- Page 279 and 280:
Customer Assistance Information w R
- Page 281 and 282:
Customer Assistance Information Ser
- Page 283 and 284:
. . .282
- Page 286 and 287:
PONTIAC SERVICE PUBLICATIONS ORDER
- Page 288 and 289:
PONTIAC SERVICE PUBLICATIONS ORDER
- Page 290 and 291:
PONTIAC SERVICE PUBLICATIONS ORDER
- Page 292 and 293:
~ $15.00 PONTIAC SERVICE PUBLICATIO
- Page 294 and 295:
PONTIAC SERVICE PUBLICATIONS ORDER
- Page 296:
PONTIAC SERVICE PUBLICATIONS ORDER
- Page 299 and 300:
Center Lap Belts ................ 3
- Page 301 and 302:
Hood Release .............. 209. 30
- Page 303 and 304:
Adults ...................... 21 Bu
- Page 305:
Service Station Information Battery