ProSeal Instructions for Olympus-35 SP Please read ... - Kyphoto.com
ProSeal Instructions for Olympus-35 SP Please read ... - Kyphoto.com
ProSeal Instructions for Olympus-35 SP Please read ... - Kyphoto.com

Create successful ePaper yourself
Turn your PDF publications into a flip-book with our unique Google optimized e-Paper software.
<strong>ProSeal</strong> <strong>Instructions</strong> <strong>for</strong> <strong>Olympus</strong>-<strong>35</strong> <strong>SP</strong><br />
<strong>Please</strong> <strong>read</strong> these instructions <strong>com</strong>pletely be<strong>for</strong>e you start. Knowledge strengthens confidence, and<br />
like most jobs, this is better done right the first time. I think you’ll find it rewarding and fun, and I’ve<br />
tried to keep things as easy and logical as possible. This is a very interesting rangefinder, and the job<br />
you’re doing now is very important in repairing one of its most <strong>com</strong>mon problems.<br />
Here are some things you may need: (1) a safe surface to work on—I like to use a piece of cardboard<br />
about 1.5’ by 1.5’, but you can work on fiberboard, newspaper or anything else handy--the important<br />
thing is to protect the surface beneath you. (2) Solvent--Naphtha (cigarette lighter fluid is the same<br />
thing) or denatured alcohol are what I would use. (3) 2 or 3 paper towels. (4) some toothpicks or your<br />
bamboo tool—if you have access to a wooden cuticle stick, this is a handy tool. (5) a safety razor<br />
blade, hobby knife, or small scissors. (6) a small screwdriver (7) a pair of tweezers (8) a metal ruler or<br />
straightedge <strong>for</strong> cutting the foam. Now, let's take a look inside your camera:<br />
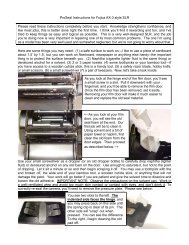
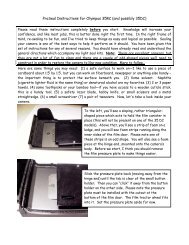
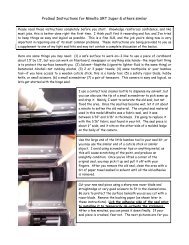
To the left, you see old deteriorated foam<br />
on the top inside edge, the hinge end<br />
and the latch end of the film door. You<br />
will also notice there is an oddity at the<br />
latch end in that there is a foam seal<br />
beneath the actual latch end seal. It<br />
seems to do nothing at all, and <strong>for</strong> that<br />
reason, we will not replace it. To make<br />
your work easier, you may want to<br />
remove the film pressure plate. This is<br />
done by sliding the assembly backward<br />
until it is free from the post which holds it.<br />
<strong>Please</strong> note: one side of it is different…<br />
As you see in the left frame above, the side near the film roller has a circular notch cut into it. You<br />
will feel a “click” as this is disengaged. In the center image, you can see I’m saturating the old<br />
foam with solvent. I’ll let this sit a moment or so to loosen the old foam/adhesive, and in the last<br />
frame, you can see I’m using a bit of paper towel and my bamboo tool to clean the old foam from<br />
the film door. Work carefully with the paper napkin piece and solvent to <strong>com</strong>pletely clean the film<br />
door of all the old foam, and then be sure to wipe the edges of the film door, too. Those will have<br />
old deteriorated foam on them, and you want the film door as clean as new again. Try to use<br />
bamboo or wooden tools so as not to scratch the paint.
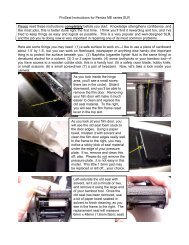
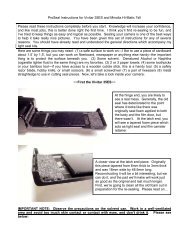
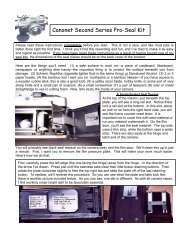
To the left, you can see I’m cleaning the hinge end<br />
seal. After applying solvent to loosen it, I use the<br />
wide end of my bamboo tool to lift and remove the old<br />
foam and adhesive. I will also use a bit of paper towel<br />
soaked with solvent to further clean the area of all<br />
traces of adhesive. If you want to cut the replacement<br />
seal <strong>for</strong> this piece, you may do so at this time. It is cut<br />
from 1.5mm thick self-adhesive foam, and the<br />
dimensions are 6mm wide x 46.5mm long.<br />
You may use a toothpick with the end broken off, the wide end of your bamboo tool, a wooden cuticle<br />
stick, or anything that will not damage the paint. When finished, wipe with a paper towel and solvent.<br />
Your work will go better if you are patient and give the solvent time to dissolve and loosen the old<br />
adhesive. IMPORTANT NOTE: Observe the precautions on the solvent can. Work in a wellventilated<br />
area and avoid too much skin contact or contact with eyes, and don’t drink it.<br />
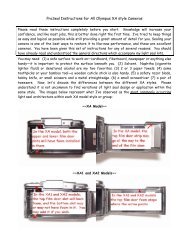
To the left, you will see one other sealed area we’ll<br />
need to clean. Inside the lower body slot there is a<br />
foam seal. You can clean that slot out using the same<br />
method you used be<strong>for</strong>e…the bamboo tool and a piece<br />
of napkin + solvent. Be sure to clean the area well.<br />
The thin end of the bamboo tool was designed to let<br />
you clean these slots easily. You may need to run<br />
several pieces of paper towel to remove all the old seal<br />
from the slot, and please note that slot runs all the way<br />
from end to end.<br />
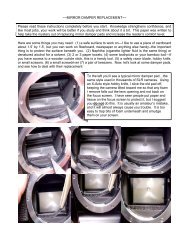
With the film door area <strong>com</strong>pletely cleaned, we can replace the foam seal on the top edge as well as<br />
the hinge seal area. For the long thin foam pieces along the top edge, please use 1.5 mm thick foam<br />
cut to a width of 2mm. The piece is about 7 inches long, and you’ll trim to fit. In order to make this<br />
foam easier to install, lick the adhesive side first. This will de-activate the adhesive <strong>for</strong> a short while,
and it will give you time to position the piece as you want. Trim at the end to match the original<br />
manner in which the foam was installed. Begin at the latch end (originally you will recall this foam<br />
piece ran a little more than halfway up the latch end—please see final image in these instructions).<br />
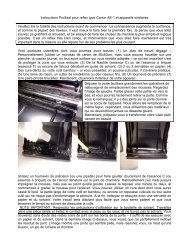
Install the foam in the slot a bit at a time, as you see I’ve done in the first frame above. If you’ve<br />
licked the adhesive side, you’ll be able to locate it right where you want it to be. At the hinge end,<br />
you will replace the seal with a piece of 1.5mm thick foam cut 46.5mm mm x 6mm. You may lick this<br />
piece be<strong>for</strong>e positioning it, also. That piece is butted up to the hinge. After you position these pieces,<br />
set the camera aside <strong>for</strong> 30 minutes or so. Your saliva will dry and you can then press the pieces<br />
down <strong>for</strong> a final installation.<br />
The hinge seal installed. <strong>Please</strong> note the seal does not<br />
cover the body slots but stops just at the edge of them.<br />
Also, the seal piece fits so that just a bit of the body shows<br />
above it. I have tried to lighten this image so you can see<br />
that.<br />
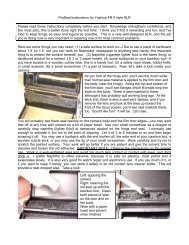
In the first frame above, I start a “Seal Strip” into the slot at the end. I push it into place with the thin<br />
end of the bamboo tool, being careful not to twist it. The coated or “glossy” side faces up, as you can<br />
see. In the second frame, I continue around the curve, and in the final frame, you can see how I<br />
guide the strip along, pushing gently into place with the bamboo tool. I will continue the strip all the<br />
way to the latch end, following the slot through the cutout <strong>for</strong> the film canister and over the “hump.”<br />
Do not worry that no adhesive is used. This strip has been carefully designed so that sidewall<br />
pressure will keep it in the slot indefinitely. At the end, you will trim the strip so it finishes in the slot:
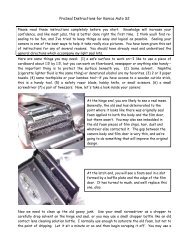
~~THE LATCH END~~<br />
Left: The latch seal <strong>for</strong> this camera is cut from<br />
2mm thick self-adhesive foam. If you<br />
remember, originally the camera had an odd<br />
seal beneath the ledge on which the latch seal<br />
sits. We don’t know why, as it had no clear<br />
purpose. <strong>Please</strong> cut the replacement 6mm wide<br />
x 46mm long, remember to lick the adhesive<br />
side of the hinge end seal to allow yourself time<br />
to adjust it and install as shown. In 30 minutes<br />
or so, your saliva will be dry, and you can press<br />
the seal down. In this image, you also see<br />
where the top edge seal piece begins.<br />
At this point, you may re-install the film pressure plate. <strong>Please</strong> remember the side facing the film<br />
roller had the small notch in it. I’d install that side first and the other side next.<br />
Now you’re finished, and your camera is <strong>read</strong>y to enjoy again.<br />
~~NOTES~~<br />
These instructions were given to you as an ac<strong>com</strong>paniment to a general seal kit, or <strong>for</strong> any of several<br />
reasons. You should be able to easily cut your own seal pieces from the material in my kits, and you<br />
should never use inferior materials as a substitute. Using the best costs no more. Remember—your<br />
camera is a precision piece of equipment. Do not <strong>com</strong>promise it or risk damaging it by using lowgrade<br />
foam or foam of an improper thickness or density.<br />
About licking the self-adhesive side: You’ll be working with small pieces of foam with one sticky side,<br />
and you’ll be working in close quarters. Make it easy on yourself by licking the adhesive side be<strong>for</strong>e<br />
you install the pieces. This will de-activate the adhesive temporarily, and keep the material from<br />
sticking to your fingers or tweezers as badly, too. After 20 to 30 minutes, your saliva will have dried,<br />
and you can press the piece down <strong>for</strong> a final seal.<br />
Jon Goodman --- 2007