ProSeal Instructions for Olympus 35RC (and possibly 35DC)
ProSeal Instructions for Olympus 35RC (and possibly 35DC)
ProSeal Instructions for Olympus 35RC (and possibly 35DC)

You also want an ePaper? Increase the reach of your titles
YUMPU automatically turns print PDFs into web optimized ePapers that Google loves.
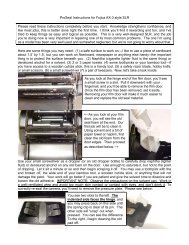
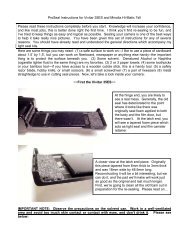
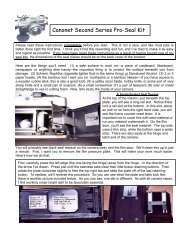
<strong>ProSeal</strong> <strong>Instructions</strong> <strong>for</strong> <strong>Olympus</strong> <strong>35RC</strong> (<strong>and</strong> <strong>possibly</strong> <strong>35DC</strong>)Please read these instructions completely be<strong>for</strong>e you start. Knowledge will increase yourconfidence, <strong>and</strong> like most jobs, this is better done right the first time. In the right frame ofmind, re-sealing to be fun, <strong>and</strong> I’ve tried to keep things as easy <strong>and</strong> logical as possible. Sealingyour camera is one of the best ways to help it per<strong>for</strong>m as it should. You have been given thisset of instructions <strong>for</strong> any of several reasons. You should have already read <strong>and</strong> understood thegeneral directions which accompany my light seal kits. Note: These are excellent cameras, butthey are not a lot of fun to clean <strong>and</strong> there are a couple of odd-shaped pieces we’ll need toconstruct in order to restore the camera to like-new condition. More to follow…Here are some things you may need: (1) a safe surface to work on—I like to use a piece ofcardboard about 1.5’ by 1.5’, but you can work on fiberboard, newspaper or anything else h<strong>and</strong>y--the important thing is to protect the surface beneath you. (2) Some solvent. Naphtha(cigarette lighter fluid is the same thing) or denatured alcohol are my favorites. (3) 2 or 3 papertowels. (4) some toothpicks or your bamboo tool—if you have access to a wooden cuticle stick,this is a h<strong>and</strong>y tool. (5) a safety razor blade, hobby knife, or small scissors <strong>and</strong> a metalstraightedge. (6) a small screwdriver (7) a pair of tweezers. Now, let's take a look inside yourcamera:To the left, you’ll see a sloping, rather triangularshapedpiece which acts to hold the film canister inplace (this will not be present on one of the 35 DCmodels). Above that, you’ll see a strip of foam on aledge, <strong>and</strong> you will see foam strips running along theinner sides of the film door. Please note one ofthese strips is an odd shape. You will also see a foampiece at the hinge end…mounted onto the camera’sbody. Be<strong>for</strong>e we start, I think you should removethe film pressure plate to make things easier.Slide the pressure plate back (moving away from thehinge end) until the tab is clear of the small buttonholder. Then you can “click” it away from the buttonholder on the other side. Please note the pressureplate must be installed with the cutout at thebottom of the film door. The film tractor wheel fitsinto it. Set the pressure plate aside <strong>for</strong> now.
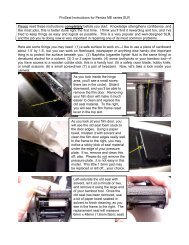
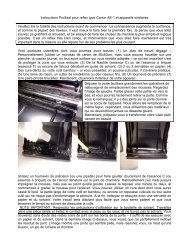
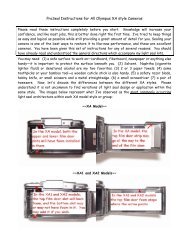
The cut pieces look like this. It isfar easier to cut one piece 43mm x49mm <strong>and</strong> then cut the individualpieces so all will be the same length.Okay, now that we’ve conquered that piece, let’s cut the pieces <strong>for</strong> the rest of the film door.Using 1.5mm thick foam, please cut a piece about 2mm wide x about 122mm long (to allow <strong>for</strong>trimming at the end). This will be the top slot. For the bottom slot, you will see the piece isodd-shaped, <strong>and</strong> the measurements are approximately 5mm wide <strong>for</strong> about 32mm, a diagonal cutback to 2mm <strong>and</strong> then about 87mm to the end. You will need to test this piece without removingthe backing paper be<strong>for</strong>e you install it <strong>and</strong> <strong>possibly</strong> trim with scissors. The pieces you cut willlook like this:Except…you will notice I have cut the odd-shaped piece wrong. It is upside-down, meaning Ihave to cut a new one which points the right way. In case you think I never make mistakes, nowyou can see that is not true.So, now I will remove the backing paper, lick the pieces well…get them really wet (because thiswill delay the adhesive <strong>and</strong> give you time to position them without becoming a frustrated <strong>and</strong>crazy maniac)…<strong>and</strong> then I will install them. Like this:When you install these pieces, you will need to trim them to fit (hencethe need <strong>for</strong> small scissors). The bottom piece fits rather flush withthe back side of the film door (I know this image makes things lookbent, but that is an illusion). When you reach the end of the slot (atthe hinge end), you will notice the small “trough” or slot the seals fitinto comes to an end. Trim the pieces so that they stop at that end.In the top slot, the piece follows the film door up toward the top ofthe latch end, <strong>and</strong> I’ve tried to show that in this image.After my saliva has dried (about 30 minutes to an hour), I can press them down <strong>for</strong> a final fit.After these are installed, I will install the film canister retaining pad (remember to lick it):
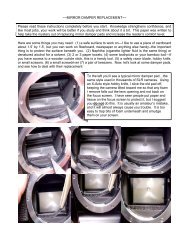
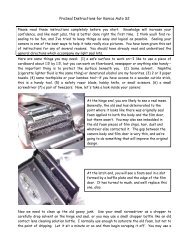
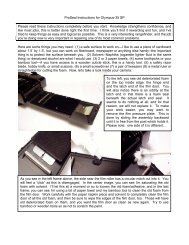
While I am at it, I will also install thesmall pad which sits above the filmcanister retaining pad. This is also madefrom 1.5mm thick foam, <strong>and</strong> it measures49mm x 2.5mm. You can lick this piecebe<strong>for</strong>e you install it, also. Doing this willmake your work much easier <strong>and</strong> moreaccurate. (now you see the film door <strong>and</strong>seal both appear to be straight again.)All finished on the latch end, <strong>and</strong> lookingjust like new again…ready to do the hingeend seal (which will be a nice easy break<strong>for</strong> you)…In the image to the left, you will notice twothings: One—you can see how I have stoppedthe little foam strips in their “troughs” orslots. The upper one is still wet. When itdries, I will make it straight as I press itdown. Two—the hinge end seal is very simple.While the original seal was a very thin foamstrip, I have chosen to use the thin adhesivefabric (velvet) material here. It is easy touse, it will seal this area excellently, <strong>and</strong> itwill last <strong>for</strong> many years. The piece is 46mm x4mm (1mm thick)…yes, lick it, also.Okay, only one more area to re-seal, <strong>and</strong> that is the lower slot near the film canister cutout.Let’s take a look:
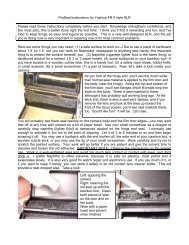
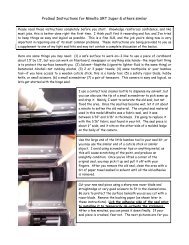
In the image to the left above, you can see the area where the last seal material will be located.It begins apx ½ inch past the upward leading angle of the slot, <strong>and</strong> extends back <strong>and</strong> throughthe cutout area. In the image to the right above, you can see how I will clean this slot out.With the thin end of your bamboo tool, push a piece of paper napkin or paper towel which hasbeen soaked with solvent through the slot. Keep doing this until there is no more evidence ofthe old foam or adhesive, <strong>and</strong> then cut a piece of 1.5mm thick foam 1.5mm wide by 70mm long.Remove the backing paper, put the piece in your mouth to make it very wet <strong>and</strong> then carefullyguide it through the slot. Hint: Begin at the end of the slot <strong>and</strong> work your way back throughthe cutout area. This will make sure you don’t have to trim the piece at the end. Be careful notto let it twist or rotate as you guide it into the slot. Then let it dry very well…overnight isideal…<strong>and</strong> then press it down with your bamboo tool.When all is, replace the pressure plate, close your film door <strong>and</strong> let your camera sit a few hoursto allow the new seals to get happy with their new surroundings. Please do not use inferior sealproducts in your cameras. Using the best costs no more, <strong>and</strong> the benefit will be less strain onyour film door plus a more professional product with a longer life expectancy.~~NOTES~~Jon Goodman --- 2008