ProSeal Instructions for Nikon F2 SLR Please read these ...
ProSeal Instructions for Nikon F2 SLR Please read these ...
ProSeal Instructions for Nikon F2 SLR Please read these ...

Create successful ePaper yourself
Turn your PDF publications into a flip-book with our unique Google optimized e-Paper software.
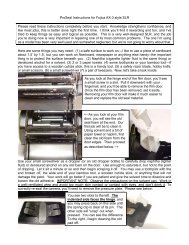
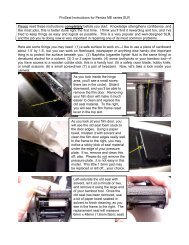
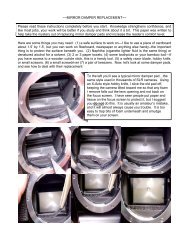
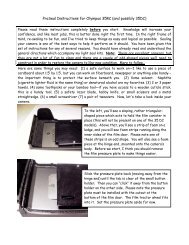
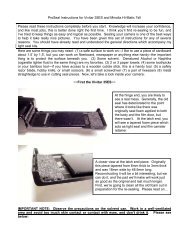
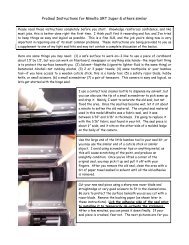
<strong>ProSeal</strong> <strong>Instructions</strong> <strong>for</strong> <strong>Nikon</strong> <strong>F2</strong> <strong>SLR</strong><strong>Please</strong> <strong>read</strong> <strong>these</strong> instructions completely be<strong>for</strong>e you start. Knowledge strengthens confidence, andlike most jobs, this is better done right the first time. I think you’ll find it rewarding and fun, and I’vetried to keep <strong>these</strong> 4 pages as easy and logical as possible. This is a very popular and well-designed<strong>SLR</strong>, and the job you’re doing now is very important in repairing one of its most common problems.Here are some things you may need: (1) a safe surface to work on—I like to use a piece of cardboardabout 1.5’ by 1.5’, but you can work on fiberboard, newspaper or anything else handy--the importantthing is to protect the surface beneath you. (2) Naphtha (cigarette lighter fluid is the same thing) ordenatured alcohol <strong>for</strong> a solvent. (3) 2 or 3 paper towels. (4) some toothpicks or your bamboo tool—ifyou have access to a wooden cuticle stick, this is a handy tool. (5) a safety razor blade, hobby knife,or small scissors. (6) a small screwdriver (7) a pair of tweezers.<strong>Please</strong> begin by removing your pentaprism and your focus screen. You may cover your fingerwith a plastic bag to avoid fingerprints on your focus screen.As you look inside the hinge area, you’ll see asmall screw there (the middle arrow). Slide itdownward, and you’ll be able to remove the filmdoor. Removing your film door will make our workeasier and less cumbersome. You will noticethere is no seal material used <strong>for</strong> the hinge endseal on this model. The arrows on the sides pointto the body slot seals, which we will clean andreplace later.As you look at the latch end, you will see therewas a thin seal used here. In this image, you cansee the old foam has begun to lift as it hasdeteriorated. The measurement of this seal pieceis 1.5mm thick x 2mm wide x 52mm long, and itshould be cut from self-adhesive open-celledfoam.To the left—Using paper and masking tape, I make a mask to keep the shutter curtains clean. Donot cover the film door slots in the body. In the middle frame, I push a small bit of paper towel ornapkin into the slot and saturate it with denatured alcohol. Be careful to start at the film framereset lever and work away from it, not pushing anything into it or under it. In the right frame, youcan see I am using the thin end of my bamboo tool to push the bit of paper towel through the slotto clean it. Repeat <strong>for</strong> the bottom slot, cleaning all areas of the slots completely.
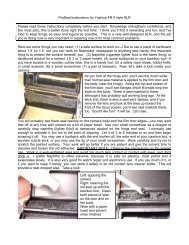
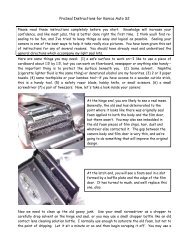
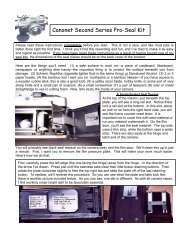
Left: I use a bit of paper towel and solvent to clean the edges of the film door. These will have oldsticky foam on them, and you don’t want this to foul or stick to your new foam. Right, I install thenew latch end seal. This is a 1.5mm x 2mm x 52mm piece of self-adhesive open-celled foamwhich I will lick well and install carefully. Once you have positioned it as you want, set it aside <strong>for</strong>30 minutes and let your saliva dry. Then it can be pressed down gently with the thin end of yourbamboo tool.~~The Body Slots~~Using a 2mm non-adhesive “Seal Strip,” begin at the hinge end and push the strip gently into theslot with your fingertip as I’ve done in the first frame to the right. The slick (or glossy) side shouldface outward. In the middle frame, you can see I am following around the curve…using the thinend of my bamboo tool to gently guide the foam into the slot. In the final frame to the right, yousee I have trimmed this piece so it will end just at the film frame reset lever, and I’m pushing thepiece into the slot with the bamboo tool. I’ll repeat this <strong>for</strong> the other side of the slot, and then I’llrepeat this <strong>for</strong> the bottom slot. Once this is done, I’ll re-attach the film door and close it. The doorwill be snug until the new seals adjust to their new settings.Guess what? You’re finished, and your camera is back to “like new” condition and <strong>read</strong>y to enjoyagain.~~NOTES~~These instructions were given to you as an accompaniment to a general seal kit, or <strong>for</strong> any of severalreasons. You should be able to easily cut your own seal pieces from my seal material, using methodsdescribed in my general kit instructions. Your camera is a fine precision instrument, and the materialsyou are using have been carefully tested to be compatible with its design. You should never useinferior seal materials as a substitute. Using materials which are too thick or too dense could damageyour camera, and a professional repair person would never consider doing that.About licking the adhesive first…when you do this, you temporarily de-activate the “stickiness.” Thisallows you time to position the piece correctly, and it keeps it from sticking to your fingers or tweezers.After 30 minutes or so, you can return and press it down again.Jon Goodman --- 2006