Create successful ePaper yourself
Turn your PDF publications into a flip-book with our unique Google optimized e-Paper software.
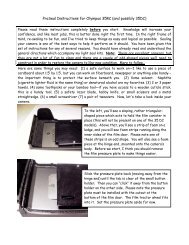
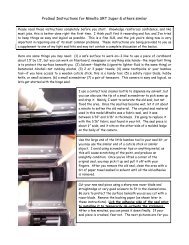
ProSeal Instructions for All <strong>Olympus</strong> <strong>XA</strong> style Cameras<br />
Please read these instructions completely before you start. Knowledge will increase your<br />
confidence, and like most jobs, this is better done right the first time. I’ve tried to keep things<br />
as easy and logical as possible while still providing a great amount of detail for you. Sealing your<br />
camera is one of the best ways to restore it to like-new performance, and these are excellent<br />
cameras. You have been given this set of instructions for any of several reasons. You should<br />
have already read and understood the general directions which accompany my light seal kits.<br />
You may need: (1) a safe surface to work on—cardboard, fiberboard, newspaper or anything else<br />
handy—it is important to protect the surface beneath you. (2) Solvent. Naphtha (cigarette<br />
lighter fluid) or denatured alcohol are my two favorites. (3) 2 or 3 paper towels. (4) some<br />
toothpicks or your bamboo tool—a wooden cuticle stick is also handy. (5) a safety razor blade,<br />
hobby knife, or small scissors and a metal straightedge. (6) a small screwdriver (7) a pair of<br />
tweezers. Now, let's discuss the differences between the different <strong>XA</strong> styles. Please<br />
understand it is not uncommon to find variations of light seal design or application within the<br />
same style. The images below represent what I’ve observed as the most commonly occurring<br />
light seal architecture within each <strong>XA</strong> model style or group:<br />
~~<strong>XA</strong> Model~~<br />
~~<strong>XA</strong>1 and <strong>XA</strong>2 Models~~
~~<strong>XA</strong>3 and <strong>XA</strong>4 Models~~<br />
As you can see above, the differences in the <strong>XA</strong>, <strong>XA</strong>1 and <strong>XA</strong>2 are relatively minor. Your <strong>XA</strong>2<br />
may or may not have seal material in the bottom film door slot (but you can add this if you wish).<br />
The <strong>XA</strong> may have seal material running along the top side of the film door all the way to the end<br />
of the door, or it may be like the <strong>XA</strong>1 and <strong>XA</strong>2 and this seal may stop around the film pressure<br />
plate. If you want to duplicate the “full door seal” design used in the <strong>XA</strong> for the <strong>XA</strong>1 or <strong>XA</strong>2,<br />
please feel free to do so. The design of the <strong>XA</strong>3 and <strong>XA</strong>4 cameras was completely different.<br />
There is a hinge end seal on the camera body, but not on the film door. Both upper and lower<br />
body slots are sealed, and there is no seal on the camera’s film door…except for the latch end.<br />
Please note the latch end seal is the same for all <strong>XA</strong> styles.<br />
~~What Kind Of Seal Material Should I Use?~~<br />
The <strong>Olympus</strong> <strong>XA</strong> cameras were designed with very close and precise tolerances. It is important<br />
to respect those tolerances when choosing a seal material. You may use 1mm self-adhesive<br />
fabric, 1mm self-adhesive foam, but please do not exceed a thickness of 1mm with any style of<br />
material in the <strong>XA</strong>, <strong>XA</strong>1 or <strong>XA</strong>2. In the <strong>XA</strong>3 and <strong>XA</strong>4, the hinge end seal should be 1.5mm thick.<br />
If this is unclear to you, please contact me (Jon_Goodman@yahoo.com) with your questions<br />
before you go any further. See the end of the instructions for an interesting demonstration…<br />
~~A Special Message for <strong>XA</strong>, <strong>XA</strong>1 and <strong>XA</strong>2 Owners~~<br />
At this point, I want you to consider removing your film pressure plate. If you have the <strong>XA</strong>3 or<br />
<strong>XA</strong>4, please IGNORE THIS SECTION. But for you others, here is how to remove it: With a<br />
thumb on the bottom edge of the pressure plate and another thumb on the film canister tab,<br />
press upward gently until the plate clip frees itself from its retaining button. You will feel a<br />
little “click.” Now, lift up slightly and slide the rear tab off its retaining button.<br />
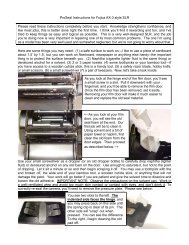
Notice the “hourglass shape” in the metal. The retaining<br />
tab can only slide in one direction (toward the wide end),<br />
because the other passage is too narrow. Small<br />
indentations (dimples) in the metal hold the plate<br />
suspended above the film door’s surface. THE <strong>XA</strong>3 and<br />
<strong>XA</strong>4 pressure plate should not be removed.
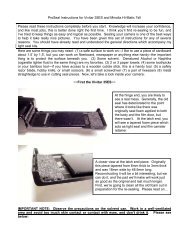
To the left, a visual example of how I remove the pressure<br />
plate in the first <strong>series</strong> <strong>XA</strong> models. Gentle pressure until<br />
you feel a “click.” It will replace in the opposite fashion.<br />
Now, if you have model <strong>XA</strong>, <strong>XA</strong>1 or <strong>XA</strong>2 and you want to go one step further and remove the<br />
film door entirely, here’s how I do that: First, look at the bottom plate of your camera…<br />
(1) remove battery cover and batteries and set aside (2)<br />
move lever to “self timer” and remove all 5 phillips head<br />
screws. 3 are long and 2 are short. You can see where they<br />
go. (3) carefully lift up on the bottom plate using your<br />
fingernail to pull it up near the lever. It may be resistant,<br />
but if you’re patient, it will come off.<br />
Remove the carrying strap, revealing the stainless<br />
steel rod (arrow number 1). Using the edge of a<br />
small knife, catch the rod and slide it downward.<br />
You should see the metal rod start to slide out of<br />
the bottom hinge (arrow number 2). When you can<br />
catch this rod with a small pair of pliers, slide it out.<br />
Your door will now come off easily, and to replace,<br />
you will simply reverse this process.<br />
(you may also remove the door of the <strong>XA</strong>3 and <strong>XA</strong>4, but unless you need to repaint the door, I<br />
seldom find this necessary)<br />
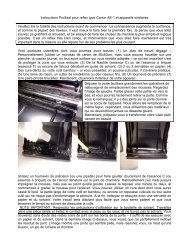
Okay, now let’s clean your camera. Take your small screwdriver or an old dropper bottle and use<br />
it to carefully drop naphtha (lighter fluid) or denatured alcohol on the areas that have seal<br />
material attached. Please remember your camera’s body is plastic…some solvents will damage<br />
plastic, so never use solvents like acetone, MEK, toluol, fingernail polish, etc. I normally drop<br />
enough solvent on the old seal to saturate it. Let this sit about 2 minutes and then begin<br />
scraping it off. You may use a toothpick with the end broken off, your bamboo tool, or a wooden<br />
cuticle stick. Work carefully and try not to scratch the painted surface. In some cases you may<br />
find the adhesive doesn’t turn loose easily. It may take the paint off with it (see picture below).<br />
If this occurs, you may touch it up with semi-gloss black paint and a small paint brush, or you<br />
may re-paint the inner door with the paint I mention in “notes.” The main thing is to be patient<br />
and give the solvent time to dissolve and loosen the old adhesive. IMPORTANT NOTE:<br />
Observe the precautions on the solvent. Work in a well-ventilated area and avoid too
much skin contact or contact with eyes, and don’t drink it. After you clean the old seal from<br />
the film door, you’ll need to also clean the old foam off at the latch end seal. This is done the<br />
same way. I run a toothpick or bamboo skewer through this channel, and sometimes I will use<br />
tweezers to lift old material away, too.<br />
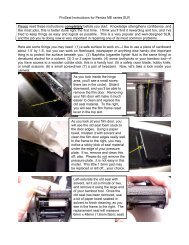
Left, I’m cleaning the old goop off of this <strong>XA</strong>2 door, and as you<br />
can see, the paint is coming off with the old seal material. I will<br />
re-touch this before I re-seal it. There will be notes about this<br />
at the end of the instructions.<br />
Once you’ve completely removed the hinge end seal, latch end seal and door seals, take a piece<br />
of paper towel with naphtha on it and clean the film door edge and the body at the hinge seal<br />
area. Usually there will be old black seal residue here, and you don’t want to leave that to foul<br />
your new seal material. You may need to wipe this two or three times until you get all the old<br />
junk removed completely.<br />
Now we’re going to clean out the rail slots on the camera body and replace those seals. Here’s<br />
how:<br />
Wet a bit of paper towel with solvent and<br />
push it into the slot with the narrow end<br />
of your bamboo tool. Avoid the film frame<br />
reset lever. Then push this wet towel<br />
through the slot until all the old seal has<br />
been removed. Repeat the procedure for<br />
the slot on the other side of the frame<br />
counter and the bottom slot if needed.<br />
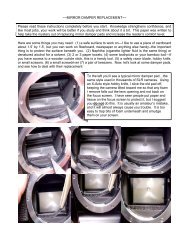
Press a 2mm Seal Strip into the slot using the thin end of your tool. Start at the end of the<br />
slot. Don’t let the seal material twist as you install it, and follow around the corner. Install with<br />
the slick side facing outward. Don’t worry that there is no adhesive. With this seal you don’t<br />
need it. When you reach the frame reset lever, use a razor blade, small knife or tiny scissors to
trim the strip so it stops at the reset lever. Repeat this procedure for the part of the slot<br />
starting at the film frame reset and extending to the hinge end. If needed or desired, repeat<br />
this procedure for the bottom rail slot. Now, with a blunted toothpick trace the seal’s length,<br />
pressing it gently down into its slot to seat it.<br />
Now, for those with <strong>XA</strong>, <strong>XA</strong>1 or <strong>XA</strong>2, let’s replace the film door seal. Remove the backing<br />
paper, lick the adhesive and start at the edge of the door on the hinge end side—flush with the<br />
lip of the edge (see picture). Run each straight down the door, keeping the edge of the seal<br />
butted straight to the edge of the door flange and be sure to evenly follow the door’s contour<br />
(rounded) part. Press into place when you have them positioned properly and after they are<br />
dry…use your bamboo tool-wide end to seat them. (picture below shows how these should look)<br />
Please note the hinge end seal sits between the edge pieces you just installed and not on top of<br />
those edge strips. Here is a view of how it should look, and you will notice I have used the 1mm<br />
fabric seal for this <strong>XA</strong>2:<br />
>>>NOTE: Please see the end of the instructions for explanation of the <strong>XA</strong> door.
Once the latch end piece is totally dry (30 minutes or so), press it against the film door to seal<br />
it.<br />
For those of you with first <strong>series</strong> <strong>XA</strong> models (<strong>XA</strong>, <strong>XA</strong>1 or <strong>XA</strong>2), you may now replace your<br />
pressure plate. First I slide the left hand slot beneath its retaining button and next I carefully<br />
position the opening over the other retaining button and push gently downward from the top<br />
until I hear or feel it click into place.<br />
~~About the <strong>XA</strong> film door and the top seal piece:~~<br />
The top strip isn’t a difficult problem at all. Simply cut two pieces. There is a ledge at the<br />
point of the bend. Please look at how I do this:<br />
Two 1mm fabric pieces set into place<br />
show how to install this piece in the<br />
easiest fashion.<br />
Now you’re finished and you can re-assemble your camera by reversing the steps above. You may<br />
use the dimensions below to cut your seal pieces.<br />
~~NOTES~~<br />
(1) If you want to re-paint your film door, a good spray paint is: Krylon #1613 Semi Flat Black.<br />
(you may also use this to re-paint the inside of the door with the pressure plate and all seal<br />
material removed). If your film door needs sanding, 400 or 800 grit wet/dry sandpaper should<br />
be just fine. Be sure to wash the film door in warm soapy water well and/or wipe it down with<br />
Naphtha before you sand it. The oils from your hands and fingers collect on the film door.<br />
Sanding the door before removing the oils only forces them into the old paint more deeply,<br />
making it more difficult to remove them later. Oils will cause “fisheyes” in the paint.<br />
(2) Dimensions for seal pieces: First <strong>series</strong> door strips: bottom strip—112mm x 2.5mm. Top<br />
strip—70mm x2.5mm (unless your camera’s strip goes all the way to the end…then it is apx<br />
112mm, cut at the break as shown above). First Series hinge end seal—42mm x 8.5mm with a<br />
cutout of 8mm x 3mm spaced 12mm from the left side/22mm from the right side. Second<br />
<strong>series</strong> hinge end seal—46mm x 6mm with a cutout of 8mm x 3mm spaced 15mm from the left<br />
side/23mm from the right side. Latch end seal (all models) 2mm x 47mm. Material to use:<br />
First Series door & hinge seal: 1mm fabric seal or 1mm foam. Second <strong>series</strong> hinge end seal:<br />
1.5mm open-celled foam.<br />
(3) Lick the adhesive? Yes! Whether using foam or fabric, this will temporarily de-activate<br />
the adhesive. Then you can position the seal just where you want it to be. When it is dry,<br />
stick it down for good.
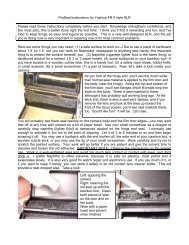
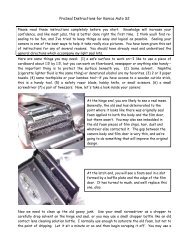
~~Let’s measure the hinge end to body gap~~<br />
<strong>XA</strong>, <strong>XA</strong>1 and <strong>XA</strong>2 models shown in this demonstration<br />
How do we know what the actual thickness of the gap is in a camera? How do we measure that<br />
accurately so we’ll know just which seal material will work best for us? Here’s a method I’ve<br />
used for several years. You can do this, also. You don’t have to use a dial gauge. You can usually<br />
tell the thickness by visual examination.<br />
First frame above…I place a bit of common clay into a tiny fold of waxed paper.<br />
Middle frame above…I close the film door and latch it. The waxed paper keeps the clay from<br />
sticking and falls out when the door is opened, preserving the measurement exactly.<br />
Third frame above…I carefully use a dial gauge to measure the clay. As you can see, it is .028<br />
inch. We know that 1mm = .0394 inch.<br />
Therefore, 1mm thick foam will give you a compression ratio of almost exactly 25%, which is<br />
ideal.<br />
The 1mm thick fabric seal I sell is actually a few thousands of an inch less than .0394, and it will<br />
provide a compression ratio of slightly over 20%, which is ideal for a fabric seal. Whichever<br />
you choose will work fine.<br />
Take your time….use the “good stuff”….do it right.<br />
Jon Goodman --- 2006