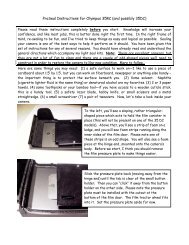
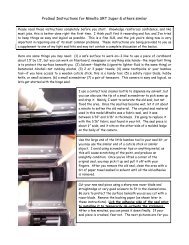
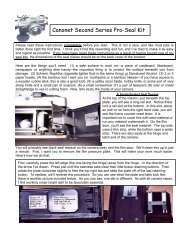
ProSeal Instructions for Konica Auto S2 - Kyphoto.com
ProSeal Instructions for Konica Auto S2 - Kyphoto.com
ProSeal Instructions for Konica Auto S2 - Kyphoto.com

You also want an ePaper? Increase the reach of your titles
YUMPU automatically turns print PDFs into web optimized ePapers that Google loves.
<strong>ProSeal</strong> <strong>Instructions</strong> <strong>for</strong> <strong>Konica</strong> <strong>Auto</strong> <strong>S2</strong><br />
Please read these instructions <strong>com</strong>pletely be<strong>for</strong>e you start. Knowledge will increase your<br />
confidence, and like most jobs, this is better done right the first time. I think you’ll find resealing<br />
to be fun, and I’ve tried to keep things as easy and logical as possible. Sealing your<br />
camera is one of the best ways to help it take really nice pictures. You have been given this set<br />
of instructions <strong>for</strong> any of several reasons. You should have already read and understood the<br />
general directions which ac<strong>com</strong>pany my light seal kits.<br />
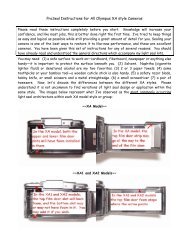
Here are some things you may need: (1) a safe surface to work on—I like to use a piece of<br />
cardboard about 1.5’ by 1.5’, but you can work on fiberboard, newspaper or anything else handy--<br />
the important thing is to protect the surface beneath you. (2) Some solvent. Naphtha<br />
(cigarette lighter fluid is the same thing) or denatured alcohol are my favorites. (3) 2 or 3 paper<br />
towels. (4) some toothpicks or your bamboo tool—if you have access to a wooden cuticle stick,<br />
this is a handy tool. (5) a safety razor blade, hobby knife, or small scissors. (6) a small<br />
screwdriver (7) a pair of tweezers. Now, let's take a look inside your camera:<br />
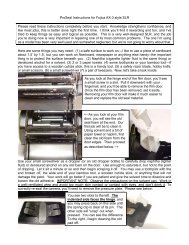
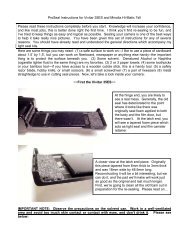
At the hinge end, you are likely to see a real mess.<br />
Generally, the old seal has deteriorated to the<br />
point where it looks like there was originally seal<br />
foam applied to both the body and the film door,<br />
but there wasn’t. You may also see imbedded in<br />
the old foam pieces of film chips, hair, dust and<br />
whatever else contacted it. The gap between the<br />
camera body and film door is very thin, and we’re<br />
going to do something that will improve the original<br />
design.<br />
At the latch end, you will see a foam seal in a slot<br />
<strong>for</strong>med by a baffle plate and the edge of the film<br />
door. It has turned to mush, and we’ll replace this<br />
one, also.<br />
Now we need to clean up the old gooey junk. Use your small screwdriver as a dropper to<br />
carefully drop solvent on the hinge end seal, or you may use a small dropper bottle like an old<br />
contact lens cleaning solution bottle. I normally use enough to saturate the old foam, but not to<br />
the point of dripping. Let it sit a minute or so and then begin scraping it off. You may use a
toothpick with the end broken off, the wide end of your bamboo tool, a wooden cuticle stick, or<br />
a popsicle stick or coffee stirrer. Work carefully and try not to scratch the painted surface.<br />
Your work will go better if you are patient and give the solvent time to dissolve and loosen the<br />
old adhesive. IMPORTANT NOTE: Observe the precautions on the solvent can. Work in a wellventilated<br />
area and avoid too much skin contact or contact with eyes, and don’t drink it. Please<br />
see below:<br />
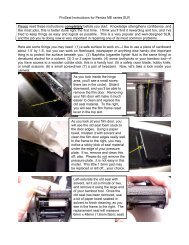
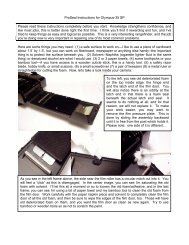
Left: Drop some solvent on the<br />
old foam and let it penetrate.<br />
Right: Use the large end of your<br />
bamboo tool to loosen the old<br />
foam and remove it. After I<br />
have removed as much as possible<br />
with the bamboo tool, I will use a<br />
piece of paper towel soaked in<br />
solvent to finish cleaning.<br />
Left: cleaning the film<br />
door edges. There will be<br />
old sticky material left<br />
here, and I don’t want it<br />
to foul my new seal strips.<br />
Right: using the bamboo<br />
tool and a bit of paper<br />
towel soaked in solvent to<br />
clean out the old latch end<br />
seal.<br />
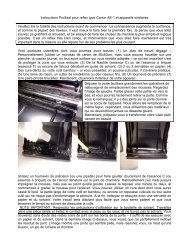
Now we’re going to clean out the rail slots on the camera body and replace those seals. Here’s<br />
how:<br />
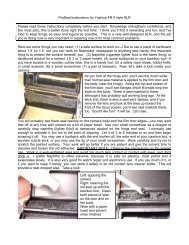
First, run a toothpick with the end broken off or<br />
the narrow end of your bamboo tool through the<br />
slot to remove the gunk. Repeat if needed,<br />
working away from the frame counter reset<br />
lever. Be careful not to push old seal material<br />
into the frame counter reset area. Then run a<br />
small piece of paper towel with a little solvent on<br />
it through the slot to finish cleaning it. You may<br />
need to do this several times to get the slot fully<br />
cleaned. Repeat this process <strong>for</strong> the slot at the<br />
bottom of the body as well.
Next, take a long 2mm piece of non-adhesive seal material and press it into the slot using your<br />
fingertip. Use the small end of your bamboo tool to guide it in and press it down. Start at the<br />
hinge end and work toward the film frame counter. Don’t let the seal material turn or twist.<br />
Don’t worry that there is no adhesive. With this seal you don’t need it. The pressure of the<br />
seal material against the channel walls will keep it in place perfectly and provide a full-channel<br />
and <strong>com</strong>pletely effective light baffle. When you reach the frame counter lever, use a razor<br />
blade, small knife or tiny scissors to trim the excess so the strip will finish at the edge of the<br />
lever and tuck it in. Repeat this procedure <strong>for</strong> the part of the slot starting at the film frame<br />
reset and extending to the latch end. Repeat <strong>for</strong> the lower slot, using a single long piece. Here<br />
are three images <strong>for</strong> you:<br />
Now, let’s replace the hinge end seal. Cut a piece of 1mm thick self-adhesive fabric seal 52mm x<br />
5.5mm. Lick or moisten the adhesive side of the piece after removing the paper backing. This<br />
will give you time to position it neatly.<br />
The hinge end seal installed, as shown<br />
below (left). Position it neatly along the<br />
door’s edge, leaving just a thin line<br />
without seal as I’ve done.<br />
The latch end seal installed, as shown above<br />
(right). Please lick or wet be<strong>for</strong>e installing to<br />
allow time to adjust <strong>for</strong> position.<br />
For the latch end seal…Cut a piece of 3mm self-adhesive open celled foam 48mm x 4mm. Lick<br />
the adhesive side well after removing the backing paper (to allow you to push it into the trough)<br />
and guide it in with the adhesive side facing downward. Using your bamboo tool’s large end,<br />
carefully press it down evenly as I have done in the above right picture. After about 20<br />
minutes, your saliva will have dried, and you can press the hinge end and latch end pieces down<br />
<strong>for</strong> a final fit. Please keep both of them straight.<br />
Now, close your film door and let your camera sit a few hours or overnight to allow the new seals<br />
to get happy with their new surroundings. You may use the 1mm open-celled sponge <strong>for</strong> the
hinge end seal in this camera if you prefer. The 1mm open-celled foam more closely matches<br />
what was originally used in your <strong>Konica</strong>. Please do not use inferior seal products in your cameras.<br />
Using the best costs no more, and the benefit will be less strain on your film door plus a more<br />
professional product with a longer life expectancy.<br />
~~NOTES~~<br />
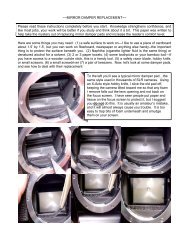
Please see image to the left. I have observed<br />
that a thin line of 1mm fabric seal may be<br />
added to this ledge if desired (maybe 3mm<br />
wide or so). It isn’t necessary, and may not<br />
improve the sealing ability of your <strong>Konica</strong>, but<br />
the clearance is there <strong>for</strong> it, and it almost<br />
looks as if this spot was originally designed to<br />
have such a seal piece.<br />
Jon Goodman --- 2005