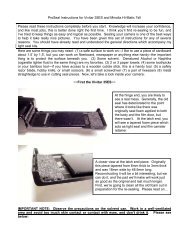
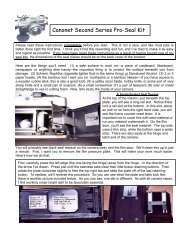
ProSeal Instructions for Pentax ME series SLR Please read these ...
ProSeal Instructions for Pentax ME series SLR Please read these ...
ProSeal Instructions for Pentax ME series SLR Please read these ...

You also want an ePaper? Increase the reach of your titles
YUMPU automatically turns print PDFs into web optimized ePapers that Google loves.
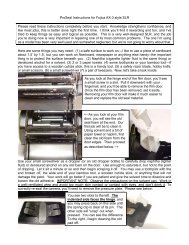
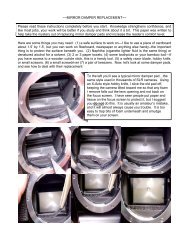
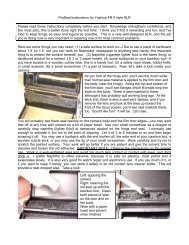
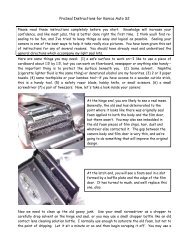
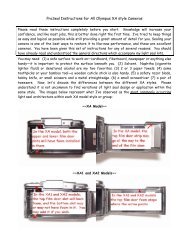
Left: I use an X-Acto typeknife to remove the old pad.Be careful not to get the oldseal on the focus screen, andplease <strong>read</strong> note below. Tothe right, you will see I amusing my tweezers to removethe old bits of pad as I loosenthem with the knife. USE NOSOLVENT IN THIS AREA.NOTE: <strong>Please</strong> do not place paper or tissue on your focus screen in an attempt to keep it clean. Thisis an amateur’s mistake, and it almost always leads to problems. One: You can (and probably will)trap bits of old seal underneath it, and <strong>these</strong> will be smudged onto your focus screen. Two: this givesyou a false sense of security, and this is not always a good thing. Work like a pro. Tilt the cameraslightly as you work so the bits will fall out of the lens opening.In the first frame above, you will see I have cleaned the old pad off. <strong>Please</strong> do not obsess aboutgetting it perfectly clean. You can not use solvent here because you can ruin your focus screen tooeasily, so just work slowly and carefully and remove the best you can. Take your time…it is not arace. Middle frame shows the pad cut from the 2.5mm thick foam. The length is 40mm and the widthis 3 to 3.5mm. In the very center, use small scissors or a very good razor to carefully cut a V notch (toexpose the tiny screw). In the last frame, you can see me setting the pad in place with my tweezers.The secret to success is to lick the adhesive side of the pad well so it will not stick be<strong>for</strong>e you get itplaced where you want it to be. Now look below to see how a professional camera repairman willpress the damper pad into place once it has dried (about 20 minutes or so):Simply lift the mirror up gently to meet thenewly installed damper pad and press againstit. Easy? Yes it is, and you will also provideuni<strong>for</strong>m pressure so that your pad will beinstalled correctly, just like a pro would do it.Most people tell me they worry about replacingthe damper pad the most, but that wasn’t sobad, was it? Certainly not.
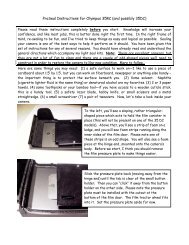
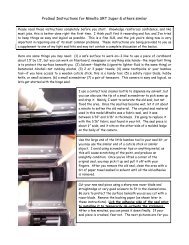
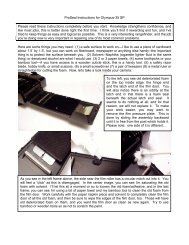
Only one more seal…the latch end seal. Clean the little ledge as shown to the left with paper toweland solvent. As to the right, cut a piece of 1.5mm thick open-celled foam 2mm x 43mm, lick theadhesive side, set it in place and adjust it be<strong>for</strong>e it dries. After a few minutes, press it down <strong>for</strong> a finalfit.Guess what? You’re finished, and your camera is back to “like new” condition and <strong>read</strong>y to enjoyagain.~~NOTES~~These instructions were given to you as an accompaniment to a general seal kit, or <strong>for</strong> any of severalreasons. You should be able to easily cut your own seal pieces from my seal material, using methodsdescribed in my general kit instructions. Your camera is a fine precision instrument, and the materialsyou are using have been carefully tested to be compatible with its design. You should never useinferior seal materials as a substitute. On the hinge end and <strong>for</strong> the tiny pieces at the latch end of thefilm door, I use 1.6mm self-adhesive fabric seal. You could use my 1.5mm open-celled foam seal,however I prefer the fabric in this instance. For the long thin door slots, use a “Seal Strip”—a 2mmnon-adhesive strip cut from a foam product I had made especially <strong>for</strong> this purpose. For the mirrordamper, use 2.5mm self-adhesive open-celled foam.About licking the adhesive first…when you do this, you temporarily de-activate the “stickiness.” Thisallows you time to position the piece correctly, and it keeps it from sticking to your fingers or tweezers.After 15 to 20 minutes or so, you can return and press it down again.Jon Goodman --- 2005