ProSeal Instructions for Vivitar 35ES and Minolta Hi-Matic 7sII ...
ProSeal Instructions for Vivitar 35ES and Minolta Hi-Matic 7sII ...
ProSeal Instructions for Vivitar 35ES and Minolta Hi-Matic 7sII ...

You also want an ePaper? Increase the reach of your titles
YUMPU automatically turns print PDFs into web optimized ePapers that Google loves.
<strong>ProSeal</strong> <strong>Instructions</strong> <strong>for</strong> <strong>Vivitar</strong> <strong>35ES</strong> <strong>and</strong> <strong>Minolta</strong> <strong>Hi</strong>-<strong>Matic</strong> <strong>7sII</strong><br />
Please read these instructions completely be<strong>for</strong>e you start. Knowledge will increase your confidence,<br />
<strong>and</strong> like most jobs, this is better done right the first time. I think you’ll find re-sealing to be fun, <strong>and</strong><br />
I’ve tried to keep things as easy <strong>and</strong> logical as possible. Sealing your camera is one of the best ways<br />
to help it take really nice pictures. You have been given this set of instructions <strong>for</strong> any of several<br />
reasons. You should have already read <strong>and</strong> understood the general directions which accompany my<br />
light seal kits.<br />
Here are some things you may need: (1) a safe surface to work on—I like to use a piece of cardboard<br />
about 1.5’ by 1.5’, but you can work on fiberboard, newspaper or anything else h<strong>and</strong>y--the important<br />
thing is to protect the surface beneath you. (2) Some solvent. Denatured Alcohol or Naphtha<br />
(cigarette lighter fluid is the same thing) are my favorites. (3) 2 or 3 paper towels. (4) some toothpicks<br />
or your bamboo tool—if you have access to a wooden cuticle stick, this is a h<strong>and</strong>y tool. (5) a safety<br />
razor blade, hobby knife, or small scissors. (6) a small screwdriver (7) a pair of tweezers (8) metal<br />
straightedge to use in cutting seal pieces. Now, let's take a look inside your camera:<br />
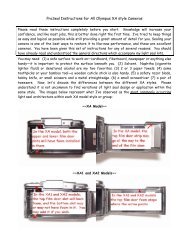
~~First the <strong>Vivitar</strong> <strong>35ES</strong>~~<br />
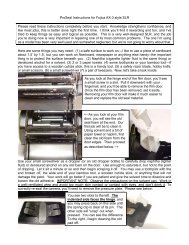
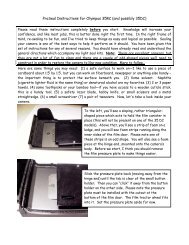
At the hinge end, you are likely to<br />
see a real mess. Generally, the old<br />
seal has deteriorated to the point<br />
where it looks like there was<br />
originally seal foam applied to both<br />
the body <strong>and</strong> the film door, but<br />
there wasn’t. At the latch end, you<br />
will see a tapered foam piece which<br />
acts as light seal <strong>and</strong> film canister<br />
retainer.<br />
A closer view at the latch end piece. Originally<br />
this piece tapered from 6mm thick to 3mm thick<br />
<strong>and</strong> was 18mm wide by 48.5mm long.<br />
Reconstructing it will be a bit interesting, but we<br />
can do it, <strong>and</strong> the pad we’ll make will work just<br />
as good as the original <strong>and</strong> last much longer.<br />
First, we’re going to clean all the old foam out in<br />
preparation <strong>for</strong> the re-sealing. Please read on…<br />
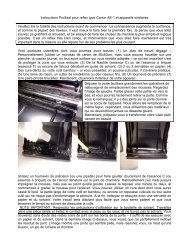
IMPORTANT NOTE: Observe the precautions on the solvent can. Work in a well-ventilated<br />
area <strong>and</strong> avoid too much skin contact or contact with eyes, <strong>and</strong> don’t drink it. Please see<br />
below:
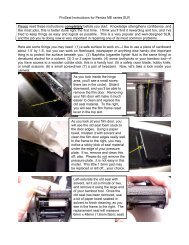
Top left-I drop solvent onto the old seal from an old dropper<br />
bottle. I use just enough to saturate it. Next, I use the wide<br />
end of my bamboo tool to loosen <strong>and</strong> remove from both the<br />
film door <strong>and</strong> camera body. I will also use a paper towel with<br />
solvent to clean this area very well. Next, I clean the film<br />
door edges well with paper towel <strong>and</strong> solvent. Next, I drop<br />
solvent on the latch end pad <strong>and</strong> remove it in the same<br />
fashion as I did the hinge end seal. Next, I clean the area<br />
very well with paper towel <strong>and</strong> solvent. You can see the<br />
cleaned area next. Finally, I run a bit of paper towel soaked<br />
with solvent through the body slots using the narrow end of<br />
my bamboo tool. Get them very clean <strong>and</strong> avoid pushing<br />
anything into the film frame counter reset lever area.
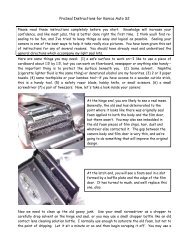
Above, you will see I’ve replaced the hinge end seal. Here’s how that is done: First, cut a piece of<br />
1mm thick self-adhesive foam 5mm wide x 47mm long. Remove the backing paper <strong>and</strong> lick the<br />
adhesive side very well. You will want to get this piece very moist, because you’re going to slide it<br />
behind the hinge itself <strong>for</strong> a very good seal. In the first image above, you can see I have set the piece<br />
in place (do not cover the body slots). In the second image, you can see I have slid it down behind<br />
the hinge so that a thin line of the body shows above the top of the seal. Use your bamboo tool to<br />
gently slide it downward. When this is dry (it will take between 30 minutes <strong>and</strong> an hour), you can<br />
press it down <strong>for</strong> a final fit.<br />
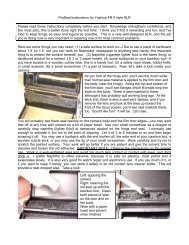
~~Reconstructing the <strong>Vivitar</strong> Latch End Piece~~<br />
Measurements of the 4<br />
component pieces:<br />
From 2.5mm thick foam—<br />
One piece 18mm x 48.5mm<br />
From 1mm thick foam—<br />
One piece 13mm x 48.5mm<br />
One piece 15mm x 48.5mm<br />
One piece 18mm x 48.5mm<br />
As shown above, cut the 4 component pieces (measurements in the text box). Laminate the 15mm<br />
<strong>and</strong> 13mm wide pieces cut from 1mm foam onto the piece cut from 2.5mm foam. This will look like<br />
the stair-step piece in the second image above. Then laminate the 18mm piece cut from 1mm foam<br />
onto this as shown in the third image above <strong>and</strong> fold it over. The end product will look like the left<br />
h<strong>and</strong> image in the second row. Remove the backing paper from the 2.5mm piece, lick the adhesive<br />
side well <strong>and</strong> install it, making sure to leave a small space behind it <strong>and</strong> the film door (this provides<br />
the light seal). When dry (30 minutes to an hour), you can press it down <strong>for</strong> a final “stick”.<br />
~~Installing the long thin strips~~
As you see in the above three images, I begin with a 2mm non-adhesive “Seal Strip” at the end of the<br />
slot, tucking it in with the thin end of my bamboo tool. Install it with the coated or glossy side facing<br />
upward, <strong>and</strong> please do not worry that there is no adhesive. Sidewall pressure will keep it in place<br />
indefinitely. Do not let the strip rotate or flip over as you tuck it in. Continue around the corner <strong>and</strong><br />
trim so the piece will end right at the film frame counter reset lever (last image above). Tuck this in<br />
<strong>and</strong> repeat <strong>for</strong> the remaining part of the top slot <strong>and</strong> the bottom slot.<br />
If you are re-sealing the <strong>Vivitar</strong> <strong>35ES</strong>, you’re finished, <strong>and</strong> you can close your film door to let the seals<br />
set <strong>for</strong> a few hours. It is normal <strong>for</strong> the door to feel tighter than be<strong>for</strong>e, as you had virtually no sealing<br />
action left when you began.<br />
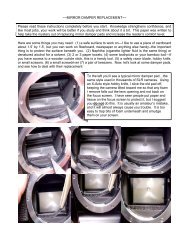
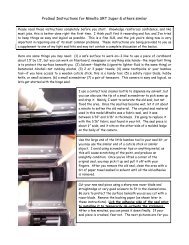
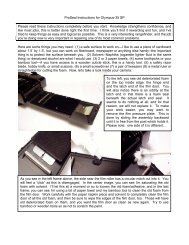
~~The <strong>Minolta</strong> <strong>Hi</strong>-<strong>Matic</strong> <strong>7sII</strong>~~<br />
Some people think these two cameras are the same. Mechanically they are not, but from a body style<br />
st<strong>and</strong>point, they are very similar. In fact, the only difference in the <strong>Hi</strong>-<strong>Matic</strong> <strong>7sII</strong> is the latch end. Let’s<br />
take a look <strong>and</strong> see how the two cameras differ:<br />
Above, you will see the <strong>Minolta</strong> uses a thin metal tab to hold in the film canister, <strong>and</strong> also there is<br />
a thin metal baffle plate used to hold the latch end seal. This is very similar to the design used in<br />
the Konica Auto S2. To replace this, first clean out the old seal with solvent <strong>and</strong> bits of paper<br />
towel. Next, cut from 3mm self-adhesive foam a piece 8mm x 49mm. Remove the backing<br />
paper, lick the adhesive side very well <strong>and</strong> slide this piece down so the adhesive side faces<br />
the baffle piece (as shown in image number two above). In the final image, you can see I have<br />
slid the piece down so that the top of the seal rests just under the edge of the baffle piece. Once<br />
it is dry, I will press it down <strong>for</strong> a final fit with the thin end of my bamboo tool. Sometimes I will<br />
leave this overnight to dry, especially if the weather is very humid. All other parts of the <strong>Minolta</strong><br />
are the same as the <strong>Vivitar</strong> <strong>and</strong> use the same dimensions of foam.<br />
Please do not use inferior seal products in your cameras. Using the best costs no more, <strong>and</strong> there is<br />
no substitute <strong>for</strong> a job professionally done with professional quality materials.<br />
Jon Goodman --- 2007<br />
One final note…you will notice on both the <strong>Vivitar</strong> <strong>and</strong> the<br />
<strong>Minolta</strong> the bottom slot has a double bend in it. The “Seal<br />
Strip” is a professional solution <strong>for</strong> these slots which has<br />
been designed <strong>and</strong> cut from foam which will allow you to<br />
follow right through that “S” curve easily. You can see how<br />
I do this in the image to your left. Just gently push the strip<br />
in place using the thin end of your bamboo tool <strong>and</strong><br />
remember to keep the coated side facing upward (as you<br />
see me doing).