~~MIRROR DAMPER REPLACEMENT~~ Please read these ...
~~MIRROR DAMPER REPLACEMENT~~ Please read these ...
~~MIRROR DAMPER REPLACEMENT~~ Please read these ...

Create successful ePaper yourself
Turn your PDF publications into a flip-book with our unique Google optimized e-Paper software.
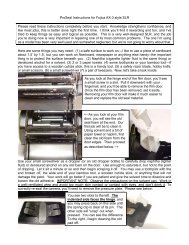
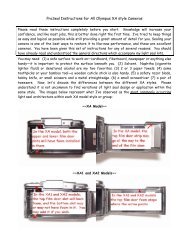
<strong>~~MIRROR</strong> <strong>DAMPER</strong> <strong>REPLACEMENT~~</strong><strong>Please</strong> <strong>read</strong> <strong>these</strong> instructions completely before you start. Knowledge strengthens confidence, andlike most jobs, your work will be better if you study and think about it a bit. This paper was written tohelp take the mystery out of replacing mirror damper pads and increase the <strong>read</strong>er’s comfort level.Here are some things you may need: (1) a safe surface to work on—I like to use a piece of cardboardabout 1.5’ by 1.5’, but you can work on fiberboard, newspaper or anything else handy--the importantthing is to protect the surface beneath you. (2) Naphtha (cigarette lighter fluid is the same thing) ordenatured alcohol for a solvent. (3) 2 or 3 paper towels. (4) some toothpicks or your bamboo tool—ifyou have access to a wooden cuticle stick, this is a handy tool. (5) a safety razor blade, hobby knife,or small scissors. (6) a small screwdriver (7) a pair of tweezers. Now, let's look at some damper pads,and see how to deal with their replacement:To the left you’ll see a typical mirror damper pad…thesame style used in thousands of SLR cameras. Usingan X-Acto style hobby knife, I slice the old pad off,keeping the camera tilted toward me so that any foamI remove falls out the lens opening and not back onthe focus screen. I have seen people put paper andtissue on the focus screen to protect it, but I suggestyou do not do this. It is usually an amateur’s mistake,and it will almost always cause you trouble. It is tooeasy to trap bits of foam underneath and smudgethem on your screen.
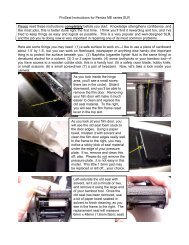
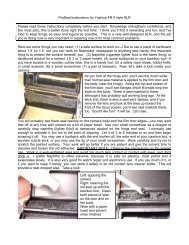
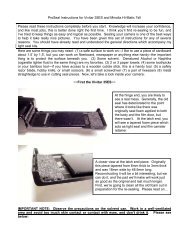
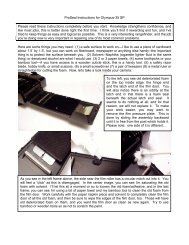
In the 6 frames above, you can see just how I will deal with this damper pad. In the first frame, Icontinue to remove it with the knife. In the next frame, you can see I let it fall toward the lens openingto keep the focus screen safe. In the final frame on the top row, you can see that I have removed theold pad completely and I have gone back to clean off remaining bits of adhesive and foam to get thisarea as clean as possible. Tweezers are also helpful here, but please do not use any solventaround your damper pad. It is too easy to make a mess, and too difficult to correct that mess.In the bottom row of frames, you can see I have measured and cut a new damper pad, and I am usingmy tweezers to set it in place. An easy way to be sure your new pad is the right size is to first cut apiece of stiff paper to fit (like a business card). When your piece of paper fits the damper pad area,you will have the measurements for your new pad. After you remove the backing paper from thefoam, lick the adhesive side to delay adhesion and give you time to adjust the damper pad. In thecenter frame, I set it down a little more, and in the final frame, the installation is complete, and I willmake any adjustments that are needed before the piece dries. Hint: You can view the damper bylooking in your camera’s mirror. Once your saliva has dried (20 minutes or so), you can press thepiece down well. There are two ways to do this safely: One, you can lift the mirror up and use it topress on the foam. Two, if your mirror resists coming up, set your camera to the “B” shutter speed,fire the shutter and hold it down. This will bring the mirror up to the foam for you, and you can useyour fingertip to press on the bottom of the mirror. Here’s how that looks:In this Pentax ME, you can see a little cutoutfor the focus screen adjustment screw. I’vedone this to make sure the damper pad sitsstraight across the top…otherwise, it would belike a rock under your mattress. To makesuch a cut, simply use a small pair of scissorsand nick a “V” into the center of the pad.~~But some damper pads are different…~~Above, you see the damper pad in an Olympus OM-10. <strong>Please</strong> note it is different. The original padwas a 1.5mm “sandwich” pad, but it isn’t available any longer. The best thing we can do is to carefullyremove it and replace with a 1.5mm self-adhesive open celled pad, as I’ve done in the frame to theright.
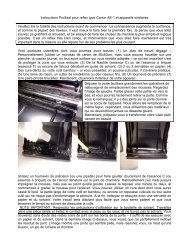
Left: the damper pad in anOlympus OM-1. It is an “L”shaped pad of 1.5mm foam. Icarefully remove with theknife blade.Center: you can see I havecut two replacement “L”pieces, and I’ve set them intoplace where I will adjust thembefore I press them down.Nikon FM2. To the left, youwill see the frame which holdsthe focus screen and the clip(middle) which releases thatframe. In the center, you willsee how I have replaced thedamper pad so that the clipand frame will still work asdesigned.Minolta SRT. In this model, afloating damper absorber wasused…a great design, by theway. All you must do isreplace the 1.5mm thick padon top of it. Left, I haveremoved the old pad carefullyand center I have replaced itwith a nice new one. Don’t letthe pad extend past the endof the moving piece.Yashica FR II. Left, I remove the old pad. Notice the ledge behind it. Center, I replace with a new1.5mm open-celled pad. Right, the job is finished, and the camera is like new again.
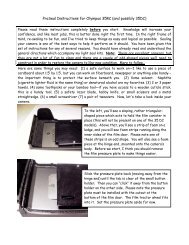
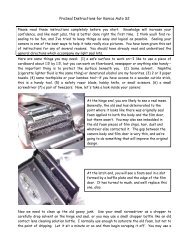
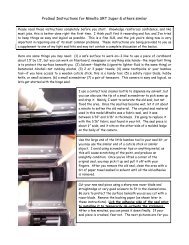
Above the Nikon EM (and all similar like FG, etc). Left, you will see the finished and replaced damperpad. The old one was almost completely gone. There is a single small screw which holds the focusscreen retaining frame in place, and this may be removed to make your work easier. You will alsonotice there are two pieces of damper foam running down the sides of the frame. You may replacethem easily with the frame removed. Also, while the frame is out, the focus screen may be cleaned inwarm soapy water if needed. <strong>Please</strong> remember to replace with the matte side of the screen facingthe pentaprism and not the mirror. When you replace this frame, set it back in place and fire thecamera with the shutter set on the “B” setting. With the shutter held open on the “B” setting, replacethe screw and test to be sure the mirror is seating correctly after your work is done.Sometimes the basic principle will be no different, but you willhave a damper with a different shape. Such is the case in thisNikkormat (left). You can use a piece of stiff paper (a businesscard or something like that) to make a template for use in the oneyou need. Here, you can see I have replaced it to look like theoriginal damper pad. In this camera, the pad is cut from a foamwhich is 2mm thick.~~NOTES~~These instructions were given to you as an accompaniment to a general seal kit, or for any of severalreasons. You should be able to cut your own seal pieces from my seal material, using the instructionsin your seal kit, and more detailed instructions on the re-sealing of the cameras represented in thispaper are available in pdf files. You should never use inferior materials in your camera. Using thebest costs no more, and using the proper materials will not harm your camera, as some of the inferiormaterials may. If you have any questions, please contact me via e:mail at jgood21967@aol.com orJon_Goodman@yahoo.com.Jon Goodman --- 2005