ProSeal Instructions for Olympus OM-1n style SLR (OM-1 note at ...
ProSeal Instructions for Olympus OM-1n style SLR (OM-1 note at ...
ProSeal Instructions for Olympus OM-1n style SLR (OM-1 note at ...

Create successful ePaper yourself
Turn your PDF publications into a flip-book with our unique Google optimized e-Paper software.
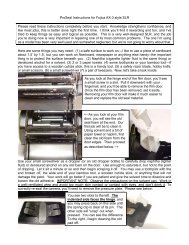
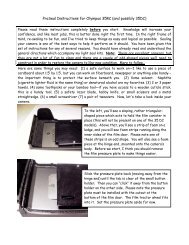
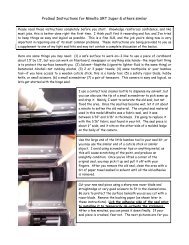
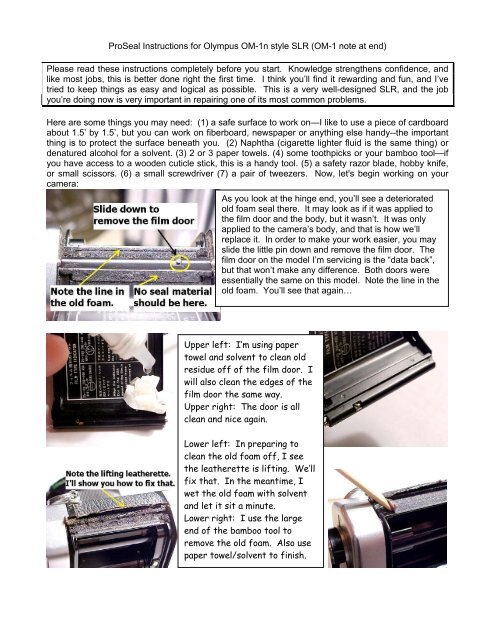
<strong>ProSeal</strong> <strong>Instructions</strong> <strong>for</strong> <strong>Olympus</strong> <strong>OM</strong>-<strong>1n</strong> <strong>style</strong> <strong>SLR</strong> (<strong>OM</strong>-1 <strong>note</strong> <strong>at</strong> end)Please read these instructions completely be<strong>for</strong>e you start. Knowledge strengthens confidence, andlike most jobs, this is better done right the first time. I think you’ll find it rewarding and fun, and I’vetried to keep things as easy and logical as possible. This is a very well-designed <strong>SLR</strong>, and the jobyou’re doing now is very important in repairing one of its most common problems.Here are some things you may need: (1) a safe surface to work on—I like to use a piece of cardboardabout 1.5’ by 1.5’, but you can work on fiberboard, newspaper or anything else handy--the importantthing is to protect the surface bene<strong>at</strong>h you. (2) Naphtha (cigarette lighter fluid is the same thing) orden<strong>at</strong>ured alcohol <strong>for</strong> a solvent. (3) 2 or 3 paper towels. (4) some toothpicks or your bamboo tool—ifyou have access to a wooden cuticle stick, this is a handy tool. (5) a safety razor blade, hobby knife,or small scissors. (6) a small screwdriver (7) a pair of tweezers. Now, let's begin working on yourcamera:As you look <strong>at</strong> the hinge end, you’ll see a deterior<strong>at</strong>edold foam seal there. It may look as if it was applied tothe film door and the body, but it wasn’t. It was onlyapplied to the camera’s body, and th<strong>at</strong> is how we’llreplace it. In order to make your work easier, you mayslide the little pin down and remove the film door. Thefilm door on the model I’m servicing is the “d<strong>at</strong>a back”,but th<strong>at</strong> won’t make any difference. Both doors wereessentially the same on this model. Note the line in theold foam. You’ll see th<strong>at</strong> again…Upper left: I’m using papertowel and solvent to clean oldresidue off of the film door. Iwill also clean the edges of thefilm door the same way.Upper right: The door is allclean and nice again.Lower left: In preparing toclean the old foam off, I seethe le<strong>at</strong>herette is lifting. We’llfix th<strong>at</strong>. In the meantime, Iwet the old foam with solventand let it sit a minute.Lower right: I use the largeend of the bamboo tool toremove the old foam. Also usepaper towel/solvent to finish.
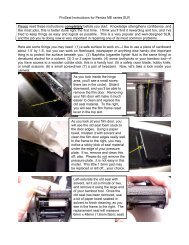
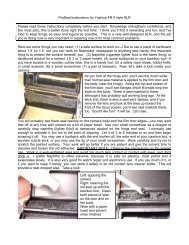
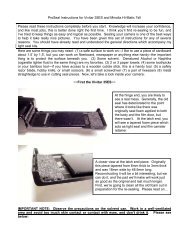
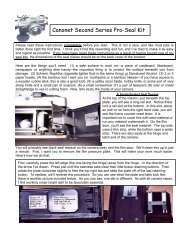
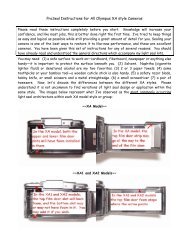
IMPORTANT NOTE: Observe the precautions on the solvent can. Work in a well-ventil<strong>at</strong>ed area andavoid too much skin contact or contact with eyes, and don’t drink it. I prefer Naphtha and Den<strong>at</strong>uredAlcohol to other solvents, because it is safe on plastics, most paints and it evapor<strong>at</strong>es slowly. If youuse much of it, or if you want to keep it handy, you can store it safely in an old contact lens cleanerbottle. This will provide a handy dropper also.Below are four frames showing the process of repairing the separ<strong>at</strong>ed le<strong>at</strong>herette. You can apply thislesson to any camera, and if you need the double-sided pressure sensitive adhesive, please e:mailme. It is the finest made and just wh<strong>at</strong> professional camera repairers use. Since I purchase it in bulk,I am able to pass savings on to you. For $5, I can send you two nice sized pieces of it.Peel back le<strong>at</strong>heretteto gain access to theold adhesive, scribe aline just through theadhesive (do not cutthe le<strong>at</strong>herette) andremove with yourfingertip. Clean thisarea (and the camerabody) well withsolvent. Cut a piece ofdouble-sided adhesiveto fit the area you’vecleaned and removeone piece of backingpaper. Fit it to thearea, remove the otherbacking paper, andpress it into place….Now we’re going to clean out the rail slots on the camera body and replace those seals. Here’s how:First, run a toothpick with the end broken off or thenarrow end of your bamboo tool through the slot toremove the gunk. Repe<strong>at</strong> if needed, working awayfrom the frame counter reset lever, and don’t push oldseal m<strong>at</strong>erial into the frame counter reset area. Thenrun a small piece of paper towel with a little solvent onit through the slot to finish cleaning it. You’ll probablyneed to repe<strong>at</strong> this a few times until the slots are reallyclean.Next, take a long 2mm piece of seal m<strong>at</strong>erial from your kit and press it into the slot using yourfingertip. Start <strong>at</strong> the frame counter reset lever (but don’t cover it or go underne<strong>at</strong>h it) and worktoward the l<strong>at</strong>ch end. Gently press the seal into the slot with the thin end of your bamboo tool, anddon’t let the seal m<strong>at</strong>erial turn or twist. Don’t worry th<strong>at</strong> there is no adhesive. With this seal you don’tneed it. I designed it so the pressure of the seal m<strong>at</strong>erial against the channel walls will keep it inplace perfectly and provide a full-channel and completely effective light baffle. Here’s a picture:
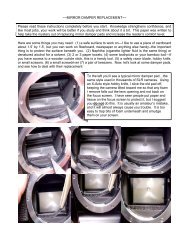
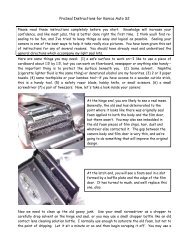
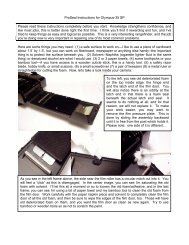
When you reach the end, use a razor blade, small knifeor tiny scissors to trim the excess so the strip will finish <strong>at</strong>end of the rail slot. Using the small piece left from wh<strong>at</strong>you just trimmed off, repe<strong>at</strong> this procedure <strong>for</strong> the part ofthe slot starting <strong>at</strong> the film frame reset and extending tothe hinge end (or vice-versa if you prefer). Repe<strong>at</strong> <strong>for</strong> thelower slot. Now, with a blunted toothpick or your bambootool, trace the seal’s length, pressing it gently down intoits slot to se<strong>at</strong> it. Don’t poke into it or damage it. Now,close your door. It is normal to feel resistance from yournew seal m<strong>at</strong>erial. Don’t worry unless the resistanceseems excessive. If you encounter too much resistance,make sure you got your seal m<strong>at</strong>erial ne<strong>at</strong>ly tucked intothe ends <strong>at</strong> each end of the slot.You will want to be sure to install so the glossy side of the strip (there are two glossy sides) facesupward in the slot. Next, clean the edges of the film door with a little naptha on a piece of papertowel. They’ll usually have sticky residue on them, and you don’t want this to ruin your new seal.For replacement seal <strong>at</strong> the hinge, I’m using the 1mmself-adhesive fabric seal m<strong>at</strong>erial in a 44mm x 8mm. Youcan also use the 1mm self-adhesive foam m<strong>at</strong>erial,however I prefer the fabric seal in this applic<strong>at</strong>ion. If youwill lick the adhesive side be<strong>for</strong>e you install it, you willfind it it easier to position and get a professional fit. Thisdelays the adhesion <strong>for</strong> a few minutes. As you look <strong>at</strong> theimage to your left, please <strong>note</strong> the small faint line acrossit. This was made when the film door was replaced todouble-check the thickness. It assures th<strong>at</strong> you will havea light-tight seal, and it lets you know just how thin thespace between the camera body and the film door is.~~The Mirror Damper~~Left: I use a sharp X-Actoknife to cut right under theold seal pad and lift it up.Do this carefully, and usetweezers if you need toremove bits. Right: I havecut my new pieces, lickedthe adhesive side and setthem in place to dry. Seebelow <strong>for</strong> explan<strong>at</strong>ion…Above left, you can see I’ve removed the old damper pad. I cut the new pad from 1.5mm selfadhesivefoam, lick the adhesive side and set it in place lightly with tweezers be<strong>for</strong>e pressing it down<strong>for</strong> the final fit. Hint: you can w<strong>at</strong>ch your work in the mirror. Another hint: If you need to clean themirror of an <strong>SLR</strong>, use a Q-Tip with both ends covered in lint-free fabric. Secure the fabric to the shaftof the Q-Tip with a piece of tape. Wet one end with Windex and clean the mirror using almost no
pressure <strong>at</strong> all…the same pressure you would use if you were touching your bare eyeball with yourfinger! Dry with the dry end of your Q-Tip.As I said, I use a sharp X-Acto knife to remove the old damper pads. I slice under them carefully,and I use tweezers to pick up little bits. Be careful not to get bits on the focus screen. Followinstructions in my general seal kits, also. When I’ve removed the old pads, I’ll cut two new padsfollowing these dimensions:Cutting these pieces is not difficult. Use the1.5mm open-celled foam, and you may use sharpscissors and/or a sharp razor type knife. If youwant to make the pieces black, use a permanentmarker…a black felt tipped pen. I left themcharcoal so they would contrast more and showup better. After a few minutes (10-15), the sealswill be dry and you can press them into place <strong>for</strong>a final fit. When all is done, I usually set thecamera to “B” and oper<strong>at</strong>e the shutter to be surethe mirror and damper pads are working welltogether.Now, we’re finished and ready to enjoy this camera again!~~NOTES~~These instructions were given to you as an accompaniment to a general seal kit, or <strong>for</strong> any of severalreasons. You should be able to cut your own seal pieces from my seal m<strong>at</strong>erial, using the instructionsin your seal kit. If you have any questions, please let me know <strong>at</strong> jgood21967@aol.com orJon_Goodman@yahoo.com.<strong>OM</strong>-1 NoteJon Goodman---2005