ProSeal Instructions for Minolta SRT Super & others similar
ProSeal Instructions for Minolta SRT Super & others similar
ProSeal Instructions for Minolta SRT Super & others similar

Create successful ePaper yourself
Turn your PDF publications into a flip-book with our unique Google optimized e-Paper software.
<strong>ProSeal</strong> <strong>Instructions</strong> <strong>for</strong> <strong>Minolta</strong> <strong>SRT</strong> <strong>Super</strong> & <strong>others</strong> <strong>similar</strong><br />
Please read these instructions completely be<strong>for</strong>e you start. Knowledge rein<strong>for</strong>ces confidence, and like<br />
most jobs, this is better done right the first time. I think you’ll find it rewarding and fun, and I’ve tried<br />
to keep things as easy and logical as possible. This is a fine SLR, and the job you’re doing now is very<br />
important in repairing one of its most common problems. These instructions are being provided to you as<br />
a supplement to one of my light seal kits and may not contain a complete discussion of the basics.<br />
Here are some things you may need: (1) a safe surface to work on—I like to use a piece of cardboard<br />
about 1.5’ by 1.5’, but you can work on fiberboard, newspaper or anything else handy--the important thing<br />
is to protect the surface beneath you. (2) Solvent--Naphtha (cigarette lighter fluid is the same thing) or<br />
Denatured Alcohol—not rubbing alcohol. (3) 2 or 3 paper towels. (4) some toothpicks or your bamboo<br />
tool—if you have access to a wooden cuticle stick, this is a handy tool. (5) a safety razor blade, hobby<br />
knife, or small scissors. (6) a small screwdriver (7) a pair of tweezers. This camera is easy and logical, so<br />
let’s get started with the hinge seal:<br />
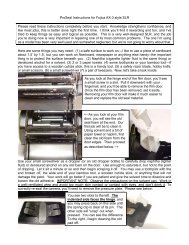
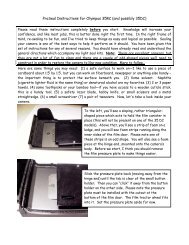
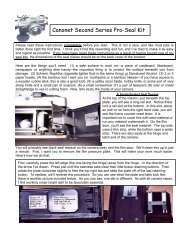
I use a contact lens cleaner bottle to dispense my solvent, but<br />
you can also use the tip of a small screwdriver to pick some up<br />
and drop it. Mainly, I want to saturate the old seal, but not<br />
flood the area. Once the seal has become wet, let it sit about<br />
a minute to soften the old material. The original seal material<br />
used in this model <strong>Minolta</strong> was a fabric seal, and it was<br />
between 1/32” and 1/16” in thickness. I’m going to replace it<br />
with the 1/16” fabric seal found in your kit. The seal piece is<br />
about ¼” wide, and it sits on the other side of a molded ledge<br />
on the body of the camera.<br />
Use the large end of the little bamboo tool in your seal kit, or<br />
you may use the <strong>similar</strong> end of a cuticle stick or <strong>similar</strong><br />
object. I avoid using screwdriver tips or anything metal, as<br />
this will cause scratching of the paint, and produce an<br />
unsightly condition. Once you’ve lifted a corner of the<br />
original seal, you may pick it up and pull it off with your<br />
fingers. After you remove the old seal, clean the area with a<br />
bit of paper towel soaked in solvent until all the old adhesive<br />
is removed.<br />
Cut your new seal piece using a sharp new razor blade and<br />
straightedge or very good scissors to fit in the cleaned area.<br />
Be sure to protect the surface beneath you as you cut with a<br />
razor blade. Remove the backing paper (as shown later in<br />
these instructions). Lick the adhesive side of the seal prior<br />
to installing it to temporarily de-activate the stickiness.<br />
After a few minutes, you can press it down finally. If your<br />
seal piece is crooked, fear not. The next pictures are <strong>for</strong> you.
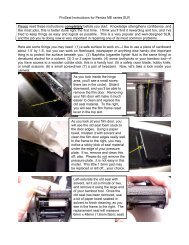
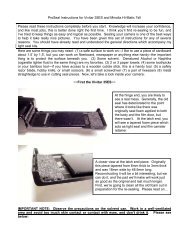
Far left—You can see a crooked<br />
seal piece…look at the line<br />
against the hinge. Apply solvent<br />
and let sit a minute or so. The<br />
adhesive will release, and the<br />
seal piece may be re-located.<br />
Let it dry and press it in place.<br />
Work carefully with fabric seal.<br />
While you are working on the hinge seal, please check the small seal pieces in the lower edge trough of<br />
the film door. These can be seen in the picture where I am using the tool to start the removal of the<br />
hinge seal, above. Yours may still be okay…they often are. If you want to replace them, use the 1/32”<br />
fabric seal in your kit and cut to fit. The old ones are removed exactly like the hinge seal was.<br />
Okay, now it is time to clean & replace the long thin film door seals. This will actually be fun <strong>for</strong> you…let’s<br />
look:<br />
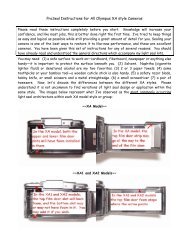
First, I push the thin end of the tool through the slot to dislodge any old loose material. Next, I put a<br />
small bit of paper towel in the slot and wet it with solvent…be careful not to put too much solvent in the<br />
slot. Start at the film frame counter reset lever (you can see it above), and work toward the latch end.<br />
You’ll need to repeat this with several pieces of paper towel to get the slot nice and clean. Do the same<br />
thing <strong>for</strong> the small slot on the other side of the reset lever…always work away from the lever and do not<br />
push anything under or into the lever. When the slots at the top and bottom are cleaned well, install a<br />
“Seal Strip.” Starting at the reset lever, gently push the strip into the slot (slick side facing up—there<br />
are two slick sides), and guide it in with the thin end of the tool, as shown. When you reach the end, trim<br />
to fit and tuck in. Repeat <strong>for</strong> the area on the other side of the film frame reset lever. I find it easier to<br />
start at the hinge end of the slot and work toward the frame reset lever. Below is a picture <strong>for</strong> you:<br />
See, I told you this would be fun. This camera is starting to<br />
look just like new again, and the pictures it takes will<br />
reflect the good job you’re doing! Since I’ve had your seal<br />
material made from foams and fabrics that will stand the<br />
test of time, you’ll be able to enjoy your camera without<br />
worry of light leaks <strong>for</strong> many years.<br />
Don’t <strong>for</strong>get to clean the edges of the film door with some<br />
solvent on a bit of paper towel. You don’t want any old foam<br />
residue ruining your new seals.
~~THE MIRROR DAMPER~~<br />
Be<strong>for</strong>e we start, an Important Note: Do not use solvent in the mirror damper area or anywhere your<br />
focus screen, with one exception. That exception is this: If your mirror has gotten old foam residue on<br />
the front edge of it, here is how to clean that…Holding the camera in a normal, upright position, moisten<br />
the tip of a Q-Tip with solvent and gently clean the residue off of your mirror, using very little pressure<br />
at all. For years, I have told people to use no more pressure than you would use if you were touching your<br />
bare eyeball with your finger. After the solvent is removed, if you want to clean your mirror, here is how<br />
I would do it…Cover the tips of a new, unused Q-Tip with lint free cloth (old cotton T-shirt fabric is<br />
perfect). Use pieces about 1.5 inches square, and tape the edges to the shaft of the Q-Tip. Wet one end<br />
with Windex and leave the other dry. Using very little pressure, swab with the wet end and dry with the<br />
dry one. Again, do not get anything on your focus screen!!! No old seal material, no solvent, nothing.<br />
These are devilish difficult to clean, and you can cause a real mess with clumsiness.<br />
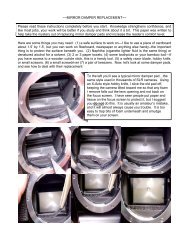
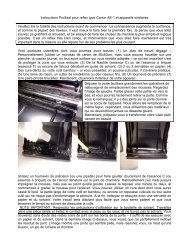
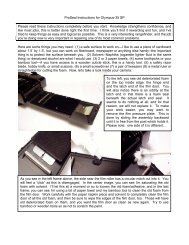
Now, look in there…where your mirror damper is…you’ll see a<br />
floating damper mechanism. This is a good thing. A nice design<br />
by <strong>Minolta</strong>. You want to use a sharp X-Acto knife to pick up the<br />
edge of the old foam and pull it off the damper mechanism.<br />
Usually, you can get it started and then pick up a corner with<br />
your tweezers, pulling it gently up and away. Sometimes it isn’t<br />
as easy, but usually the old seal will cooperate if you are<br />
patient. Think of yourself as an archaeologist, working on a<br />
delicate and important artifact. Take your time. All cleaned up,<br />
it should look like the picture to your left.<br />
When the old foam is removed, cut a piece of 1.5mm selfadhesive<br />
foam to fit the damper mechanism. It is about 1/8”<br />
wide. Remove the backing paper, lick the adhesive side and<br />
using tweezers, guide the piece in carefully be<strong>for</strong>e pressing it<br />
down. You might need to hold the camera between your knees<br />
and use both hands. Sometimes I will use my tweezers and a<br />
toothpick to get the seal piece just where I want it.<br />
Remember, you can not use solvent in this area, so you want the<br />
pad aligned right the first time. To press into place, lift the<br />
mirror up to the pad and press against it.<br />
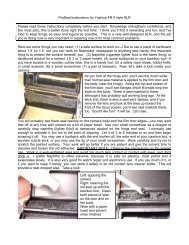
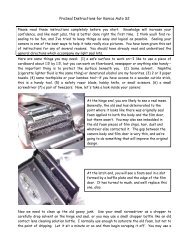
The best way to remove backing paper is to catch an edge<br />
of it using the tip of a razor or hobby knife. All the seal<br />
materials I sell have been made using the strongest<br />
adhesive available. I know the tendency is to want to pick<br />
off the backing paper with a fingernail. This may work on<br />
inferior seal products, but on mine this will only prove to be<br />
frustrating and damaging to the seal material. The image to<br />
your left shows the proper way.
On this Yashica, you can see how I use an X-Acto knife to remove<br />
old damper material. I have seen people try to place paper and<br />
other items in this area to try to protect the focus screen, but I<br />
do not suggest doing this. It is too easy to trap a bit of old foam<br />
underneath a piece of paper and smear it on your focus screen. A<br />
false sense of security can become a liability quickly. Just work<br />
carefully and slowly.<br />
Okay, all work on your <strong>Minolta</strong> is completed. Your film door will normally feel tighter and more secure<br />
than be<strong>for</strong>e. New seal material has a way of bringing back the new camera feel again. If you need more<br />
seal material or want to refer a friend, please contact me at: jgood21967@aol.com,<br />
Jon_Goodman@yahoo.com or mail me at:<br />
Jon Goodman<br />
9153 Loma Vista<br />
Dallas, TX 75243<br />
© Jon Goodman, 2004<br />
~~NOTES~~