SterilGARD III Advance SG403 / SG603 - Baker Company
SterilGARD III Advance SG403 / SG603 - Baker Company
SterilGARD III Advance SG403 / SG603 - Baker Company

You also want an ePaper? Increase the reach of your titles
YUMPU automatically turns print PDFs into web optimized ePapers that Google loves.
Warning!<br />
Decontaminate the unit before changing filters.<br />
1 Close the view screen.<br />
2 Protect your new filters by covering the face of the filter with plastic or cardboard. HEPA<br />
filters are very easily damaged.<br />
3 Pull out the outer front wedge panel to disconnect the wires and tubing from the back of the<br />
Air Pressure Monitor and lift the panel off.<br />
4 Disconnect the wiring form the viewscreen alarm limit switch.<br />
5 Remove the two thumbscrews inside the inner closure panel and lower the light canopy.<br />
6 Remove the inner dress panel by removing the two bolts at the top and loosening the two<br />
bolts at the bottom that hold the electrical component mounting board in place.<br />
7 Close the view screen completely.<br />
8 Loosen each of the ten 3/8” hex head bolts on the front seal panel. Be sure not to damage or<br />
lose the seal washers on each bolt.<br />
9 Remove the front seal panel. Be careful not to damage the rubber gasket on the back of the<br />
panel.<br />
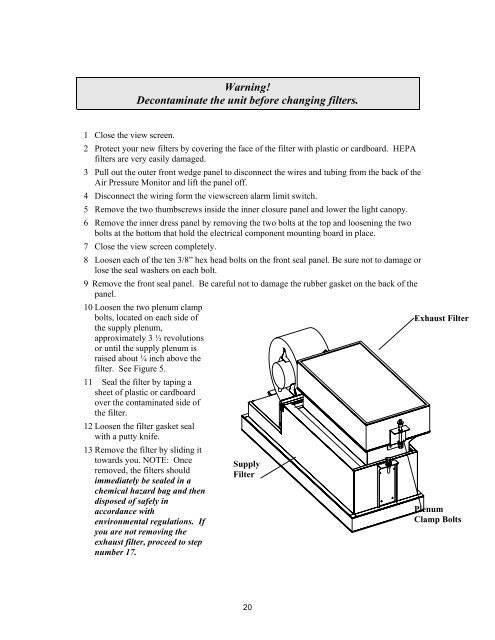
10 Loosen the two plenum clamp<br />
bolts, located on each side of<br />
Exhaust Filter<br />
the supply plenum,<br />
approximately 3 ½ revolutions<br />
or until the supply plenum is<br />
raised about ¼ inch above the<br />
filter. See Figure 5.<br />
11 Seal the filter by taping a<br />
sheet of plastic or cardboard<br />
over the contaminated side of<br />
the filter.<br />
12 Loosen the filter gasket seal<br />
with a putty knife.<br />
13 Remove the filter by sliding it<br />
towards you. NOTE: Once<br />
removed, the filters should<br />
immediately be sealed in a<br />
chemical hazard bag and then<br />
disposed of safely in<br />
accordance with<br />
environmental regulations. If<br />
you are not removing the<br />
exhaust filter, proceed to step<br />
number 17.<br />
Supply<br />
Filter<br />
Plenum<br />
Clamp Bolts<br />
20