SterilGARD III Advance SG403 / SG603 - Baker Company
SterilGARD III Advance SG403 / SG603 - Baker Company
SterilGARD III Advance SG403 / SG603 - Baker Company

You also want an ePaper? Increase the reach of your titles
YUMPU automatically turns print PDFs into web optimized ePapers that Google loves.
14 Alternately loosen the ½ -13 plenum clamp bolt, located on each side of the exhaust<br />
plenum, approximately 3 ½ revolutions or until the exhaust plenum is lowered about ¼ inch<br />
below the top front farrting.<br />
15 Loosen the filter gasket seal from the metal plenum. Remove the filter by sliding it towards<br />
you.<br />
16 Align the new filter with the notches in the frame and slide it back against the stops. Be<br />
careful that the gasket remains attached to both sides of the filter.<br />
17 Tighten the clamps two or three revolutions or until the gasket is compressed to<br />
approximately 1/8 inch. When tightening clamps, tighten a little at a time, alternating sides.<br />
Do not completely tighten one side before starting on the other side.<br />
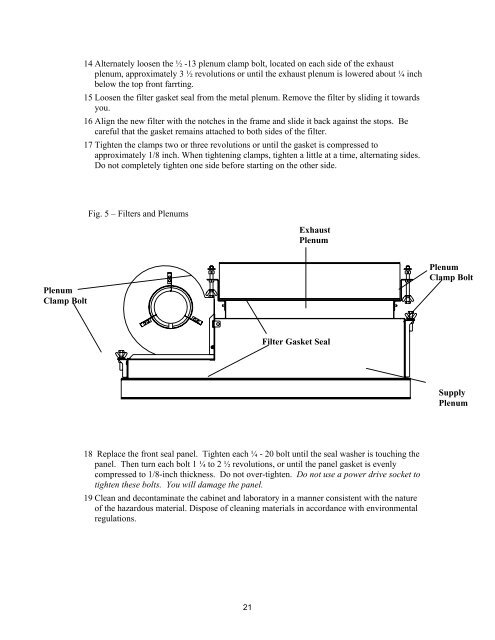
Fig. 5 – Filters and Plenums<br />
Exhaust<br />
Plenum<br />
Plenum<br />
Clamp Bolt<br />
Plenum<br />
Clamp Bolt<br />
Filter Gasket Seal<br />
Supply<br />
Plenum<br />
18 Replace the front seal panel. Tighten each ¼ - 20 bolt until the seal washer is touching the<br />
panel. Then turn each bolt 1 ¼ to 2 ½ revolutions, or until the panel gasket is evenly<br />
compressed to 1/8-inch thickness. Do not over-tighten. Do not use a power drive socket to<br />
tighten these bolts. You will damage the panel.<br />
19 Clean and decontaminate the cabinet and laboratory in a manner consistent with the nature<br />
of the hazardous material. Dispose of cleaning materials in accordance with environmental<br />
regulations.<br />
21