DriveRight 600 User's Guide - Davis Instruments Corp.
DriveRight 600 User's Guide - Davis Instruments Corp.
DriveRight 600 User's Guide - Davis Instruments Corp.

You also want an ePaper? Increase the reach of your titles
YUMPU automatically turns print PDFs into web optimized ePapers that Google loves.
3. Make sure you have a new trip started on the <strong>DriveRight</strong> <strong>600</strong> (i.e.,<br />
the distance travelled is 0.<br />
To forcibly start a new trip, log out (see page 14 for details).<br />
4. Drive the vehicle for at least 32 km (20 miles).<br />
The further you drive, the more accurate your calibration.<br />
5. When you finish driving, compare your vehicle’s trip meter reading<br />
to the distance travelled reading on the <strong>DriveRight</strong> <strong>600</strong>.<br />
At this point, what you will need to do is increase or decrease the distance<br />
measured by the <strong>DriveRight</strong> <strong>600</strong> until it agrees with your vehicle’s<br />
odometer reading. This is accomplished from the calibration screen.<br />
6. Press and hold MODE to access the settings screens.<br />
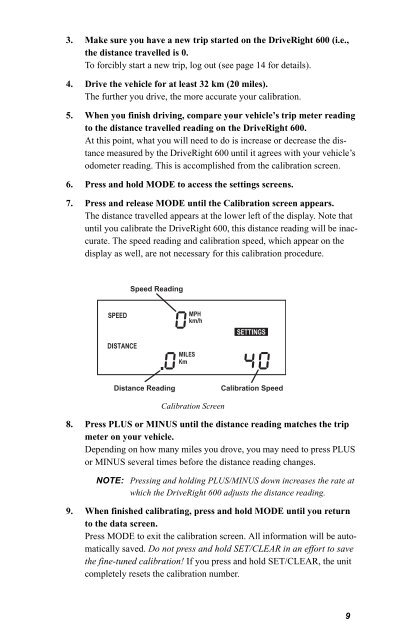
7. Press and release MODE until the Calibration screen appears.<br />
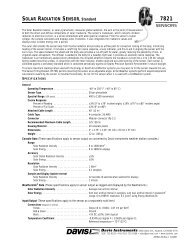
The distance travelled appears at the lower left of the display. Note that<br />
until you calibrate the <strong>DriveRight</strong> <strong>600</strong>, this distance reading will be inaccurate.<br />
The speed reading and calibration speed, which appear on the<br />
display as well, are not necessary for this calibration procedure.<br />
Speed Reading<br />
SPEED<br />
DISTANCE<br />
MPH<br />
km/h<br />
MILES<br />
Km<br />
SETTINGS<br />
Distance Reading<br />
Calibration Speed<br />
Calibration Screen<br />
8. Press PLUS or MINUS until the distance reading matches the trip<br />
meter on your vehicle.<br />
Depending on how many miles you drove, you may need to press PLUS<br />
or MINUS several times before the distance reading changes.<br />
NOTE: Pressing and holding PLUS/MINUS down increases the rate at<br />
which the <strong>DriveRight</strong> <strong>600</strong> adjusts the distance reading.<br />
9. When finished calibrating, press and hold MODE until you return<br />
to the data screen.<br />
Press MODE to exit the calibration screen. All information will be automatically<br />
saved. Do not press and hold SET/CLEAR in an effort to save<br />
the fine-tuned calibration! If you press and hold SET/CLEAR, the unit<br />
completely resets the calibration number.<br />
9