Onyx-RAD Chiropractic Tools Step by Step Guide - Viztek
Onyx-RAD Chiropractic Tools Step by Step Guide - Viztek
Onyx-RAD Chiropractic Tools Step by Step Guide - Viztek

You also want an ePaper? Increase the reach of your titles
YUMPU automatically turns print PDFs into web optimized ePapers that Google loves.
<strong>Onyx</strong>-<strong>RAD</strong> <strong>Chiropractic</strong> <strong>Tools</strong> <strong>Step</strong> <strong>by</strong> <strong>Step</strong> <strong>Guide</strong><br />
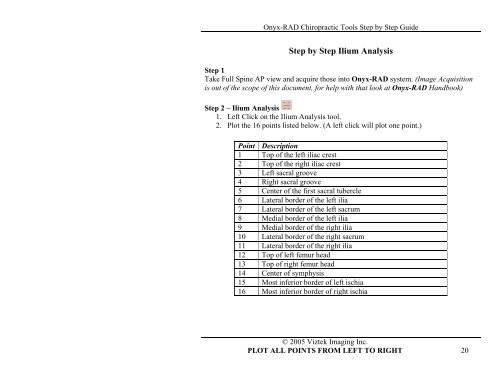
<strong>Step</strong> <strong>by</strong> <strong>Step</strong> Ilium Analysis<br />
<strong>Step</strong> 1<br />
Take Full Spine AP view and acquire those into <strong>Onyx</strong>-<strong>RAD</strong> system. (Image Acquisition<br />
is out of the scope of this document, for help with that look at <strong>Onyx</strong>-<strong>RAD</strong> Handbook)<br />
<strong>Step</strong> 2 – Ilium Analysis<br />
1. Left Click on the Ilium Analysis tool.<br />
2. Plot the 16 points listed below. (A left click will plot one point.)<br />
Point Description<br />
1 Top of the left iliac crest<br />
2 Top of the right iliac crest<br />
3 Left sacral groove<br />
4 Right sacral groove<br />
5 Center of the first sacral tubercle<br />
6 Lateral border of the left ilia<br />
7 Lateral border of the left sacrum<br />
8 Medial border of the left ilia<br />
9 Medial border of the right ilia<br />
10 Lateral border of the right sacrum<br />
11 Lateral border of the right ilia<br />
12 Top of left femur head<br />
13 Top of right femur head<br />
14 Center of symphysis<br />
15 Most inferior border of left ischia<br />
16 Most inferior border of right ischia<br />
© 2005 <strong>Viztek</strong> Imaging Inc.<br />
PLOT ALL POINTS FROM LEFT TO RIGHT 20