Onyx-RAD Chiropractic Tools Step by Step Guide - Viztek
Onyx-RAD Chiropractic Tools Step by Step Guide - Viztek
Onyx-RAD Chiropractic Tools Step by Step Guide - Viztek

You also want an ePaper? Increase the reach of your titles
YUMPU automatically turns print PDFs into web optimized ePapers that Google loves.
<strong>Onyx</strong>-<strong>RAD</strong> <strong>Chiropractic</strong> <strong>Tools</strong> <strong>Step</strong> <strong>by</strong> <strong>Step</strong> <strong>Guide</strong><br />
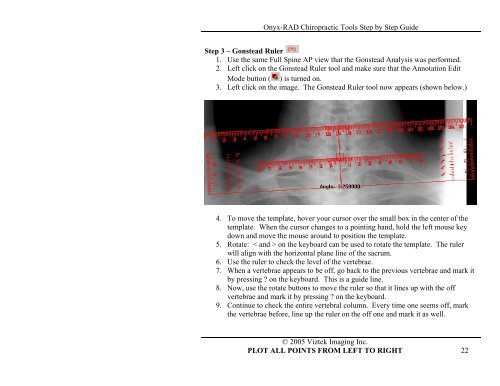
<strong>Step</strong> 3 – Gonstead Ruler<br />
1. Use the same Full Spine AP view that the Gonstead Analysis was performed.<br />
2. Left click on the Gonstead Ruler tool and make sure that the Annotation Edit<br />
Mode button ( ) is turned on.<br />
3. Left click on the image. The Gonstead Ruler tool now appears (shown below.)<br />
4. To move the template, hover your cursor over the small box in the center of the<br />
template. When the cursor changes to a pointing hand, hold the left mouse key<br />
down and move the mouse around to position the template.<br />
5. Rotate: < and > on the keyboard can be used to rotate the template. The ruler<br />
will align with the horizontal plane line of the sacrum.<br />
6. Use the ruler to check the level of the vertebrae.<br />
7. When a vertebrae appears to be off, go back to the previous vertebrae and mark it<br />
<strong>by</strong> pressing on the keyboard. This is a guide line.<br />
8. Now, use the rotate buttons to move the ruler so that it lines up with the off<br />
vertebrae and mark it <strong>by</strong> pressing on the keyboard.<br />
9. Continue to check the entire vertebral column. Every time one seems off, mark<br />
the vertebrae before, line up the ruler on the off one and mark it as well.<br />
© 2005 <strong>Viztek</strong> Imaging Inc.<br />
PLOT ALL POINTS FROM LEFT TO RIGHT 22